Showing posts with label raspberry. Show all posts

Thursday, 18 April 2013

Baked 'coconut cream' cheesecakes

More coconut cream concoctions...this stuff is totally amazing, please don’t roll you eyes at me as I go off on one again!  Try it first...please (if only to shut me up!!)


Ok, so now we've tried it as a creamy whipped topping, as a thick mouse, in a cream egg and as a chilled cheesecake. So how about cooking it?

Yes, you can bake this stuff too!!

My initial reason for doing this was to see whether I could make a light and not too thick mix and then bake it instead of freezing it and still be able to take it out of a pudding mold (i.e muffin case). Without baking these little beauties there would have been no way that I would have been able to remove them...that would have been an absolute mess!

It worked perfectly since the short baking time seals the edges and allows them to pull away from the muffin case or whatever silicone mold you use. Since the edges pull away I would suggest that you would also be fine with metal cake pans- just edge round using a knife to lever them out.

You can add any mix-ins you choose, I tried out a few options but creativity is virtually endless.  I would suggest serving these cheesecakes hot, just for a change and to make the most of the ‘just baked’ feel.
Oh, before I go....here is one more coconut cream idea... a chocolate cookie cream sandwich that I posted over here at the Real Food Source. I based the recipe on my popular chocolate quinoa cookies.


Recipe: Baked coconut cream cheesecakes

Makes 3-4 mini cheesecakes

Ingredients:

2/3 cup soy yoghurt (other yoghurts would probably work well)
3 tbs fine coconut flour
Stevia or syrup of choice to taste
1/2 tsp vanilla extract

Topping mix-in options
2 tsp cocoa powder
Crushed frozen raspberries (frozen are easier to handle to create a mottled not blended look)
Blueberries (frozen are best to avoid burning during baking

Base: I used a variant of my breakfast cookie oat base without the choc chunks, or you could use a smoosh bar style base. Or go for no base at all!

Method

Combine all cheesecake ingredients in a small bowl and stir together well to from a thick paste. Add mix ins as necessary.
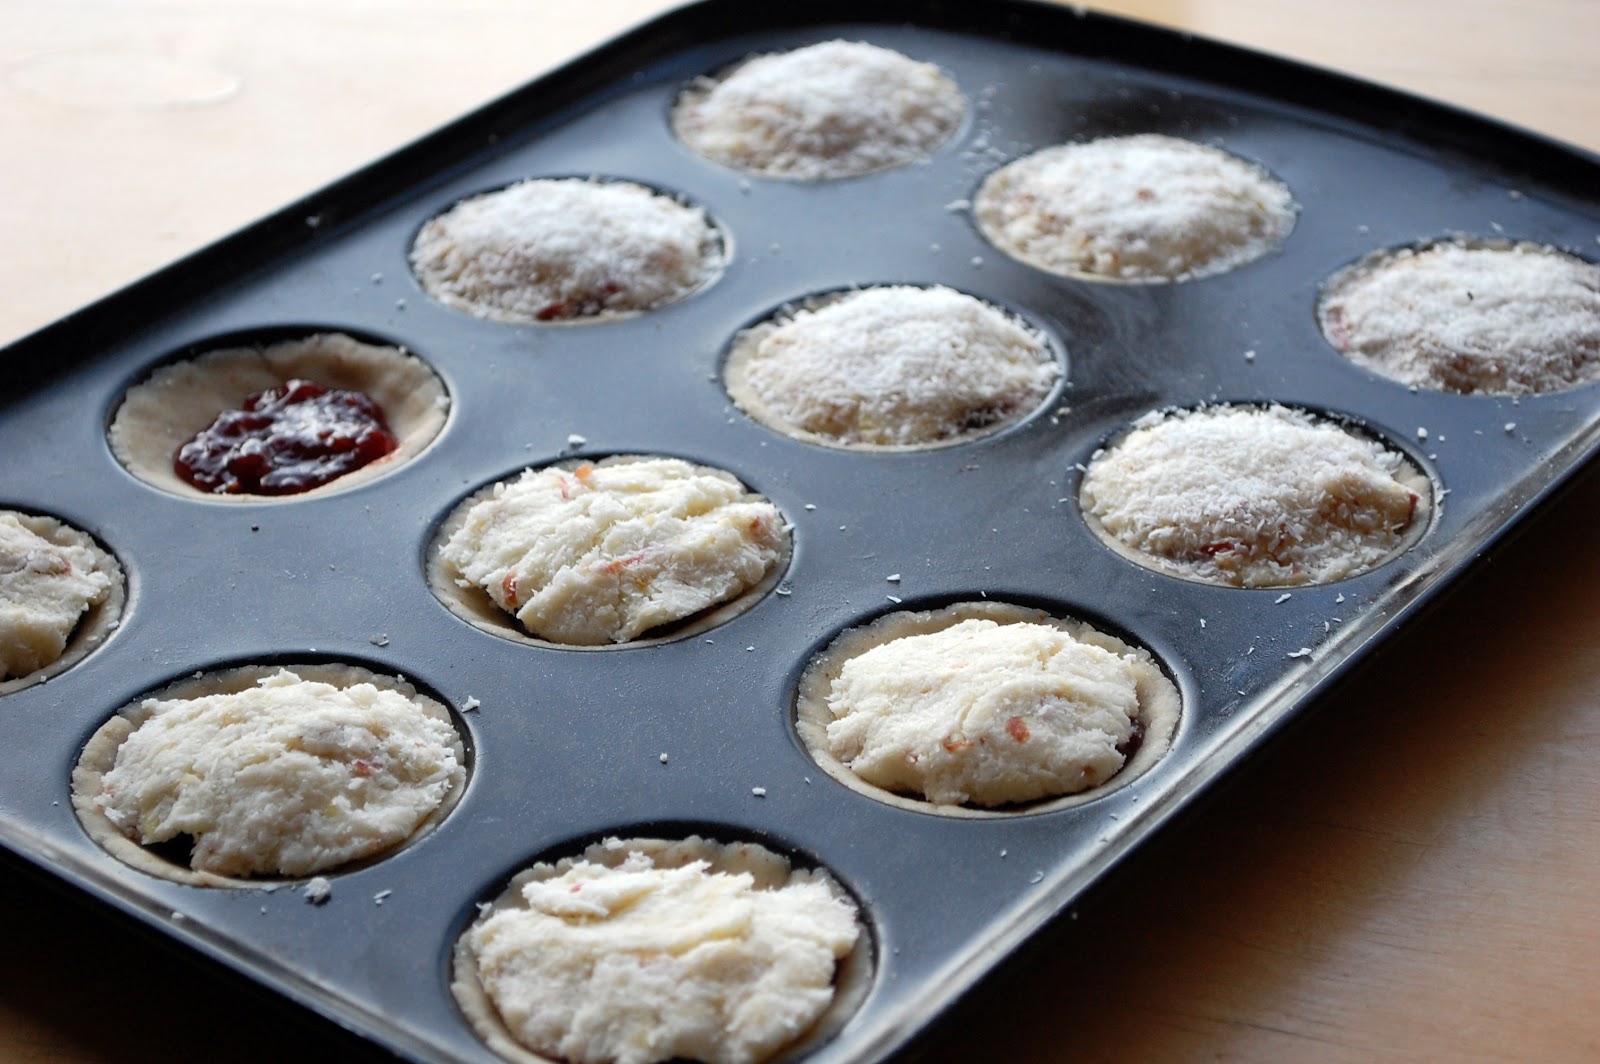
Press chosen base mix (if using) in the bottom of mini muffins or cupcake tins (use silicone for ease of removal) and then top with the cheesecake mix  and toppings. Bake for 5-10 mins at 180ÂșC just until the edges have baked and sealed and the mixture is heated through, no need to be golden. The baking will seal the edges and make for an easy removal.

Serve hot or cold.


For further guidance on making gluten free choices please see this post.

For tips and info on recipe measurement conversions, ingredients, substitutions and the methods behind how I do things.... check out my 'baking tips' tab at the top of the page.

Wednesday, 27 June 2012

Battenberg…with a difference


So this month’s Daring Bakers challenge is….Battenberg cake.

Mandy of What The Fruitcake?! came to our rescue last minute to present us with the Battenberg Cake challenge! She highlighted Mary Berry’s techniques and recipes to allow us to create this unique little cake with ease.

Battenburg- the classic chequered sponge cake, sandwiched together with jam and all wrapped up in a marzipan jacket!


Marzipan is a tricky one, the traditional version is full of powdered sugar and although it's generally vegan I still have difficulty in endorsing such a sugary treat here on my blog! I have been trying to suss out a sugar free marzipan for quite some time now, with some degree of success here in my Christmas Stollen and my the toppings for the super-cute Christmas puds. But when it comes to a rollable marzipan I have not yet had a breakthrough!

However this challenge allowed us to push the boundaries beyond a traditional Battenberg as long as we held true to the chequered sponge concept with a sweet covering whether it be marzipan, fondant or chocolate. So, one idea came to my mind straight away….

….the ‘world’s healthiest chocolate fudge’!

I had tried rolling the fudge dough previously to make these hearts and it worked really well, so I figured it could also work really well as the Battenberg covering.  That then just left the sponge and the flavours to choose. I opted for a plain vanilla sponge alongside a raspberry sponge (although it has taken on more of a brown tinge in the photos), that allowed me to use sugar-free raspberry jam as the sole sweetener in the raspberry sponge.  I opted to try my ‘easiest ever gluten free sponge’ recipe as the basis for this cake as i really wanted to go gluten free for this recipe.

In hindsight I wish I’d gone for a different sponge recipe, as whilst that simple sponge works well as a small super-simple mug cake, it just didn’t really do it for me as larger oven baked sponge. There was nothing drastically wrong with it, I just felt it could have been a lot more delicate with a lighter crumb. I also wish now that I’d rolled the fudge wrap a little thinner before wrapping the sponge slices.

The overall concept was a great success and the chocolate fudge coating worked a treat (particularly if I’d rolled it more finely), however after eating a slice with the sponge, I got the feeling that the sponge was not doing the cake justice. So what did I decide to do?  Peel the fudge off and reform it into fudge balls of course. Mmmm…much better!

Try this frosting…go on give it a go! It is so easy to form and model that you can cut it into rounds, bars, roll it out as an icing layer or even turn it into a soft piped healthy frosting as I did here with these cupcakes.

I will give the Battenberg another go with an alternative sponge recipe at some point soon. This fudge frosting is so versatile that I want to give it a proper chance to do my Battenberg proud!

This link takes you to the original Daring Bakers Challenge notes with  plenty of alternate recipes for battenberg to try.


Recipe: Battenberg

Makes 1 approx. 7” long cake

Ingredients: chocolate fudge frosting

½  can black beans- rinsed and drained
1 mashed banana
½ cup cocoa powder (or raw cacoa powder)
1/3 cup dates
¼ cup cranberries
2 tsp vanilla extract
½  tsp cinnamon
½ tsp stevia
½ cup ground oats
2 tbs ground flax
2 tbs chia seeds

Method

Combine all ingredients in a food processor and blend until a smooth pliable dough is formed. The dough should be fairly tacky but not sticky and should easy to handle.

Roll out the dough on a sheet of parchment or similar for easily handling. Roll to achieve desired thickness and then, using thr parchment to assist, carefully drape across the jam coated sponge to create the finish Battenberg.

Ingredients: simple vanilla sponge

½ cup buckwheat flour (or other GF grain)
3 tbs ground almonds
½ tsp vanilla
1 tsp baking powder
½ cup plain soy yoghurt (or regular)
2 tbs agave (for vanilla version)
2 tbs sugar free raspberry jam (for raspberry version)

Method

Mix dry ingredients in a medium bowl and then add wet ingredients (other than agave and jam) and mix together well.  

Divide the mixture between two bowls and then add the agave and jam to a bowl each.  Note: to achieve a deeper red/pink colour you may need to add a few drops of food colouring.

You will now have two different coloured/flavoured mixtures. Spoon each into a 7” square  baking tin divided down the centre with parchment paper and foil to prevent the batters mixing (foil helps make a more ridged central partition).

Bake in  pre-heated oven  at 180C for approx. 15 mins until very lightly golden.

Assembling the Battenerg

Cut the slices of sponge into neat squares and arrange in a larger square with each flavour on the diagonal. Paint each edge with slightly runny sugar-free raspberry jam and then firmly wrap the chocolate fudge frosting around the entire cake, ensuring an overlap to seal.


For tips and info on recipe measurement conversions, ingredients, substitutions and the methods behind how I do things.... check out my 'baking tips' tab at the top of the page.

Thursday, 10 May 2012

Red velvet carob cake

This was another one of my carob experiments, and yes it is also another single serving mini cake. It also happens to be an opportunity to test out a few other more unusual ingredients- namely teff flour and red palm oil.  I haven’t had much experience of either, but after reading lots of good stuff about their nutritional value I was keen to give them a try.

I will warn you now, red palm oil is bright orangey-red and it stains if you get in anywhere you don’t want it to be….wear an apron…you have been warned!

Red palm oil is strong in flavour when compared to the coconut oil I more typically use, the natural red pigment is due to the unrefined nature of the oil and the oil itself is full of vitamins and antioxidants, most significantly vitamin E , betacarotenes and co-enzyme Q10.

This recipe uses the dominant flavours of the carob and raspberry to carry the red  palm oil so that it does not dominate the sweet cake with its slightly savoury taste, you won’t notice it in this recipe. I would advise using strong flavours in conjunction with red palm oil, unless you are opting for a savoury dish where you want the natural flavour of the palm oil to come through.

By the way, you can quite easily sub the red palm oil for coconut oil in this recipe, and the teff flour for another GF grain, it should still work just fine!  The ‘red velvet’ title was generated by the use of the red palm oil along with raspberries, however the photos give the impression of a much more ‘brown’ chocolatey cake…oh well the thought was there.  

Either way, I promise you this little light and fruity dessert with a chocolately twang is worth it, and with just a couple of minutes of your time...how could you resist?  I used my silicone egg poach again…I’m having so much fun playing with it, and also added a ‘surprise’ sweet berry centre, but again that’s optional.  

I also got a little bit more carried away and with few small tweaks to the recipe I made red velvet carob pancakes…you can find the recipe for those in my guest post here! P.s I had some help to eat the pancakes…I’m not quite that greedy.


Recipe: Red velvet carob cake for one

Serves 1

Ingredients

2 tbs teff flour
2 tsp carob
½ tsp baking powder
Tiny pinch salt
½ tsp vanilla extract
2 tbs pureed raspberries (I used frozen)
1 tbs red palm oil
1 tsp agave syrup
Up to 2 tbs soy milk/juice
2 tsp sugar free jam- optional for centre and for glaze

Method

Mix together well in a small bowl. In another greased/lined small microwaveable dish (or use a silicone egg poach!) spoon half of the mixture, add a dollop of jam to the centre and then spoon the remaining batter on the top.

Microwave for 1 minute at full power. Test gently with the tip of your finger and if the sponge springs back you’re done!

Serve with a little extra sugar free jam and vegan cream or yoghurt of desired.


 ...and for the pancake version..... find me here!


This recipe has been linked with Allergy Free Wednesdays.

For tips and info on recipe measurement conversions, ingredients, substitutions and the methods behind how I do things.... check out my 'baking tips' tab at the top of the page.

Friday, 20 April 2012

Coconut cakes…with a twist!

I have so much coconut!!

I ordered a 25kg sack load of organic coconut flakes some months back as it was such a good deal at that size…however I am trying to get through it before it begins to dry out.

I use a lot of desiccated coconut flakes for making coconut butter…it’s so cost effective that way, however there is a limit to how much coconut one person can eat! So recently I’ve been using lots of extra coconut in my granola bars, in my smoosh bars, and of course in this chocolate slice and in this coconut ice too. You may see a few more coconut inspired treats coming along in the next few weeks!

So, today I thought a coconut cake was in order. This cake also uses coconut flour which I also have in my regular baking supplies (just not in such vast quantities), it’s something I actually don’t use that often, often forgetting it’s there or simply using the coconut flakes instead.

It’s a really great but strange flour. Great because it has a delicate flavour and texture, is gluten free and high in fibre. But strange in that it is very ‘drying’ and absorbs liquid so you’ll find that the proportions of liquid in a recipe and the consistency of the batter are different to the norm. Don’t let that put you off- it’s fun to try new things!

This cake has a really delicate crumb, and is light and moist probably helped by the extra coconut and banana. I kept the sweetness fairly low so that it did not overpower and took on more of a ‘teabread’ type sweetness with the raspberry preserve adding an extra sweet kick. Feel free to increase the agave or add some stevia if you like. The coconut-raspberry combo was inspired by these tarts…oh they were so good and so I just had to get the combo going again. The coconut ‘bombe’ also worked really well with the warm gooey raspberry centre.

 coconut 'bombe'

coconut cake with raspberry drizzle

Recipe: coconut cake with raspberry delight

1 x 21cm loaf tin (or smaller tin plus one small microwave cake see below)

Ingredients

1/3 cup each coconut flour, tapioca starch, buckwheat flour
¼ cup dessicated coconut flakes (plus more for topping)
1 tsp baking powder
Pinch salt
1 small banana- mashed
1 tsp ground chia mixed with 2 tbs water
1/3 cup orange juice (or pineapple juice/non-dairy milk)
3 tbs agave syrup (more to taste)
1 tsp rum extract
Sugar free raspberry jam- for glaze

Method (for loaf)

Mix all dry ingredients together in a medium bowl and then add wet ingredients. Mix together gently but well. Note the coconut flour is very ‘drying’ so the batter will not be as runny as normal cake batter. It will probably be very light and airy.

Spoon the batter into a loaf tin (or a smaller loaf tin plus small round microwavable bowl-see below). Smooth the top of the batter and cover with a fairly generous layer of desiccated coconut flakes, gently press them into the batter 180C for approx. 30 mins until the top is golden and toothpick inserted into the centre of the cake comes away clean. Note- I loosely covered the loaf with tin foil after being in the oven for 10 minutes to ensure to coconut flakes did not burn.

Allow to cool slightly in the loaf tin before lifting out. Drizzle with raspberry jam whilst still warm and allow to cool fully before serving.

Method (for mini ‘bombe’)

serves 2

Keep aside approx. ½ cup of cake batter. Lightly oil a small microwavable round bowl (approx. 10 cm diameter rim). Sprinkle 1tbs of desiccated coconut flakes in the bottom and then carefully top this will ¼ cup cake batter. Spread the batter evenly across the bottom of the bowl. Dollop 1 generous tsp of raspberry jam into the centre of the batter before covering with the remaining  ¼ cup of batter. Smooth evenly ensuring all the jam is fully covered.

Cook in the microwave for 90 seconds. Lightly touch centre to check if cooked and if still wet cook for another 30-60 seconds as necessary.


For tips and info on recipe measurement conversions, ingredients, substitutions and the methods behind how I do things.... check out my 'baking tips' tab at the top of the page.

Tuesday, 20 March 2012

Bakewell oat-tart

So on Sunday it was Mother’s Day here in the UK. You may have noticed I gave you a little sneak preview as to the subject of today’s post….

Mmmmm, raspberries and almonds! I figured this was a very underused combo on my blog but I love bakewell tart so I can’t believe I haven’t attempted a healthy version before now. Plenty of time for all that, but this little oatcake certainly did the trick, and yes this is another single serving cake of the microwave variety. Oh how I do love them!

Perfect for mother’s day breakfast.


The original idea for this cake came via this recipe, when I was doing some ‘oatmeal’ research, and it simply looked too good to not to try out. I made a few tweaks to the ingredients, and the quantities simply because I wanted to make more of a single serving (though I’ll definitely be making a larger batch from now on!) I then also took the leap of faith and use the microwave to turn it into a super quick breakfast/brunch/dessert, and also because I resent having to turn the oven on for a single cake! 

It worked really well in a muffin case in a silicon muffin pan, as you can then simply peel away the paper case once cooked (you may well not even need the paper cake case). To me these had the lovely dense texture of oatmeal without the creaminess of a bowl of cooked oats (I love that too but I know some people don’t). It's really a kind of porridge cake but that doesn't sound as good as it tastes! Having not tried the oven version I was not able to compare the methods, I imagine the oven version would maybe have more of a crust on the top and simply taste more ‘baked’ so if that’s your preference go for it!

I tried this recipe on the Saturday (in preparation for Mother’s Day) and ate the first ‘cake ‘plain and then the second with a dollop of super thick melted cashew cream, oh yeah…I’d recommend going for the topping!  By Sunday I’d run out of topping…so I served them with soy yoghurt for our mid-morning brunch which was still yummy!


Recipe: Bakewell oat-tart

Makes 2 cakes

Ingredients:

2/3 cup oats
1 tbs agave
¼ cup apple puree
¼ cup soy milk (or any milk alternative)
½ tsp almond extract
1 tsp ground chia or flax
Handful of fresh or frozen raspberries (I use frozen as they don’t ‘bleed’ so much)
Flaked almonds for decoration (add some extra to mixture if desired)

Method:

Mix all ingredients together in a small bowl, adding the raspberries last so the mixture doesn’t turn totally pink, unless that’s what you are aiming for!

Spoon into two silicone cupcake/muffin cases (or anything suitable for microwaving) and cook on full power for 2 minutes, though I would advise checking after 90 seconds to see if they are ready to your desired consistency since microwaves are all different.


For tips and info on recipe measurement conversions, ingredients, substitutions and the methods behind how I do things.... check out my 'baking tips' tab at the top of the page.

Tuesday, 29 November 2011

Coconut tarts with apple and raspberry

Things are looking up!

On Sunday, following a few days of re-adjustment once all my kitchen equipment and baking boxes had found new homes, I started to feel more at ease. I began to look forward to baking again and I moreover I needed to cook up some snacks to keep me going throughout the coming week. 

So, I had to go for it. An afternoon of baking in a new environment and with a new perspective…  and it felt good.  I’d even go so far as to say it was a resounding success!

First up I tried a ‘safe’ recipe with few ingredients and minimal mess to test the waters… more on that in a later post (clue- it contained ginger!)

Second up, these apple and raspberry coconut tarts… indeed they are as good as they sound. Since I was feeling adventurous and surprisingly confident by that point I decided to go all out and put together a crazy gluten free pastry base to boot.  Feel free to use your own ‘tried and tested’ pastry recipe if you prefer (GF or not), but I felt this version turned out surprising well- see additional notes below. The ingredients and method might appear long winded- but please do not let this put you off, each step is pretty simple and there is really not too much to it. It will be worth it!

Do I really need say any more or does this picture speak for itself….mmmmm, crisp coconut flakes, sweet moist coconut buttery apple topping and drippy raspberry centres all wrapped up in a crisp pastry shell.


Recipe: Apple and raspberry coconut tarts

Makes 12 tarts

Ingredients


Pastry base:
130g GF flour mix
30g ground almonds
¼ tsp xantham gum
80g coconut butter
40g banana puree (approx. ½ mashed banana)
½ tsp cinnamon


Filling:
1tsp sugar free raspberry  jam per tart case
1 apple grated
1tsp lemon juice
2 tbs agave
50g coconut butter (partially melted)
40g unsweetened desiccated coconut
1/3 tsp stevia (or to taste)

Topping:
1tbs ground flax plus 2 tbs hot water
Approx. ½ cup unsweetened desiccated coconut

Method

Prepare GF pastry base (as above or use own recipe) but combining all ingredients together and forming a ball of dough. Cover in cling film and let rest whilst you prep the remaining ingredients.

Mix the grated apple with the lemon juice and set aside. Mix the partially melted coconut butter with the agave, stevia and desiccated coconut then add the apple mixture.

Either roll the pastry and use a cutter to cut circles to lay in each tart case, or if the pastry is a little too crumbly (as in this case) put of sections of dough and press into each tart case with fingers tips ensuring the pastry is not too thick. Note- it is impotant that the pastry is pretty thin as otherwise it will dominate the tart and be too tough.

Mix the ground flax with hot water and allow to sit for a few minutes until gloopy.

Fill each tart with a tsp of jam and then top this with a ‘disc’ of apple/coconut mixture- I pulled off a piece the size of a walnut and then flattened this in my hands.

Lastly, using a pastry brush, cover the top surface of the tart with the flax mixture and sprinkle over a generous layer of desiccated coconut so that it sticks to the wet flax.

Bake at 180C for approx. 15 minutes until the top begins to turn golden.

 First- add 1 tsp of jam per tart

 Second- lay the apple/coconut 'pattie' over the jam 
(note I ran short of topping hence the lonely jam tart!)
before adding the coconut sprinkles over the top.

Note: My pastry base was completely experimental, but I felt it worked quite well with a subtle sweetness of banana and coconut. I haven’t created a GF pastry before so have little experience to go on. It wasn’t at all flaking but neither was it too tough the next day (however it got tougher in the following couple of days so maybe still needs torefinement!) It had the characteristic of a more robust pastry shell with a substantial ‘bite’ as opposed to melt-in-your-mouth, so make sure you keep the pastry case very thin. I quite liked the robustness it gave it but I understand some people may prefer a more delicate flakier pastry. Any neutral pastry base would work well here so feel free to mix it up a bit and use your own pastry recipe.


For tips and info on recipe measurement conversions, ingredients, substitutions and the methods behind how I do things.... check out my 'baking tips' tab at the top of the page.

Friday, 18 November 2011

Raspberry cheesecake ‘rame-cake’

It was a busy morning for me. First stop swimming followed by pilates.

I enjoy swimming as it is one of the only times I am able to truly switch off, maybe it’s the rhythmical pace gliding up and down the lane or maybe it’s the submersion and notion of feeling ‘in your own little bubble’. It is also the time when I often feel most creative, my mind is quiet and thoughts come flooding in….

…. It can also been the most frustrating time to be creative, inspired thoughts in the middle of a pool with no capacity to write anything down is, well, rather annoying at times!

After my swim and a quick sauna, the pilates session is a nice compliment to round off the morning’s activities. I’m a bit of a pilates newbie but I’m finding I actually quite enjoy it. My usual activities involve more hard core cardio or flinging myself about- i.e around a squash court or a pole… (I teach pole dance classes), I was recently advised to take up pilates as I have had problems with my hips due to the fact my joints are hypermobile, and actually I think it may be helping. It also gives me an opportunity to sloooow down, something which I am notoriously very bad at! Thus, my Friday mornings have become a time to revive my mind and set me up for a productive weekend.

Once home I was in need of food and lots of it.…. The mug cakes were calling!!

The recipe for my first ever chocolate mug cake post was based on one large mug or two ramekins. Whilst that’s great for sharing (or if you are in need of a major cake hit!), I often simply want a little treat just for me, and a mug is too much. So here I have reworked the recipe amounts to create a ‘single serving ramekin’ aka the ‘rame-cake’ and believe me this is more than enough to hit the spot!

In putting together this recipe I was also keen to experiment with a GF version... um, so then one 'ramecake' became two... shhhh!  I have noted my GF alterations below, and in my opinion this version was perfectly yummy with barely a hint of any grainyness so typical with GF flours.  I did notice a slight difference in texture as I sampled each cake one after the other, but had this not been the case then I don't think I would have 'noticed' I was eating a GF sponge. 


 Recipe: Raspberry cheesecake ‘rame-cake’

Ingredients:

2 tbs white spelt flour (see GF version below)
1 tsp rapadura and a few grains of stevia (or an extra tsp of rapadura as it is easy to overdo the stevia for such a small amount)
Tiny pinch salt
¼ tsp baking powder (increase to a heaped 1/4 tsp for GF)
2 tbs soy milk (add 1 extra tsp for GF)
1 tsp coconut oil
1 tsp yoghurt
Few drops vanilla extract
Small handful of frozen raspberries broken up (I use frozen as they are easier to break, don’t colour the batter and are available all year round)
1 tsp vegan cream cheese, 1tsp soy milk, tiny amount of agave (or any liquid sweetener) to make the ‘cheesecake’ (omit this if you just want a fruity sponge!)

Method

Mix the ‘cheesecake’ ingredients- cream cheese, soy milk and agave together and set aside. Place coconut oil, vanilla and soy milk up in a small bowl and melt together until the coconut is melted. Add the dry ingredients to the wet mix and keep mixing until there are no lumps or dry patches of unmixed flour. Lightly mix through the raspberry pieces and spoon the batter into a ramekin or mini bowl. Top the batter with the ‘cheesecake’ mix and mix in slightly with a toothpick if desired. Cook on full power (based on 900W) in microwave for 30 seconds. Check with a cocktail stick until stick comes out almost clean. Cook for up 20 seconds more if necessary until cooked.

For the GF version I used GF flours to the equivalent of 2 tbs.  I used 1 tbs of Doves Farm GF mix (this is a UK brand consisting of rice, potato, tapicoca and buckwheat flours) plus 2 tsp almond meal.  I think the addition of nut meal really helps to prevent the sponge from becoming grainy or dry. I imagine any type of GF flour mix would be quite flexible for those that have their favourite combos.  Also note the slight increase to baking powder as I found that with a level 1/4 tsp the cake did not rise to the same degree as the spelt version so was a little more dense. I also added slightly more soy milk as in my experience GF flours are dryer.


Please let me know how you get on and any changes you make!


 P.S The pics are of the spelt version.

Tuesday, 18 October 2011

Raspberry crumb top cake

Well, I figured we were in much need of another sweet treat as I came to my attention that my last few posts were a little lacking that department!

I’d been meaning to tackle a ‘crumb top’ style cake for a while, and then one day one of my colleagues brought in a version that he’d made over the weekend.  Of course this contained the usual eggs, milk, butter and refined sugars, but I was curious to see whether I could come up with an equally yummy healthy alternative. A couple of days later, upon my request I found his recipe in my inbox, so the challenge was set!

The original recipe followed a different methodology to the route I eventually took at this use fresh yeast to create a kind of dough for the base, although it had the texture of sponge. I figured that my best bet was to opt for a more standard ‘sponge’ style with the fruit layer and crumb topping to boot. After doing a little research I settled on this recipe by The Post Punk Kitchen to give me my starting point.

This cake was pretty yummy. The sponge was light and the topping crumbly (in my opinion a bit too dry and crumbly to I’d be tempted to use agave as noted below). Also don’t skimp on the amount of jam/fruit as this gives the cake moistness and a beautiful layer of textures.


Recipe: raspberry crumb top cake

Makes one 9’ cake pan (round or square)

Ingredients

Cake base:
¾ cup soy milk
1 tsp cider vinegar/white wine vinegar
¼ cup rapadura plus ¼ tsp stevia
2 tbs coconut butter
2 tbs apple puree
1 tsp vanilla extract
1 ¼ cups white spelt flour
2 tsp baking powder
½ tsp salt

Topping:
½ cup sugar free raspberry  (or other berry) jam
½ - ¾  cup raspberries
1 cup white spelt flour
1/3 cup rapadura (using agave may be better as will be stickier)
1 tsp cinnamon
¼ tsp nutmeg
1/3 cup coconut butter melted

Method
Mix the soy milk and vinegar and set aside to curdle in a large bowl. For the topping mix the dry ingredients then add the coconut butter (and agave if using) and mix with fingers until the mixture clumps into fairly large lumps that don’t crumble away immediately. Add extra oil if needed. For the cake base, mix the remaining wet ingredients with the curdled soy milk. Add the dry ingredients and mix well until the batter is very smooth. Pour the batter into a greased/lined cake pan. ‘blob’ the jam onto the top and mix through a little. Break up the raspberries a bit and evenly cover the top of the batter. Sprinkle the crumb topping across the cake evenly and press down into the batter a little. Bake for approx. 30 mins at 180C until a toothpick comes out clean.
 

you may also like

Related Posts Plugin for WordPress, Blogger...