Showing posts with label pasta. Show all posts

Tuesday, 29 January 2013

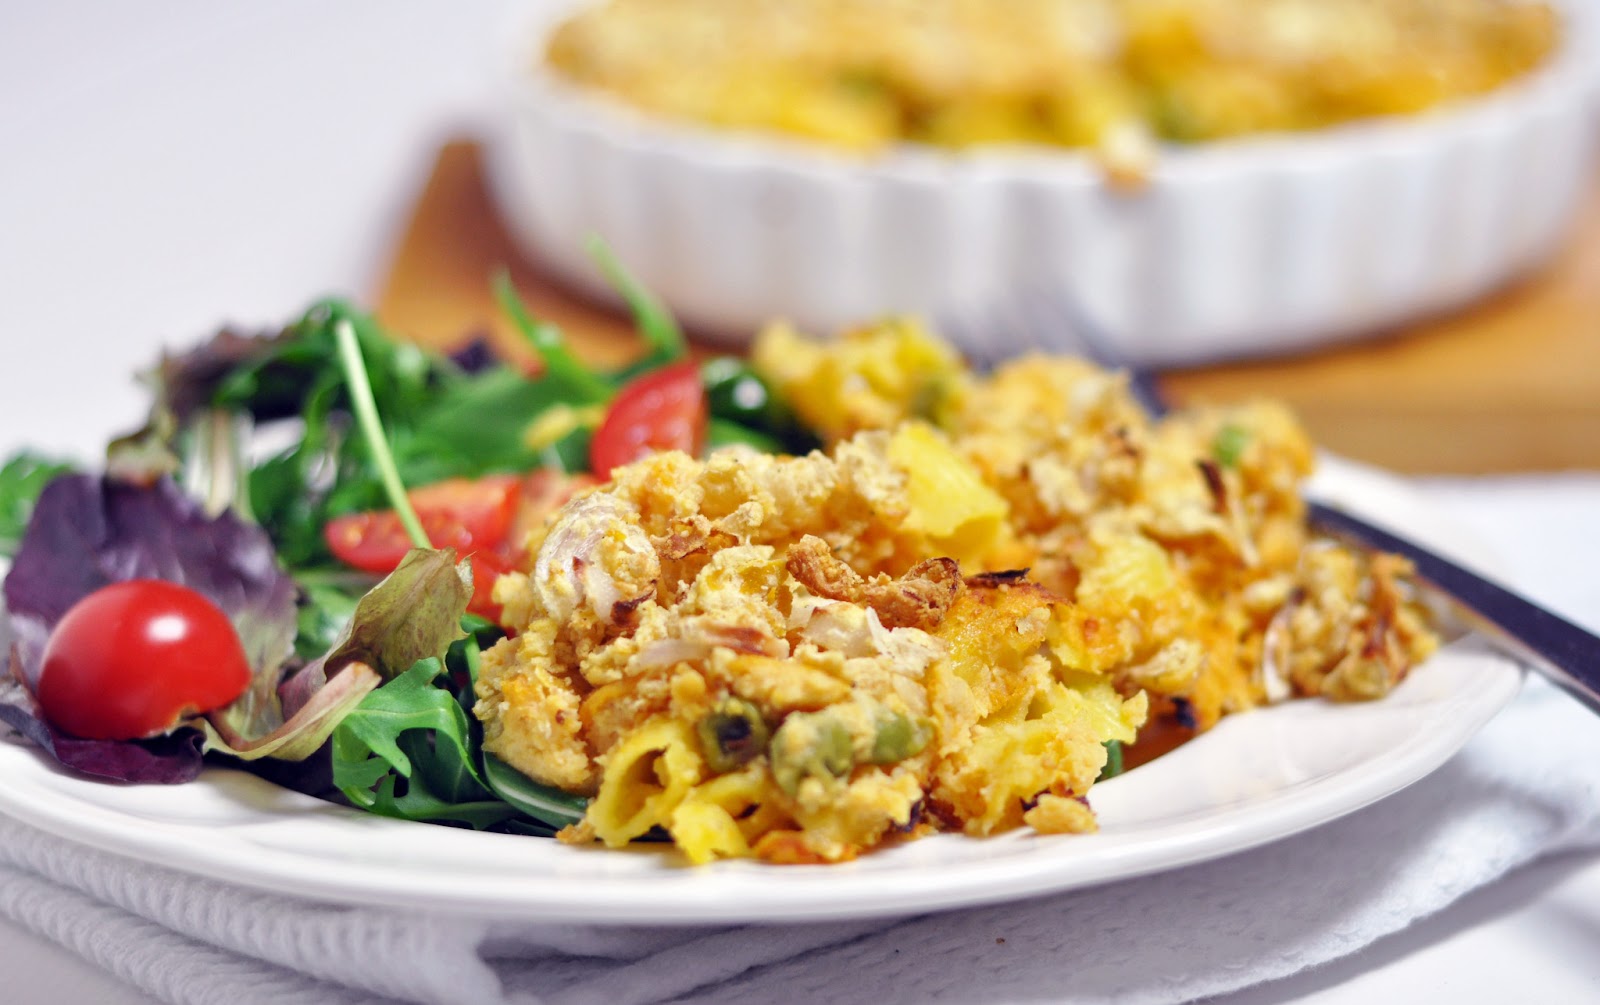
Healthy GF baked ‘mac and cheese’- 2 ways!

Ok, so this ended up being a bit of a long title, but I had a lot I wanted to convey! 

This sauce contains a multitude of health wholesome ingredients, the entire dish is gluten free and is also baked with a wonderful crispy topping...one of my favourite parts. Oh, and there are two ways you can enjoy this dish!


Using brown rice pasta has an additional benefit, as well as being gluten free it is so quick to cook. Regular pasta would take 10-15 minutes but the GF pasta takes a mere 6 minutes, shaving important time off the process. Meaning you can eat sooner!

I had a go with this dish two ways. The first trial involved cooking the pasta from dried within the sauce base in the oven. Due to the potato content this cooked up more like a flan and was much drier and less saucy, this was a great texture in its own right  however I had originally envisaged a creamy sauce and so was keen to create a more saucy variation.  It was a simple teak to the recipe meaning that the pasta was pre-cooked and therefore reducing the overall oven time.

I had some of the ‘mac and cheese flan’ as a cold slice the following day which was also good.  The photos are of the less creamy version as I didn’t have my camera to hand for the second variation.  I added peas to the mix for good measure and a bit of colour, but you can omit or substitute another quick cooking vegetable if you prefer.

The topping is my favourite part...a simplified non-oat version of this recipe. It doesn’t crisp up quite as much as the oat version but is still delicious. You can add extra herbs and spices to taste.


Recipe:  Healthy GF baked ‘mac and cheese’

Sauce ingredients:
1 1/2 cups sweet potato- grated
1/2 cup cauliflower grated
1/4 cup nutritional yeast
2 tsp roasted garlic granules (or regular garlic cloves)
1/2 mustard
1-2 tsp mixed spices
1/4 tsp salt to taste
2 tbs lemon juice
2 tbs coconut oil melted
1 1/2 cup soy milk- heated

filling:
1 cup frozen peas
2 cups GF rice pasta (it should state cook in approx. 6 mins on pack)

Topping:
Heaping 1/2 cup crushed chickpeas
1 small white onion finely chopped
salt and pepper

Method 1:
Cook pasta according to packet instructions until only just cooked.

Meanwhile boil the sweet potato and cauliflower for 5 mins until cooked. Drain and blend with all remaining sauce ingredients ensuring the sauce is still hot.

Whilst the sauce and pasta are cooking prepare the topping and set aside.

Place the GF pasta and frozen peas (optional) in a 30cm pie dish and cover with the sauce. Sprinkle the topping in an even layer.

Bake at 200C for approx 10minutes until the topping browns and the peas are cooked through.

Method 2:
Follow the steps above to make the sauce but don't cook the pasta prior to baking. Pour the sauce over the uncooked GF pasta and peas. Loosely cover in foil and oven bake for 30 mins- removing the fil for the last 5-10 minutes to allow the topping to brown. This creates a dryer and less creamy 'flan' style texture that could be sliced and also served cold the following day.


For further guidance on making gluten free choices please see this post.

For tips and info on recipe measurement conversions, ingredients, substitutions and the methods behind how I do things.... check out my 'baking tips' tab at the top of the page.

Tuesday, 20 November 2012

Lentil spaghetti bolognaise

How crazy authentic does this bolognaise look?


I was so happy with my lentil 'mince'. Super impressive on all counts….looks, taste and how easy it was to prepare.

This is probably the easiest and healthiest spag-bol you’ll ever make!

Ok, so the ‘spaghetti’ is green I give you that, I julienned a courgette to make spaghetti noodles but you could easily swap in actual spaghetti instead, no dramas, I won’t mind. I just fancied doing some ‘julienning’ since I love the peeler so much! In any case it’s the bolognaise that’s the real star of the show.

You could eat this on its own as a warming snack, spooned over a jacket potato or on a bed or spinach or kale. It’s just so versatile. The flavours are really authentically ‘bolognaisey’ as well- at least I think so (don’t shout at me if you disagree). I added a little beetroot chutney since I had some in the fridge, this simply gives it a greater richness of flavour but isn’t critical or you could add another condiment or chutney of choice for added body and depth.

The one and only important part of this recipe is to use the right lentils! Mine were ‘dark speckled green lentils’ that I’d soaked overnight from dried and cooked up a big batch of to freeze leftovers. Just make sure they are dark lentils (not red or yellow) and that they hold their shape firmly once cooked. I made the mistake of first experimenting with this recipe a few weeks ago at my dad's house and the lentils I took out of the freezer I thought were the ‘hold their shape type’ er no…I ended up with a pile of mush. Edible but not great to look at. You have been warned!


Recipe: Lentil spaghetti bolognaise

Serves 2

Ingredients

1 tbs olive oil
1 small red onion
1 1/2 cups cooked dark green lentils- either cooked from dried or tinned (important to use lentils that hold their shape stay firm once cooked)
1 small tin (200g) chopped tomatoes
1-2 cloves garlic or ¼ tsp garlic powder
¼ cup beetroot chutney (optional for richness of flavour)
1/2 tsp mixed dried Italian herbs (or use fresh)
2 courgettes or use pasta or choice

Method
 
Saute the onion for 5 minutes until softening. Add all remaining ingredients other than the courgettes and simmer for 5 mins.

Whilst the ‘bolognaise’ simmers, slice the courgette into noodles using a julienne peeler. I set the bolognaise aside once cooked and used the same pan for the courgette (to save on washing up) but you can use a separate pan if desired to cook the courgette for 3-4 minutes.

Serve the courgette ‘pasta’ around the edge of a plate and pile the bolognaise in the centre. Serve immediately.


For further guidance on making gluten free choices please see this post.

For tips and info on recipe measurement conversions, ingredients, substitutions and the methods behind how I do things.... check out my 'baking tips' tab at the top of the page.

Tuesday, 17 July 2012

Cheezy pasta carbonara


No matter how hot it may be outside (not very in this case!) There is always time for some true comfort food. Cheesy (or should that be cheezy?) pasta hits the spot!

I love this simple creamy and full flavoured saurce closely based on this recipe by Oh She Glows.  It’s typically my go to sauce for cheezy based meals over and above the nut versions  purely for its simplicity in my Thermomix (the nut based sources tend to burn onto the bottom of the mixing jug).

This was also an continuation of my recent experiments using brown rice pasta instead of regular wheat pasta…and I can tell you I’m hooked, if I hadn’t known I was eating a GF version I wouldn’t have been able to tell the difference. Just keep a close eye on the cooking time as from what I’ve heard there is a much smaller window of time from it being just cooked to it being overdone and mushy.

This simple bowl of comfort started life like this:


A simple cheese and tomato dish, but then I felt it needed more (plus I had a few leftover soy ‘meat’ chunks from a meal with a friend to use up) so it turned into this hearty monster with mixed beans and grated courgette, plus the soy chunks along with the tomato. You could add anything thing you like to create your very own colourful ‘carbonara’ of sorts, a meat substitute is optional but by no means necessary, it’s very rare that I use ‘fake’ ingredients but this did add a nice smoky taste- a ‘smoked’ vegetable such as pepper could work realty well .

I really hope the sun starts shining soon…I want to be outside wearing shorts, flip flops and sunglasses….not inside wearing jumpers and slippers! I guarantee when that happens there’ll be more salad recipes coming this way. You know what I may just do that anyway!


Recipe: Cheezy pasta 'carbonara'

Serves 2

Ingredients

¾ cup ‘milk’ (I use almond or soy)
6tbs nutritional yeast
1 tbs coconut oil
1 ½ tbs cornflour (or any GF thickener)
2 tsp Dijon mustard (to tatse)
¼ tsp garlic powder
½  tsp salt and pepper

pasta (GF optional) to serve two
selection of veggies
smoked 'meat' (optional)

Method

Melt the coconut oil in a small pan over the hob. Whisk the flour and milk together in a separate bowl ensuring there are no lumps. Add the milk mixture plus all remaining ingredients to the pan and whisk well. Simmer and whisk for approx. 5 mins until thick.

For a hearty pasta dish, cook the brown rice (or regular) pasta accordingly to packet instructions- mine took 6 minutes and then meanwhile cook your selection of veg.

Once the sauce is ready, mix through and eat immediately.


For more main meals check out this link.

For tips and info on recipe measurement conversions, ingredients, substitutions and the methods behind how I do things.... check out my 'baking tips' tab at the top of the page.

Wednesday, 14 March 2012

Pesto

I know what you’re thinking…. pesto is all about the cheese.

Well not this version and I guarantee you won’t miss it. What’s more I’ve included a few cost saving and tips and healthanizing (hmmm that’s really not a word!) tips to reduce the oil content if you are that way inclined (personally I am not since pesto is used in such relatively small quantities).

I first made this batch up a few months back and had almost forgotten about it since I had portioned it in to an ice-cream tray and frozen it. It’s a great way to ensure you have fresh pesto on hand at all times as it can be used in so many ways…. one great option will be coming up in tomorrow's post…but for now let’s just talk pesto!

This recipe is so simple (as you know I’m not generally a fan of over complicated instructions),  it’s another one of my ‘whack it all in a food processor and go’ type recipes, so there’s no excuse for not giving it a go if you have the ingredients to hand!

It’s also a pretty flexible recipe, and as you can see from the list of ingredients, spinach can used to sub part of the basil if necessary without compromising the flavour, similarly in the past I have used both walnuts and cashews instead of pine nuts as they are so expensive, but feel to use either, or even almonds…go a little crazy with your combos! Obviously some nuts have more of a dominant taste than others, so go with your preference.  The nutritional yeast and miso paste are what gives the pesto the deep mellow cheesy nutty touch so don’t leave these out if you want to achieve a pesto that is more reminiscent of the real thing. As with many vegan foods, don’t expect it to be an exact replacement for it’s traditional counterpart . Embrace the (healthy) differences and enjoy it in it’s own right and appreciate the unique but equally satisfying flavours and textures.


Recipe: Pesto

Makes one jar

Ingredients:

1 cup fresh basil (or 1 ½ cups and omit the spinach)
½ cup spinach plus ½ tsp dried basil)
1/4 cup olive oil
2 tbs soy milk or silken tofu
1 cup walnuts/cashews/almonds (cheaper than the traditionally used pine nuts)
4 cloves garlic
1/3 cup nutritional yeast
1 tsp miso paste
3/4 teaspoon salt
1/2 teaspoon black pepper
Note: You could sub half the oil for silken tofu (not tested)

Preparation:

Grind nuts and garlic in a food processor until nuts are coarsely ground. Combine with remaining ingredients and grind until you have a medium grained paste- it should not be to smooth!. Add more salt and pepper if preferred.

Store in the fridge for a few days or freeze in batches- I used an ice cube tray.


 (here's your little teaser....pesto polenta bruschetta)


For tips and info on recipe measurement conversions, ingredients, substitutions and the methods behind how I do things.... check out my 'baking tips' tab at the top of the page.

you may also like

Related Posts Plugin for WordPress, Blogger...