Showing posts with label chickpeas. Show all posts

Tuesday, 29 January 2013

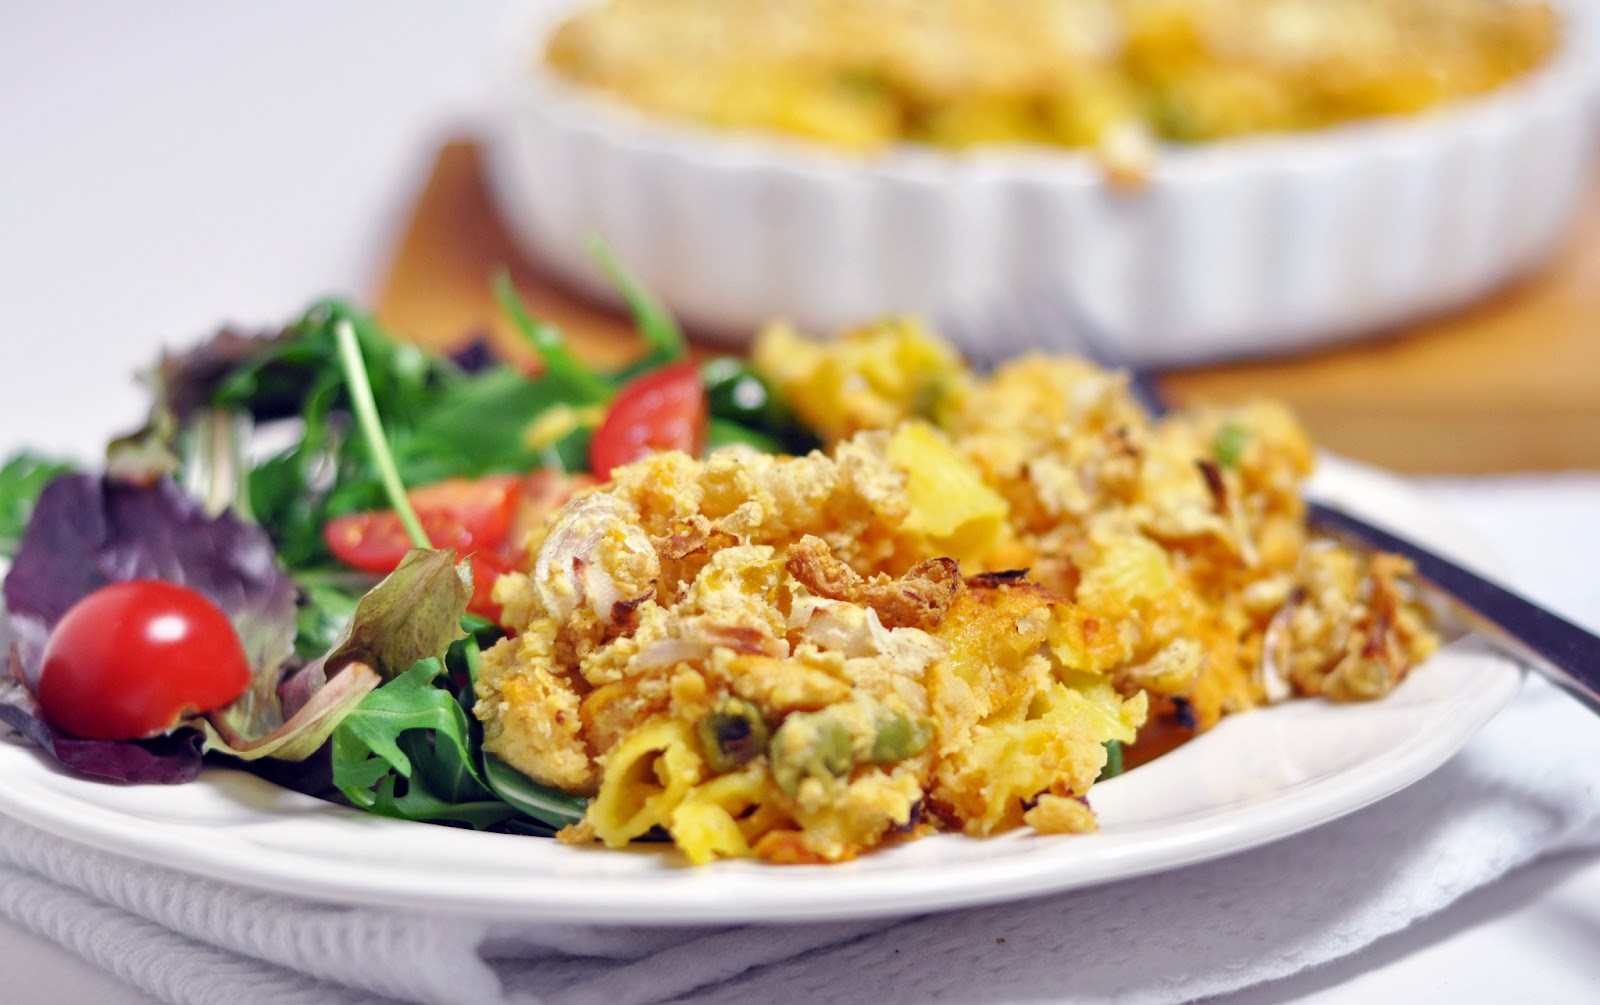
Healthy GF baked ‘mac and cheese’- 2 ways!

Ok, so this ended up being a bit of a long title, but I had a lot I wanted to convey! 

This sauce contains a multitude of health wholesome ingredients, the entire dish is gluten free and is also baked with a wonderful crispy topping...one of my favourite parts. Oh, and there are two ways you can enjoy this dish!


Using brown rice pasta has an additional benefit, as well as being gluten free it is so quick to cook. Regular pasta would take 10-15 minutes but the GF pasta takes a mere 6 minutes, shaving important time off the process. Meaning you can eat sooner!

I had a go with this dish two ways. The first trial involved cooking the pasta from dried within the sauce base in the oven. Due to the potato content this cooked up more like a flan and was much drier and less saucy, this was a great texture in its own right  however I had originally envisaged a creamy sauce and so was keen to create a more saucy variation.  It was a simple teak to the recipe meaning that the pasta was pre-cooked and therefore reducing the overall oven time.

I had some of the ‘mac and cheese flan’ as a cold slice the following day which was also good.  The photos are of the less creamy version as I didn’t have my camera to hand for the second variation.  I added peas to the mix for good measure and a bit of colour, but you can omit or substitute another quick cooking vegetable if you prefer.

The topping is my favourite part...a simplified non-oat version of this recipe. It doesn’t crisp up quite as much as the oat version but is still delicious. You can add extra herbs and spices to taste.


Recipe:  Healthy GF baked ‘mac and cheese’

Sauce ingredients:
1 1/2 cups sweet potato- grated
1/2 cup cauliflower grated
1/4 cup nutritional yeast
2 tsp roasted garlic granules (or regular garlic cloves)
1/2 mustard
1-2 tsp mixed spices
1/4 tsp salt to taste
2 tbs lemon juice
2 tbs coconut oil melted
1 1/2 cup soy milk- heated

filling:
1 cup frozen peas
2 cups GF rice pasta (it should state cook in approx. 6 mins on pack)

Topping:
Heaping 1/2 cup crushed chickpeas
1 small white onion finely chopped
salt and pepper

Method 1:
Cook pasta according to packet instructions until only just cooked.

Meanwhile boil the sweet potato and cauliflower for 5 mins until cooked. Drain and blend with all remaining sauce ingredients ensuring the sauce is still hot.

Whilst the sauce and pasta are cooking prepare the topping and set aside.

Place the GF pasta and frozen peas (optional) in a 30cm pie dish and cover with the sauce. Sprinkle the topping in an even layer.

Bake at 200C for approx 10minutes until the topping browns and the peas are cooked through.

Method 2:
Follow the steps above to make the sauce but don't cook the pasta prior to baking. Pour the sauce over the uncooked GF pasta and peas. Loosely cover in foil and oven bake for 30 mins- removing the fil for the last 5-10 minutes to allow the topping to brown. This creates a dryer and less creamy 'flan' style texture that could be sliced and also served cold the following day.


For further guidance on making gluten free choices please see this post.

For tips and info on recipe measurement conversions, ingredients, substitutions and the methods behind how I do things.... check out my 'baking tips' tab at the top of the page.

Saturday, 26 January 2013

‘Muffin top’ banana blondie

This was originally dreamed up as a single serve recipe...and as much as I could have eaten it all to myself, I felt it was better suited two and so shared it with my mum. If you choose to eat it all yourself...I wont judge! It is the weekend after all ;-)


I love single serve recipes as they are quick, require few ingredients and are great for experiments as if things don’t turn out quite the way you expected you haven’t got a whole pan of cake to dispose of! Luckily that was not necessary in this instance.

This little recipe is a coming together of my mug cakes and my blondies. I also tried to strip back the ingredients to the bare minimum to keep it quick and easy.  Chickpeas feature...that was always going to be the case...you know me by now! This little blondie was just like a giant muffin top in shape and texture hence the title of the post, yummy!

I baked this in the oven and it had a deliciously light (blondie like) texture and a golden top. I haven’t tried it in the microwave but since my mug cakes are typically microwave versions I see no reason why this wouldn’t work, obviously without the golden oven baked top so they may not have quite the same 'muffin top-ness'. 


Recipe: Quick banana blondie (for two)

Ingredients:

1 banana (1/3 sliced, 2/3 mashed)
1/4 cup chickpeas
1 tbs coconut oil- melted
2 tbs agave
1/4 cup flour- I used white spelt (but you could use GF mix of choice)
scant 1/2 tsp baking powder
pinch salt
1/4 tsp (or more) cinnamon
Maple syrup to serve (optional indulgence)

Method:

Blend together the mashed banana and chickpeas with the oil and agave until well blended. Add the remaining dry ingredients and mix through.

Spoon the blondie into a 'dollop' on a small lined baking sheet or alternatively use a small pie dish. arrange the remaining banana slices on the top. Decorate with a few choc chunks or nuts if desired.

Bake for approx. 10-12 minutes until golden on top. Note: You could microwave this blondie for 90 seconds, but the texture may not be so light or the top golden.


For further guidance on making gluten free choices please see this post.

For tips and info on recipe measurement conversions, ingredients, substitutions and the methods behind how I do things.... check out my 'baking tips' tab at the top of the page.

Thursday, 24 January 2013

Tahini sauce salad- low fat!

Salads have become much more of a big deal for me in recent months. By salads I’m talking huge bowl salads, soup accompaniment salads and hot salads.... gone are the days when salads were only served in summer!


I love hot food, there is something so satisfying about a plate of hot home cooked food, but I also appreciate the virtues of raw and uncooked foods and try to eat raw veggie sticks and salads when I can. It’s a simple fact that regardless of how healthy a food is, it will lose some of its nutritional value during the heating process. So, for me a hot salad is a great compromise... the benefits of raw veggies whilst satisfying the ‘hot’ meal side of things.  I nearly always eat my spinach raw in what ever dish I make, partly because raw spinach is so much more bulky and visually substantial that wilted cooked spinach. You eat with your eyes, right?


Back to the point of this post....it’s not all about the salad but the dressing! The dressing is a low fat twist on a traditional tahini dressing and I credit Susan over at Fat Free Vegan for her great recipe.


The salad itself is up to you... I threw together a mixture of roasted and raw veggies...  iceberg lettuce with raw grated carrot and cucumber chunks, along with some leftover chickpeas and roasted cauliflower and courgette that I chopped small and sprinkled with a little salt and pepper and allowed to roasted whilst I blended the dressing and prepped the rest of the dish. 

Assemble your salad and then go crazy with the healthy tahini dressing until your hearts content! This could also be used as a dipping sauce- reduce the water by half when you blend together.


Recipe: Low fat tahini dressing

Ingredients:

1/4 cup chickpeas
1/4 cup lemon juice
1/2 cup water
1 tbs tahini
2 tsp soy sauce
1 tbs ground chia
1 tbs nutritional yeast
1-2 garlic cloves- crushed
2 tsp fresh ginger (or 1/2 tsp ground)
black pepper to taste

Method:

Blend all ingredients together until very smooth. Dressing will store in the fridge for up to two weeks.


I served mine over a raw-cooked combo salad!


For further guidance on making gluten free choices please see this post.

For tips and info on recipe measurement conversions, ingredients, substitutions and the methods behind how I do things.... check out my 'baking tips' tab at the top of the page.

Saturday, 3 November 2012

Chana masala


I have a bit of a thing for chickpeas and a bit for a thing for soups, particularly at this time of year! Plus whenever I order an Indian dish Chana Masala is at the top of my list.


So really it was only a matter of time before I made my own version of this warming dish. I admit this is probably not overly authentic, as I have not gone to town on attention to detail in its traditions but instead opted for a tasty quick meal that can be made in minutes with store cupboard ingredients. 

My inspiration came firstly in this recipe by the PPK and similarly I opted for using soaked and cooked dried chickpeas (I cook them in large batches and freeze them), but you could use canned for speed if necessary.  I didn't have any fresh tomatoes to hand and was concerned as to whether canned would impair the flavour, but then I came across plenty of other recipes that opted for canned tomatoes so I decided I’d give it a go! I also had no fresh coriander (cilantro) and so I added ground coriander to the mix.

I love the texture of the chickpeas in this recipe and the fact it is a cross between a soup and a curry. You could add less water for a thicker dish- mine is probably not so authentic in it's 'soupiness'. This freezes easily so is perfect to portion up for nice protein rich work lunches!

overhead shot....ha ha see my reflection in the spoon (oops!)
Recipe: Chana masala

Serves 4

Ingredients
Spices: 1 tbs garam masala, 1tbs ground coriander*, ½ tsp turmeric, 2 tsp cumin, oinch cayenne pepper
1 tbs coconut oil
2 onions finely sliced
2 tsp smoked garlic powder (or 2 cloves garlic- crushed)
1 dried smoked jalapeno pepper (or 1 fresh)
1 can chopped tomatoes
1 tbs tomato puree
3 cups cooked chickpeas
approx.½ cup water
Squeeze of lemon juice
Salt and pepper to taste
*you can use fresh coriander instead of ground if preferred.

Method

Dry fry the spices in a large frying pan for 1 minute, add the onion and garlic and cook for 5 minutes until the onion has softened.

Add the tomatoes,  chickpeas, salt and pepper and cook for approx. 10 minutes. Add the water (to achieve desired consistency) and lemon juice and cook for a final 5 minutes.

If using fresh coriander, add in the final minute of cooking. Add extra to garnish if desired,

Serve on its own as a light dish or with rice, naan or pitta bread.


For further guidance on making gluten free choices please see this post.
For tips and info on recipe measurement conversions, ingredients, substitutions and the methods behind how I do things.... check out my 'baking tips' tab at the top of the page.

Thursday, 4 October 2012

DAY FOUR: Cheese bake with crispy oat topping


Oats make fabulous, fill-you-up, healthy sweet snacks, but they can also work extremely well in savoury recipes. This is an area in which I need to do some more research and investigation as I am typically more comfortable with ‘sweet’ oat based baking…still so much to learn, all in good  time.

I love the way oats are so hardy and robust, with most recipes simply calling for them to be ‘mixed through’ or ‘mashed in with’. They never cause a scene or disappoint…oats are a dependable friend!

Today I have a savoury recipe. You can use this topping for anything vaguely savoury, though its best serves as a baked topping over a sauce…but  filling and the sauce itself are totally up for grabs. Throw in some spices to compliment, and you’re well away.

If you change up the spices and flavouring you would also have a sweet bread or streusel topping, the key things is to make sure the chickpeas are well mashed and flaky otherwise it’s a dead giveaway as to what the topping contains! The consistency you are looking for is a coarse crumbly flaky one.

It’s Day 4 of MOFO and I feel as though I’m missing out…I’m currently on holiday in Turkey and as I write this post before I leave (Sunday morning scheduled for two days time) I’ve got no real idea how much internet access I’ll get…hopefully all will be fine and I’ll be able to log on and get involved…but it’s always best to be safe, right?


Recipe: Cheese bake with crispy topping

Serves 3

Ingredients

Equivalent 3 cups cooked chopped veg of choice- I used broccoli, cauliflower and peas.

Sauce:
¾ cup soy milk
6tbs nutritional yeast
1 tbs coconut oil
1 ½ tbs cornflour
2 tsp Dijon mustard
¼ tsp garlic powder
½  tsp salt and pepper

Topping:
½ cup mashed chickpeas
½ cup oats
1 tsp dried mixed herbs (I used Italian herb mix)
2 tbs nutritional yeast
2 tbs crushed nuts

Method

Cook the veg until just cooked using steaming or boiling.

Preheat the oven to 180C.

Meanwhile make up the sauce. Melt the coconut oil in a small pan over the hob. Whisk the flour and milk together in a separate bowl ensuring there are no lumps. Add the milk mixture plus all remaining ingredients to the pan and whisk well. Simmer and whisk for approx. 5 mins until thick.

In a medium oven dish place the cooked veg in an even layer and cover with the cheese sauce so that all vegetables are fully coated.

Mix the topping ingredients so that you have a coarse slightly sticky mixture and crumble over the sauce giving an even covering.

Bake at 180C for approx. 20 minutes or until the topping is nicely golden.


What Vegan MOFO means to me.


For further guidance on making gluten free choices please see this post.

For tips and info on recipe measurement conversions, ingredients, substitutions and the methods behind how I do things.... check out my 'baking tips' tab at the top of the page.

Friday, 27 July 2012

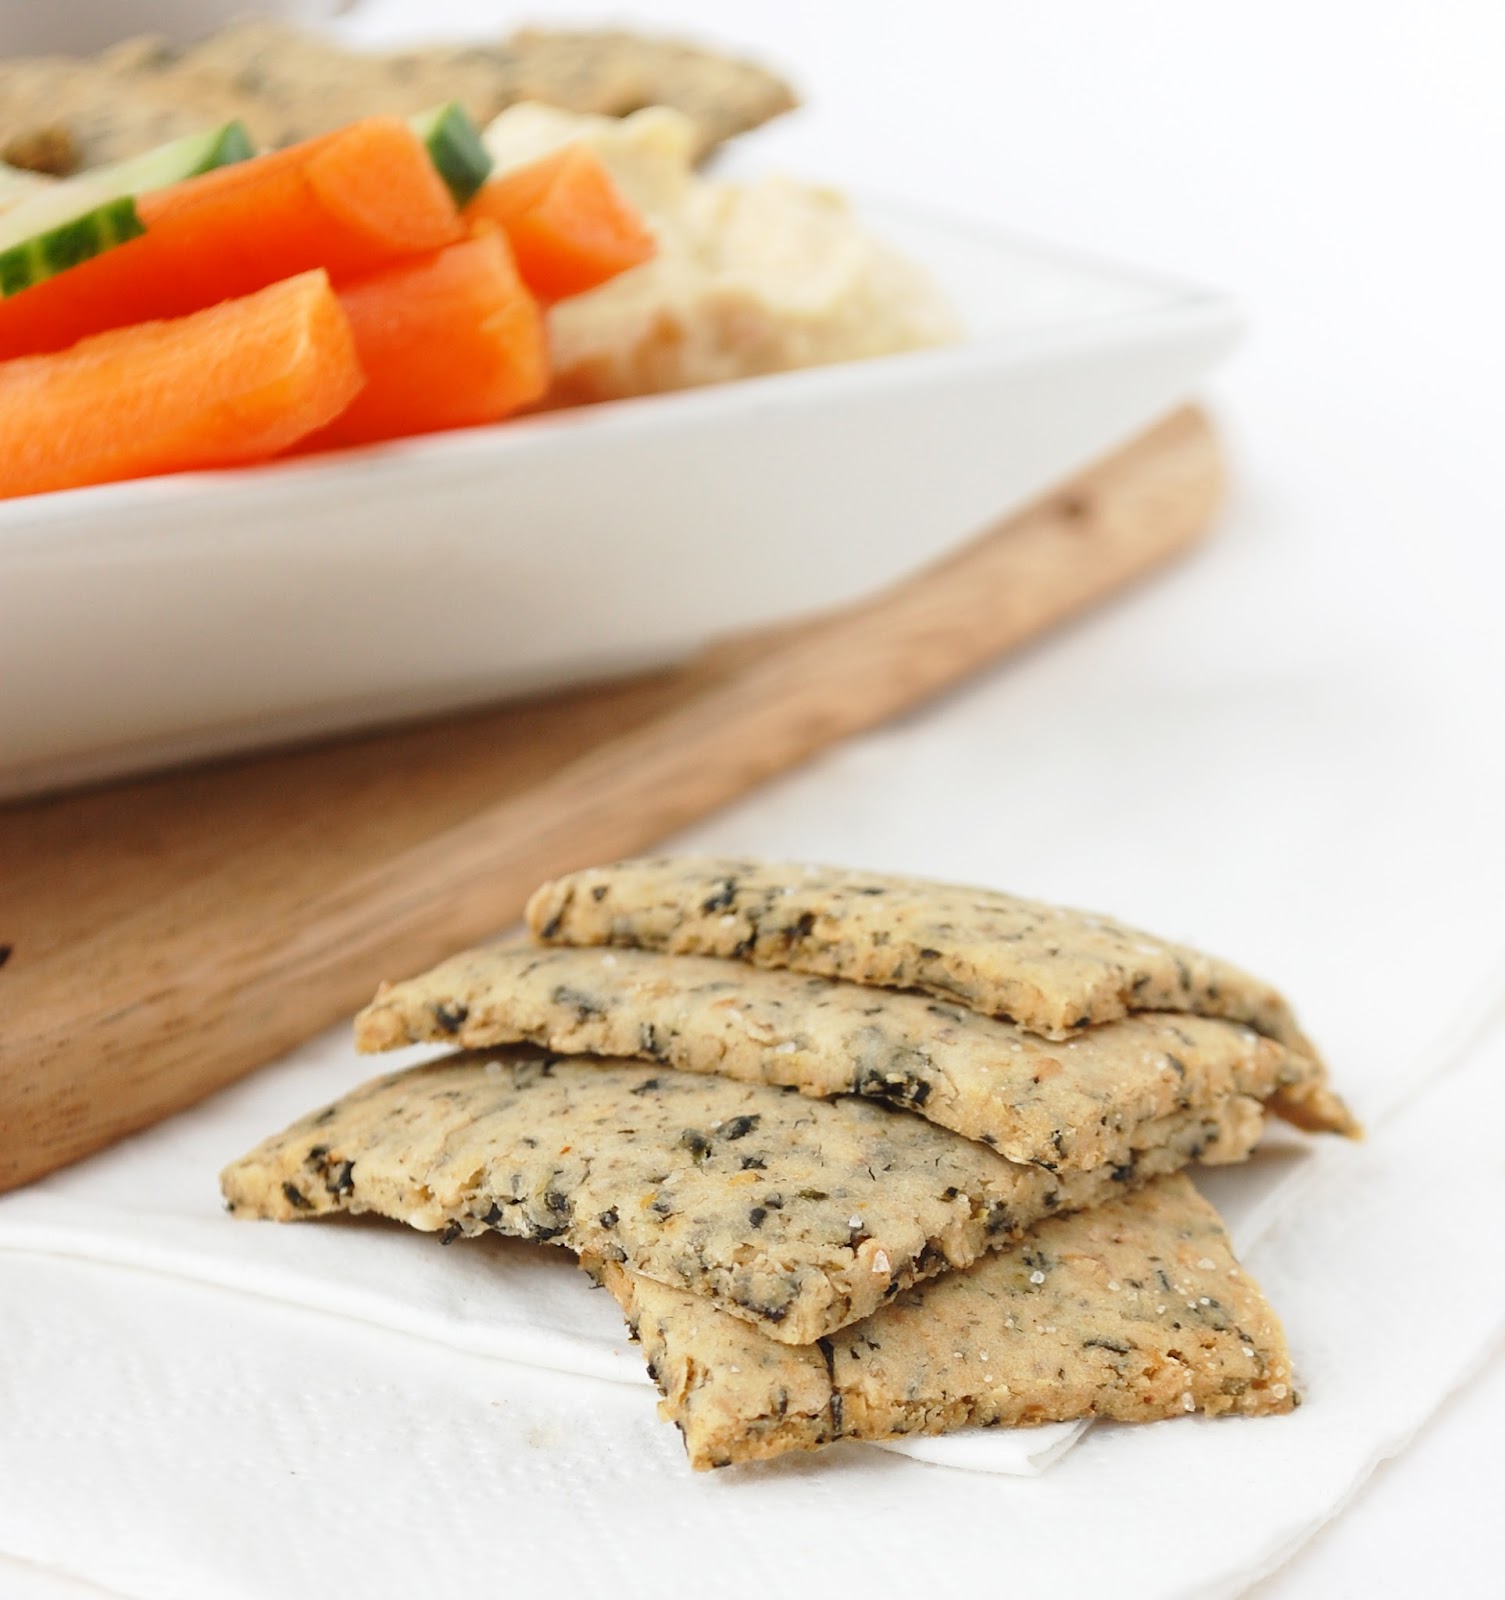
Cracking crackers…two ways


Continuing the savoury kick with this month’s Daring Bakers challenge….

“Our July 2012 Daring Bakers’ Host was Dana McFarland and she challenged us to make homemade crackers! Dana showed us some techniques for making crackers and encouraged us to use our creativity to make each cracker our own by using ingredients we love”.

As I type this post, I site with my laptop rested on my knee pausing every other sentence to watch the very beginning of the opening ceremony of the London Olympics 2012….this post could take some time!  This is Britain at is best, full of its quirks, its love of routines, it classics and it’s food.  If I’d thought ahead I may have gone for my take on a more ‘classic British cracker’ like a water biscuit or a cream cracker but these are very neutral plain crackers and I love to get the taste buds going with the cracker itself not reliant on toppings.

So back to the challenge… I do love snackety foods and dips of all kinds, so what better accompaniment but crackers! Particularly crackers that are full of tasty good-for-you things…..wholesome, gluten free, vegan…what more?!

The challenge required us to make two different types of crackers with two different presentation methods which was interesting in itself. Now since I don’t have any form of pasta/cracker roller machine, I went for a ‘roll thinly and score’ option and the ‘roll into a log and slice into rounds’ option.

I had a lot of fun with flavourings to make sure these were big on taste without using butter and cheese as many of the cracker options seems to entail. You can vary the flavours as you like to achieve you own taste preference, these crackers have such a simple ingredients list you can really go to town with experimentation. The chickpea crackers in particular were a pure shot in the dark, instead of using chickpea flour I opted for chickpeas themselves and to my delicious surprise  they give a lovely chewiness to the cracker that itself has a crisp exterior. The nori crackers are loosely based on these crackers so I was more certain of their success from the outset, although the addition of brown rice was a new twist. The nori crackers were inspired in part by this recipe since I had some leftover sheets of seaweed that caught my eye as I opened the cupboard for inspiration.

These crackers retain their crispness for a couple of days but you may want to crisp them up in the oven beyond that.

Right, that’s me done…now to sit back and watch the amazing creativity and ‘organized chaos’ (words just uttered by the commentator) that all goes on behind the scenes to create a truly memorable opening sequence to the Olympic Games.


Recipe: Nori crackers

Makes approx. 12-16 crackers

Ingredients

½ cup brown rice flour
½ cup cooked brown rice
¼ cup roasted nori seaweed
½ tsp salt
2 tbs sesame seeds
Up to 3tbs water
1 tbs sesame oil

Method

Blend all ingredients together in a food processor, adding the water last a little at a time to reach a slightly sticky dough consistency. The dough should be sticky enough to bind but easy to roll out thinly.

Roll as thinly as possible (approx. 2mm thick), cut into squares and bake in a preheated oven at 180C for approx. 20 minutes until lightly golden.

Allow to cool fully before serving.


Recipe: chickpea sesame crackers

Makes approx. 8 crackers

Ingredients

¾ cup chickpeas
3tbs tapioca starch (or other starch)*
3 tbs gluten free flour (I used buckwheat)*
½ tsp baking powder
¼ tsp salt
¼ cup sesame seeds
1 tbs fresh coriander (or ½ tsp dried)
Pinch chilli flakes (or other spice as optional)
1 tsp sesame oil
1 tsp chia and 2 tbs water

Method

Blend all ingredients together in a food processor to get a fairly smooth and even crumb mixture. Form into a ‘log’ with your hands and cut into rounds with a sharp knife. If it is too soft to cut chill for up to 30 minutes.

Bake in a preheated oven at 180C for approx. 25 minutes until lightly golden.

Allow to cool fully before serving.


* for further guidance on making gluten free choices please see this post.

For tips and info on recipe measurement conversions, ingredients, substitutions and the methods behind how I do things.... check out my 'baking tips' tab at the top of the page.

Saturday, 14 July 2012

Chocolate chunk cookie pie


Another cookie-pie you might be thinking…?  Oh yes, but it’s a full throtle ‘Cookie Pie’ not a breakfast cookie-pie.

This warm and melty chocolately pie tastes like cookie dough….only it’s good for you! Would I ever let you down?


You’ve probably already guessed what’s coming next…beans. Ok it’s another chickpea recipe, but hey what’s not to love when chickpeas can taste this good (i.e like cookie dough pie!)  There are so many recipes of this kind floating  around blog world and so it was only a matter of time before I attempted a healthy, gluten free version of my own. 

This is the second time I have made this dessert and the fist time it was tasty but a little dry. The second time around it was perfect. I attributed this to two factors... 1) don’t skip the dates as they add a caramelly sweetness and moistness, 2) make sure you don’t over cook the pie- it wants to be only just cooked when tested with a skewer.

To take the decadence factor up a notch I teamed this pie served warm from the oven (so so so good served hot) with a dollop of my newly developed super healthy dark chocolate ice cream. You will think I’m crazy when I tell you this ice cream has beans in it too (black beans this time!) but I’m gonna make you wait for that recipe….

A healthy, high protein, warm and comforting dessert…perfect whatever the weather be it summer or winter…you can never go wrong with a slice of cookie pie for dessert. Top tip: don’t skimp on the choc chunks…the oozy melty part is the best bit! (see the difference between the top pic and the one below- no melted chunks below)


Recipe: Chocolate chunk cookie pie

7” round cake pan

Ingredients

1 cup cooked chickpeas
4 tbs vegan yoghurt (or apple sauce)
1 tbs coconut oil- melted
3tbs agave
1 tsp vanilla extract
¼ cup buckwheat flour
¼ cup quinoa flakes (could sub oats*)
Approx. 1/3 cup finely chopped dates
¼ cup chopped nuts (I used hazlenuts)
Tiny pinch salt
1 tsp baking powder
½ tsp baking soda
½ cup dark chocolate chunks (reserving some for the top)
Handful of nuts for top- optional
Sprinkle of coconut sugar or rapadura- optional for a crisp topping

Method

Blend the wet ingredients with the chickpeas in a food processor/blender until smooth. Mix all remaining ingredients (other than choc) together in a medium bowl and then add the blended wet ingredients. Mix together , adding the chocolate chunks last (reserve a handful for topping).  

Spoon the batter into a smallish approx. 7” greased round or square cake pan, smoothing the top with a knife and sprinkling the remaining choc chunks/nuts for decoration. Press the nuts and chocolate lightly into the batter.

Bake in a pre-heated oven at 180C for approx. 15 mins until cooked through and slightly golden. Be careful not to overcook otherwise you’ll have a drier cake…still tasty but much better moist!


* for further guidance on making gluten free choices please see this post.

For tips and info on recipe measurement conversions, ingredients, substitutions and the methods behind how I do things.... check out my 'baking tips' tab at the top of the page.

Friday, 6 July 2012

Gluten free granola

You know how much I love oats and therefore love granola!

buckwheat sprinkles
Well, it occurred to me that it might be nice (insert: ‘different’ 'a challenge’) to come up with a gluten free version that did not rely on oats as the main ingredient. I know it is entirely possible to purchase oats that are fully gluten free  (i.e without the risk of cross contamination) but they are typically expensive, and you know what… I simply wanted to give myself another opportunity to indulge in a little creative granola making!

In true Including Cake style I needed to think outside the a little. So here we have two options…one quite normal and the other a bit quirky! I encourage you to give them both a go, or simple do both together!

chickpea granola
You can see in the pictures that the buckwheat groats which I’d soaked and then left on the side for a while actually started to sprout- that wasn’t intentional and is not necessary. This granola is really crisp and it  makes a great sprinkly topping for desserts.

The second type…Wait for it…contains chickpeas! You saw that coming, right?

This was inspired by the savoury roasted chickpeas, which I’ve been experimenting with a lot more recently. I found this a really lovely granola mix and you really would know you were eating chickpeas once spiced and roasted in that way.

You can change this recipe up an way you wish with alternative spices or  by omitting the cacao powder. The one thing I would say about these GF granolas is that they do not clump together to the same degree as an oat granola would, so great as sprinkles or breakfasts but not so easy to eat as large snacky clumps…well that was my experience but you may find it comes together differently.

Either way… super yummy in my tummy. Enjoy!


Recipe: Gluten free granola

Makes approx. 1 cup

Buckwheat granola: Ingredients

½ cup buckwheat groats (pre-soaked overnight and drained)
¼ cup quinoa flakes
1 tsp cacoa powder
½ tsp cinnamon
1 tsp coconut/rapeseed oil
2 tbs apple puree
2 tbs agave
2 tbs chia seeds

Chickpea  granola: Ingredients

½ cup cooked chickpeas- partially processed or mashed (so there are both large and small pieces)
¼ cup mixed seeds (I used pumpkin, chia and sunflower)
1 tsp cacoa powder
½ tsp cinnamon
1 tsp coconut/rapeseed oil
2  tbs apple puree
2 tbs agave

Method

Mix all ingredients together until well coated. Lay on a greased/lined baking sheet in clumps or a loose even layer.
Bake for approx. 15 minutes or until crispy.


There are more granola recipes here!

For further guidance on making gluten free choices please see this post.

For tips and info on recipe measurement conversions, ingredients, substitutions and the methods behind how I do things.... check out my 'baking tips' tab at the top of the page.

Thursday, 14 June 2012

Roasted chickpea 'croutons'

I had come across numerous recipes for roasted chickpeas but I’d never had a go myself until now.  The principle is so simple…..get your cooked chickpeas (I cook mine from dried in big batches and then freeze them until needed), add seasoning, roast until crisp and golden.


The perfect alternative to popcorn for a night in with a DVD, a handy snack alternative to roasted nuts or even sprinkled over a salad for a crispy bite offering a GF alternative to crispy bread croutons.   You can vary the seasonings as you wish. I went for an Indian theme for my first batch and then through in a few Italian spices and a little tomato paste for a lovely crunchy salad topper. I would really recommend the salad topper as a really quirky alternative to croutons as the texture is great!

The chickpeas will keep for a few days if stored in an airtight container so you’ll have plenty of snack options to hand. I haven’t yet tried freezing these but I imagine that would also work well.

The spice combinations below are just examples of what I went for so feel free to through in whatever you choose!


Recipe: Roasted chickpeas

Makes one bowl

Ingredients Indian:
1 tsp chili powder
1 tsp ground cumin
1 tsp garam masala
¼ tsp garlic powder
½ tsp sea salt
1 tbs ground flax or chia seeds
1 tbs fresh lemon juice
1 tbs red palm oil or olive oil
1 tsp agave nectar (optional)
200g cooked drained chickpeas

Ingredients Italian:
1 tsp chili powder
1 tsp mixed Italian herbs
¼ tsp onion powder
¼ tsp garlic powder
½ tsp sea salt
1 tbs ground flax or chia seeds
1 tbs fresh lemon juice
1 tbs red palm oil or olive oil
1 tbs tomato puree
200g cooked drained chickpeas


Method:

Preheat oven to 200C. In a medium bowl all the ingredients and mix well adding the chickpeas last.
Place the seasoned chickpeas in a single layer on a greased or parchment lined baking shee. Bake for 25-30 minutes, stirring once during cooking, until chickpeas are slightly crispy.


For tips and info on recipe measurement conversions, ingredients, substitutions and the methods behind how I do things.... check out my 'baking tips' tab at the top of the page.

Wednesday, 23 May 2012

Pesto cabbage and chickpea soup

This is a red soup, a very red soup indeed! 

As much as I love this soup and could eat it every day, sometimes I have the urge to change things up a little and so today this is my new soup concoction.

I used a red onion and a red cabbage which gives the deep rich hue, but I imagine this would also work fine with white cabbage. The key ingredient in this soup is pesto. I used my homemade pesto but you could use any vegan pesto (or regular pesto if vegan is not a priority).

This soup is super simple to throw together, and allows for plenty of variation with choice of beans and cabbage type if you don’t have the ones I used to hand. I love using chickpeas in soups as they have a lovely unique bite to them, more so that other beans in my opinion, but that’s just me so feel free to go for your favourite. Or use red kidney beans for a truly red delight!

This makes for a lovely light lunch or a more hearty evening meal served with bread, cous cous or quinoa. You could even try this chilled on a hot summers day!

The sun has finally decided to come out here and I am going to make the most of it! I have a few ‘summer’ recipe ideas up my sleeve for the coming days…and hopefully a few days of reading in the sun will be on the cards for this weekend. Yay!

I hope the sun is out wherever you are too!


Recipe: Pesto cabbage and chickpea soup

Serves 4

Ingredients

2tbs olive oil
1 red onion
1 carrot- grated
1 small courgette- grated
½ head red cabbage- chopped/sliced
¼ cup vegan pesto (I used my homemade version)
1 can chopped tomatoes
4 cups vegetable stock
1 tsp dried oregano or mixed herbs
1 ½ cups cooked chickpeas
Salt and pepper to taste
¼ cup pine nuts (or crushed cashews as I used)
Handful fresh basil

Method

Heat oil in a large pan and gently fry the onions for 2 minutes. Add the pesto, grated carrot, courgette and cabbage and sauté for another 3 minutes.

Add the tomatoes, dried herbs and stock and simmer for around 15 minutes until softening. Add the chickpeas and simmer for another 10 minutes.

Mix through the basil and nuts just before serving. Serve with a swirl or soy yoghurt or cream if desired.


For tips and info on recipe measurement conversions, ingredients, substitutions and the methods behind how I do things.... check out my 'baking tips' tab at the top of the page.

Saturday, 19 May 2012

Carrot burgers

These carrot burgers came about as a moment of spontaneity on my birthday evening last week. I shared these burgers for dinner with my mum, who proclaimed (after having eaten it all up) ‘oh I should have really cooked for you since it’s your birthday’, oh well….bit late now! Not that I minded, I think about food all day long and am always excited to try out something new when the idea strikes, this particular moment in time was no exception…birthday or not!

I’d had a pretty full on day…well, with the birthday cake under my belt (er, quite literally) I was in the mood for more of a light bite in the evening, so I served these burgers with salad and a simple tahini sauce. The perfect balmy summer dinner (balmy summer…I wish!) You could serve with a side of couscous for a more substantial meal.

The other great thing about these burgers is that they are pretty quick and simple to throw together and I’m pretty sure they could be frozen, although I haven’t tried. Add in your own favourite blend of spices, I used a cajun mix for a warm Mexican kick. I have also used red palm oil (as I like the deep yellow colour it gave to coat the burgers, but other oils would be absolutely fine. I like to add beans to things…most things, sweet or savoury! Beans or chickpeas give great texture, act as a binding ingredient and provide a good source of protein, so are a great base for many burgers.

If you have a thing for burgers, these recipes might also take your fancy:


Recipe: Carrot burgers

Makes approx. 6 burgers (depending on size)

Ingredients- burgers

300g carrots
200g chickpeas
1 small onion
1 tbs tahini
1 tbs ‘spices’ (I used a Cajun mix)
Extra salt to taste
50g oatmeal
1 tbs chia or flax plus 2 tbs hot water
1 tbs red palm oil (or other oil) for frying

Ingredients- tahini sauce

50g yoghurt of choice (or cashew yoghurt as I used)
2 tsp tahini
2 tbs lemon juice

Method

Coarsely chop the carrot and onion in a food processor and then add the chickpeas, tahini and spices and roughly mash through. Transfer the mixture to a sauce pan and cook for approx. 10 minutes stirring frequently to prevent sticking.

Once cooked, stir through the oatmeal and gelled chia/flax mixture. The mixture should be sticky but firm, if too sticky add a little more oatmeal. With wet hands form flat burger patties and fry them in a lightly oiled pan for a few minutes on each side until golden.

For the tahini sauce, mix all ingredients together well in a small bowl.

Drizzle burgers with tahini sauce and serve immediately.


For tips and info on recipe measurement conversions, ingredients, substitutions and the methods behind how I do things.... check out my 'baking tips' tab at the top of the page.

Thursday, 1 March 2012

Quinoa and chickpea burgers

I have a few basic principles that I try to keep in mind when I cook:

...Healthy without compromising on taste
...Indulgent without compromising health
...Simple meals that come together quickly
...Snacks and meals that can be made in bulk and frozen
...Recipes that are really versatile

So, with that in mind these Quinoa and Chickpea Burgers get their marks on the tick list. They provide a high protein hit, perfect for a vegan diet, are really simple to throw together, are suitable for freezing and could be dressed up in a variety of ways. Perfect for super speedy lunches or suppers, when I get in late from the gym.

I now make the process even simpler for myself as I cook and freeze batches of chickpeas and quinoa in bulk so I have always have them to hand, it’s also a much cheaper way than buying canned chickpeas or packets of pre-cooked quinoa (which I used to do for speed!)  I prepare a lot of my regularly used ingredients in bulk…I will elaborate on this is a separate post another time.

I sourced the original recipe here and actually made very few changes, other than adding a little leek and a few tweaks to spices.

These burgers held together really well and had a really lovely ‘substantial’ texture due to the quinoa grains. I served them with a simple tomato and basil salsa on a bed of stir fried courgette ribbons and spinach. They’d be equally at home in a bun, or made into small ‘meatballs’ with some spicier flavours….just made a mental note to try this!  I also had a leftover burger which I had cold the next day on its own as a snack, I think that may have been even better than the freshly cooked hot version!

These versatility of these quinoa burgers follow in the same vein as these sweet potato cakes and also these meat balls.


Recipe: Quinoa and chickpea burgers

Makes 4 medium patties (you could easily double this recipe)

Ingredients

1 ½ cup cooked quinoa
½ cup cooked mashed chickpeas
1 small onion or half a leek- finely chopped
1 rounded tbs ground chia or flax seed
1 tbs soy sauce
1 tbs fresh basil- chopped (or 1tsp dried)
1 tsp paprika
½ tsp ground cumin
½ tsp ground coriander
½ tsp garlic powder
4 tbs potato starch/tapioca flour (other starches should also work)
1 tbs mild oil for frying

Method

Dry fry the dried spices for approx. 2 minutes until the aromas are released.

Mix all the ingredients together in a large bowl.

Chill the mixture for approx. 30-60mins to allow to firm up and marinade

Uisng your hands, form patties approx. 1.5-2cm thick and fry for approx. 5 minutes on each side. To omit most of the oil, you could coat the outside in a very light covering of oil and bake them for approx. 15 minutes until golden (note: I haven’t yet tested this method)


For tips and info on recipe measurement conversions, ingredients, substitutions and the methods behind how I do things.... check out my 'baking tips' tab at the top of the page.

Thursday, 16 February 2012

Noodle comfort

Sometimes the simplest meals are the nicest purely for that reason. A quick, healthy, hot and comforting snack…made all the better with a quick 5 minute turnaround so no slaving over a hot stove. You can sink down into the sofa and relax after a long day when you most need it.

This was actually an accidental dinner that came about as I was prepping a batch of dried chickpeas (I’d soaked them overnight and was just finishing cooking them ready for freezing in small batches) when I realised the time was getting on and I needed to eat…and fast…before I had to head out of the door. I threw some ingredients together and this is what came out!

One of my favourite meals (yet to be featured on the blog) is a peanutty stir fry affair, and this is an even easier speedier version of that principle. Veggies, beans, PB and rice noodles all come together in a nice bowl of winter comfort…well not just winter, any time of the year will do!

To speed everything up I used rice noodles that take just 3-4 minutes to cook, along with some grated carrot, courgette and spinach- which literally took a couple of minutes to heat through, and I also threw in a handful of the chickpeas I’d just finished cooking but you could use any canned beans. Some nice drippy PB and a tad of soy milk if necessary to mix through and you are away. You could also sprinkle some chilli flakes or thai spice seasoning if you fancy…jazz it up any way you like.


Recipe: speedy veggie noodles

Serves 1 (easily multiplied)

Ingredients

1 portion of dried rice noodles
1 smallish carrot
½ medium courgette
Large handful of any beans
Large handful of spinach
1 tbs peanut butter
1-2 tbs soy milk (or any non-dairy milk or water) as necessary
Spicy seasoning to serve if desired

Method

Bring a smallish pan of water to the boil and cook rice noodles for 3-4 minutes (or according to packet instructions). Meanwhile grate carrot and courgette get the beans and spinach ready. Drain the noodles and place back in the pan on low heat, mix through the peanut butter and ‘milk’ if necessary. Once the 'sauce' is warm and drippy add all the veg and mix through for two minutes until just cooked through/wilted.

Serve in a bowl with some extra seasoning sprinkled over as necessary. If your PB has no added salt you may wish to add some soy sauce or a slightly salty seasoning to give a flavour boost.


For tips and info on recipe measurement conversions, ingredients, substitutions and the methods behind how I do things.... check out my 'baking tips' tab at the top of the page.

you may also like

Related Posts Plugin for WordPress, Blogger...