Showing posts with label chia. Show all posts

Friday, 5 July 2013

Fruity Chia lollies

Do you remember this chia pudding?

Do you remember I was curious as to whether it could be turned into chia fruit lollies... Well I just couldn't resist giving it a go, so here we are! They are pretty good!


The recipe is pretty much identical to the pudding but to add a slight twist and colour pop I added some crushed raspberries to the mix to give a pretty colour contrast  :-)  I always use frozen fruits for things like this purely on a practical level as there is so much less colour bleed and crushing the 
raspberries is so easy when solid, however I do appreciate that frozen fruit has less chance of being seasonal and organic- unless of course you buy fresh and freeze them yourself- that would be best!

I doubled up the original recipe to make approx. 6 lollies. I tried to find some 
silicone lolly moulds but to no avail so my mould consisted of a hard plastic shell that needs running under hot water to loosen the lolly to eat. Not the easiest way to go about things and the tops did begin to go a little melty in places for the photoshoot...but no major drama!

I served up my lollies with some of my watermelon cooler....no way I was going to be dehydrating anytime soon ;-)


Recipe:  Fruity Chia lollies

Makes 6 lollies


Ingredients:


3 tbs white chia seeds (dark will work fine too but won’t look so pretty!)
2 bananas- mashed well
1 tbs maca powder (optional)
1 cup fresh pineapple
1/2 cup broken rasberry pieces- frozen works best
1/2 cup coconut water (or substitute regular filtered water)


Method:


Blend all ingredients together until smooth, stirring through the raspberry pieces last.

Spoon the mixture into lolly moulds and freeze.


For further guidance on making gluten free choices please see this post.

For tips and info on recipe measurement conversions, ingredients, substitutions and the methods behind how I do things.... check out my 'baking tips' tab at the top of the page.

Tuesday, 11 June 2013

Hot chocolate 'power' pudding.... power for body and mind!

Ok, so I reeled you in with the title of this post...chocolate! That'll make anyone glance twice ;-)


Don't worry I will give you a chocolate fix, but first a little post-training debrief and review of the foodie variety!

As many of you now (I promise this is the last time I talk about it to any degree!) I completed Tough Mudder last weekend and so therefore in the month or so leading up the event my meals and snacks had been more carefully thought out than usual, with higher protein and hydrating foods featuring more heavily, also higher on the complex carbs in the few days prior. I have a backlog of recipes to share so the posts over the coming weeks will showcase some of these- great for the active and non-active people alike since good hydration is great for summer recipes and my protein focussed meals and snacks were based around whole foods and not protein supplements, equally important for everybody following a predominantly plant based lifestyle. Saying that, I do have some protein cookie coming tomorrow that utilise protein powders- but that's all :-)

To keep it brief and not bore or overwhelm you, here is a little overview summary of my food profile for last week in the final run up to the event. Obviously this was a balance of food that worked well for me but every body is different, for example I know I don't react well to high quantities of dried fruits and nuts (bloat inducing) so beans and quinoa took centre stage. Many of the recipes quoted below (and shown in the montage) will feature over the next few days.


Typical Daily Food Dairy (approximated for the entire week)

Food:
• Green Smoothie upon waking- between 6-9am
Quinoa oatmeal power bowl (similar to below but typically without choc)- between 9am-11am
• Protein cookies (tomorrow's post) after workouts, or choc protein mousse plus banana- whatever time during the day
• Quinoa salad/veg bowl, or lentil chilli soup with quinoaTypically I made a large batch and had some for lunch/snack and then the rest for dinner. Depending on if/when I was working out that day depended on whether I had the larger portion for lunch or for dinner. 
 Tropical chia pudding prior to workouts of as dessert/snack. I made a enough to last me a couple of days and grabbed a spoonful whenever I fancied it. (I also ate this approx. 1 hour prior to the event happening- totally fuelled me up- quickly digested carbs and mega hydrating!)

Drinks:
I made up a litre of the watermelon coconut cooler which lasted me a couple of days at a time.  I also drank a lot of green tea (tropical green tea as I can't get my taste buds around the plain stuff) I drank 2-3 mugs a day, this was instead of the usual mint tea I drink. I also drank at least another 2 ltrs plain filtered water. In total a minimum of 3 ltrs fluids. I don't drink coffee or regular tea anyway so that didn't come into the equation for me.


I found the balance worked really well to hydrate and sustain me without bloating me out as a lot of seeds/nuts tend to.

So, now i'd like to hear from you- what are your favourite 'fit foods', and ways you find best hydrate and sustain you?

Oh yes, I promised you a recipe!  

Here you go...as ever a super versatile, breakfast, brunch, snack...whatever (omit the choc and add other flavours if you feel choc is a bit much for an everyday breakfast ;-)  This totally set me up for the day. Fitness, motivation, endurance and focus is as much built in the mind as it is in the body... I promise this 'power' bowl will kick both into touch!


Recipe: Hot choc power pudding:
Serves 2 
Ingredients:
2 cups cooked quinoa (I have precooked portions in the freezer at all times for speed)
2 cups non-dairy milk of choice
2 tbs peanut butter (or other- hazlenut butter is fab!!)
4 tbs chia seeds
a few drops vanilla stevia to taste (or maple syrup)
2 tsp maca powder
2 tbs raw cacao or carob (note carob is slightly sweeter)
2 tsp cinnamon
Toppings of choice (I used a handful of goji berries and mixed red/black currants plus extra chia)

Note: you could sub some of the quinoa with part oats.

Method:
Prepare the quinoa if uncooked.
Add the quinoa, milk, nut butter, chia and sweetener to a pan and simmer on the stove for a few minutes until well mixed and warmed through. Turn off the heat and add the remaining ingredients, stir to mix well.
Spoon into bowls and add the toppings of choice. Eat immediately or chill half for eating later!


For further guidance on making gluten free choices please see this post.


For tips and info on recipe measurement conversions, ingredients, substitutions and the methods behind how I do things.... check out my 'baking tips' tab at the top of the page.

Saturday, 1 June 2013

Tropical chia summer pudding

More coconut and pineapple!


This recipe is a keeper for hot summer afternoons!  I’m planning on making this a few more times in the final lead up to my Tough Mudder event as it was so hydrating and refreshing and I’m in full on hydration mode... irrespective of the fact that the weather in England is still dull and cold most days!

This keeps well in the fridge for 2-3 days so make a double batch if you’ve got a hot spell on... and  grab a big spoonful whenever you pass the fridge!

I’m also now wondering whether this mixture could be frozen into ice lollies...that thought literally just popped into my head so I have not yet had a chance try it out....sounds like it could work?

I added a tsp of maca powder as I often try to add it into my ‘fitfood’ recipes for an extra boost and to assist adrenal recovery, but that is totally optional and won’t affect the taste or texture.


Recipe: Tropical chia summer pudding

Serves 1

Ingredients:

1 heaped tbs white chia seeds (dark will work fine too but won’t look so pretty!)
1 banana- mashed well
1 tsp maca powder (optional)
½ cup fresh pineapple
¼ cup coconut water (or substitute regular filtered water)
Coconut sprinkles and mint to decorate (optional)

Method:

Blend all ingredients together until smooth. Or if you prefer a chunkier consists you could whip everything together lightly with a fork. (I whipped mine until almost smooth)

Allow to chill and thicken in the fridge for at least an hour before consuming.


For further guidance on making gluten free choices please see this post.

For tips and info on recipe measurement conversions, ingredients, substitutions and the methods behind how I do things.... check out my 'baking tips' tab at the top of the page.

Saturday, 25 May 2013

Summer fruit slaw with chia berry dressing


My julienne peeler has been getting a bit of action again! But this time it’s not only with the veggies.


After the success of this simple cucumber and pineapple salsa, I was keen to experiment more with mixing the refreshing subtle taste of cucumber with other fruits.

Here I used any fruits I could get my hands on to julienne. For your reference...no, you cannot julienne a banana. Believe me I tried. It would have been the perfect shape so I am very disappointed! (I even tried with a frozen banana as I was that determined but nope it just wasn’t happening!)

The first time I made this slaw I had a large mango in my fruit bowl and that worked a treat, the second time I didn’t have a mango, hence why the photos below are mango-less but I have still added it to the recipe. I also used rhubarb which gave a great tart flavour contrast, though raw rhubarb is a little tough and stringy so you may want to cook it ever so slightly after julienning it- I left it raw, but it’s just an idea for you to try.

Throw in lots of cucumber, you won’t taste it against the sweetness of the fruits and I also added a simple fruity yoghurt and chia dressing to give an extra touch of sweetness.

Breakfast? Dessert? You choose.


Recipe: Summer fruit slaw

Serves 1

Ingredients:

½ cup cucumber noodles
¼ cup rhubarb noodles (cook lightly if desired)
¼ cup mango noodles
----
1tbs sugar free berry jam
2 tbs non-dairy yoghurt
1 tsp chia seed
Extra fruit/berries to decorate as desired.

Method:

Mix the yoghurt with the sugar free jam and chia seeds and set aside to thicken slightly. 

Prepare the fruit and cucumber noodles and place in a swirl in a serving plate/bowl leaving a well in the centre. Spoon the jam mix into the centre of the slaw.

Decorate with berries  to serve as desired. You could also add a sprinkle of cinnamon, vanilla bean powder, cocoa, coconut, nuts.....


For further guidance on making gluten free choices please see this post.

For tips and info on recipe measurement conversions, ingredients, substitutions and the methods behind how I do things.... check out my 'baking tips' tab at the top of the page.

Saturday, 16 March 2013

'Green Smoothie' peppermint cheesecake

I wasn't planning to post a recipe today (well actually I was since yesterdays post was supposed to be today but my fingers got clumsy and hit 'publish' and not 'schedule'...oops!)

But that's ok cos I accidentally came up with a little gem of a recipe that relates to yesterday's recipe and is oh so green I had to share it in the final run up to St Patricks Day!

P.S...I apologies now for the overuse of the word 'exciting' and the number of !!!! and ... you'll see in this post.


This receipt is indulgent whist being ridiculously healthy... I mean totally ridiculously healthy- so much healthier than you'd imagine when tasting a bite! Even my mum was wide eyed at how good it was and she won't go near my green smoothies! :-)

Just quickly scroll down now and take a look at the ingredients list!

I have been playing around with coconut flour and yoghurt combos a lot these last few days....such a revelation of simplicity and so versatile. I was almost dancing around the kitchen when I took this cheesecake out of the freezer, allowed it to thaw out and dove in...the texture is amazing- so soft and creamy!!

I am so excited to have created a vegan cheesecake that doesn't rely on tofu or cashews! Whoop whoop!

I have a few more experiments along these lines to bring your way soon, all equally exciting (in my opinion) but this will have to keep you going for now. Just promise me this....next time you make a green smoothie, reserve a little bit to make this!! I made a mini cheesecake as I wasn't sure if it was going to be a success or disaster, but you could easily make 3 or 4 times the amount and make a regular sized cheesecake. It really is good enough for dessert I promise (although it might freak out your dinner guests!) You can also cheat and use extra sweetener if you need to.

Right...gotta go, so much to do and so little time. All the taste testing I've been talking about that has largely sabotaged my '6 pack challenge' these last few weeks is soon to be coming to an exciting conclusion! Phew- there really is only so many dried fruits and nuts a girl can consume, so it's a good thing I had this little beauty and a big glass of the Super Green smoothie to hand for my post-work out lunch today!


Recipe: 'Green Smoothie' peppermint cheesecake

Serves 2 (or one hungry person!)

Ingredients:

3 tbs leftover green smoothie (I used this recipe)
1 tbs fine coconut flour
3 tbs vegan yoghurt (I used soy) Note: for non vegans this does also work with regular plain yoghurt
1 tbs white chia seeds (plus more for topping if desired)
1/2 tsp peppermint extract
4 drops pure stevia (or to taste)

Cheesecake base: I used some leftover 'smoosh bar' style mix from one of my testing samples. Basically its a mixture of dates, almonds and raw cacao nibs. You can use any raw crust mixture.

Method:

Mix everything together very well to form a smooth thick paste with no lumps of flour.

Press the cheese cake base into the bottom of a large silicone muffin case or a mini pie dish with removal base/sides (approx 8cm wide). Note: it may be hard to remove the cheesecake otherwise.

Spoon the cheesecake mix on top of the crust and firmly smooth the top with the back of a wet spoon. add chia seeds (or other decoration) is desired- or you can add these at the time of serving.

Freeze the cheese cake for a minimum of one hour. To serve remove from the case whilst still solid (it should peel away easily). Allow to defrost on a serving plate at room temperature for at least 30 mins.


For further guidance on making gluten free choices please see this post.

For tips and info on recipe measurement conversions, ingredients, substitutions and the methods behind how I do things.... check out my 'baking tips' tab at the top of the page.

Friday, 4 January 2013

Chia tomato spaghetti sauce


I really wanted this post to feature spaghetti squash! 

I had a spaghetti squash delivered in my veg box and have been a little scared to use it since my first attempt a few months back was less than desirable (i.e a pile of mush)....so with trepidation I had another attempt....ahhhh the same result! When I scrape the cooked squash halves wth a fork just as I saw in many tutorial videos I came across my squash simply did not turn into elegant spaghetti style strands, but instead...more mush.

What am I doing wrong? I can only assume I am overcooking it, or maybe I need to let it cool a little before spaghettifying it?  Any advice appreciated...!

Anyway, I had to resort to a backup spaghetti plan. Sasify noodles! 


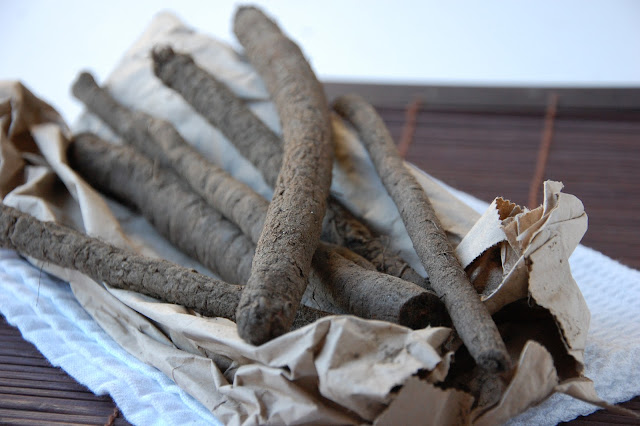
salsify (complete with earthy covered skins)
Salsify is another veg I have not used before, also delivered in the veg box. I figured I could julienne the stems (is that the right word for them?!) in a similar way to my noodle stir fry. It worked pretty well so I'm pleased. My salsify stems were quite skinny and getting a bit old and bendy so they were  harder to work with than if they were thicker. You could of course use courgettes or parsnips instead....or even spaghetti squash if you can master it!  Or if you want to go all out, just use regular spaghetti! :-)

The sauce is the star of today's post. I wanted a traditional style Italian tomato sauce flavour but with a thicker consistency since the sauce clings less to vegetable noodles compared to pasta noodles. Enter the chia seeds... achieving a thicker sauce but without altering the flavour
 (with a bonus 'superfood'  infusion). You could of course add other veggies to this sauce and use it top anything you like.  I also added my 'meat' balls to add some carbs to an otherwise low carb meal. 


Recipe: Chia tomato spaghetti sauce


Ingredients:


2 tsp oilve oil

400g (large tin) chopped tomatoes
2 tbs tomato puree
1 tsp mixed dried Italian herbs
2 garlic cloves- crushed
1 small white onion- chopped
handful of fresh herbs- chopped (I used basil but parsley would also work)
2 tsp ground chia seeds (ground ensures a smoother texture)

Method:


Fry the onion and garlic in the oil for approx. 5 minutes until softening. 


Add all ongredients other than chia and frash herbs. Simmer for 10 minutes stirring occasionally. Add the chia and fresh herbs suring the final 2 minutes of cooking.


Serve immediately over the 'spaghetti' of whatever type you choose.


Notes: I stir fried my 'noodles' of salsify in a little coconut oil for approx. 5-7 minutes until they had just softened. My veggie noodle recipe is here and my meat balls recipe is here or for a quinoa version try these. 


For further guidance on making gluten free choices please see this post.

For tips and info on recipe measurement conversions, ingredients, substitutions and the methods behind how I do things.... check out my 'baking tips' tab at the top of the page.

Tuesday, 11 September 2012

Power ice cream!

This is quite simply my new favourite snack…just a pity I discovered it during the last few weeks of summer since it is a snack of the ice cream and soft serve variety! Oh well, I will still eat it in winter too, maybe simply as a chilled desert as it really is that versatile. This is very similar in principle to the 'chia puddings' seen all over blog land, but for some reason I just couldn't make the texture of those chia puddings work for me...however change things up and add some yoghurt and I love it, crazy how such a small change can make such a big difference!

banana and raspberry soft serve bowls

I’ll stop going on in a moment and cut to the chase, but this really one of the best breakfast, dessert and post work-out power snack concoctions that I have chanced upon in a while.

The chia seeds are the key ingredient in this recipe with the added bonus of their amazing hydrating qualities (perfect for summer or post workout).  This recipes simply calls for chilling the mixture until it begins to freeze for a soft-serve or just freeze for longer for an ice cream. Note that without the addition of refined sugars and dairy fats the ice-cream will freeze harder than regular ice creams but I have found that a 30 minute thaw in the fridge prior to serving thaws the ice cream just enough for serving up, it can then simply go back in the freezer if need be.

The chilled chia soft serve is best made in quantities to eat on the same day (unless you want to fully freeze into an ice cream). You could alternatively make a larger batch and keep in the fridge for more of a chia pudding without the’just frozen’ texture.


This is another simple recipe base where you can easily play around with topping until your hearts content. I particularly like the banana soft serve with a sprinkle of cacoa nibs- as pictured in my ice cream balls, or how about topping with, granola or a crumbled smoosh bar or simply go chia crazy and add a dollop of chia jam!

banana soft serve with a dash of cinnamon (couldn't resist!)

Recipe: Chia soft serve dessert and ice cream

Serves 1

Ingredients

½ cup yoghurt of choice (I used soy)
2 tbs chia seeds (plus extra to sprinkle serving if desired)
¼ cup fruit puree (i.e apple, strawberry, raspberry or banana puree) note: banana is my favourite and makes the dessert super creamy.
Spices to complement the fruit.e.g a large pinch each of cinnamon and nutmeg
Extra fruit, chocolate, granola etc for optional topping

Note: I used white chia seeds for a light coloured mixture but dark would be fine too.

Method

Mash/blend all ingredients together to achieve a smooth consistency.

Chilled pudding: Store in fridge of min. 30 mins. before serving to thicken up.
Soft-serve: Store in the freezer for a 2-3 hours to create a soft-serve dessert.
Ice cream: Freeze for longer to make an ice cream.

chia banana ice cream with coconut flakes and cacoa nibs to serve


For tips and info on recipe measurement conversions, ingredients, substitutions and the methods behind how I do things.... check out my 'baking tips' tab at the top of the page.

Saturday, 11 August 2012

Strawberry cream pancakes


I told you my cashew custard would be making another appearance!


Here it is used as the dressing but also as part of the pancake mix (this can be substituted for regular cashew butter if you are not planning on making cashew custard). The pancakes are perfect for a summer brunch or dessert and you can dress them up however you fancy… I warn you now, they are pretty filling!

When cooking pancakes, I find that it helps to keep them fairly small, no larger than fist sized rounds as otherwise it can be tricky to flip them…or maybe I just haven’t got the knack!

I have also topped my with chia jam, such a simple recipe of mashed berries and ground chic seeds. The sweetness of the berries really shines, but you could add some extra sweetener to the mix if you prefer.


Recipe: Strawberry  cream pancakes

Makes approx. 6 medium thick pancakes. (serves 2-3 for brunch or dessert)

Ingredients

½ cup mix of white spelt flour (or GF mix-* I used buckwheat and tapioca)
3 tbs rolled oats (GF if necessary)
1 tsp baking powder
Pinch of salt
1 tsp vanilla extract
1 tbs agave
1/3 cup soy milk
1 tbs softened cashew butter (or 2 tbs cashew custard)
1/3 cup chopped strawberries (add last)

Method
Mix the wet ingredients together in a small bowl. Combine the dry ingredients in a separate bowl then add the wet and mix. Add chopped strawberries last and lightly mix through. Spoon  dollops on a lightly oiled hot frying pan and fry till golden for a couple of minutes each side.
Serve with cashew custard, yoghurt or fruit.
You'll find more pancake recipes here.


* for further guidance on making gluten free choices please see this post.

For tips and info on recipe measurement conversions, ingredients, substitutions and the methods behind how I do things.... check out my 'baking tips' tab at the top of the page.

Saturday, 5 May 2012

Breakfast crumble crisp

 So many ideas…!

That often happens, I have one idea of something to I want to bake, which then gives rise to another version which then inspires another recipe idea, and then I have a brainwave to make an old recipe even better by using the new ideas…etc etc, you get the picture. Not that I’m complaining though, I simply wish I had even more time (and even more money to buy all these ingredients).

Yesterday I had one majorly successful recipe…a burger trial (with one more variation left to try to make sure it’s the best it can be) until I will unveil all to the world. However that was followed by one major disaster recipe….it was my basic nutty granola to stock up my snack supplies but I burnt it big time and it was not salvageable. Sad times.

Anyway, now onto breakfast; this one is so good, so simple and more like dessert than breakfast but just as good for you as my usual bowl of fruity oats. Make a big dish full and have it as breakfast and then dessert in the evening! Perfect.

Meet the fruity breakfast crumble crisp.

A deep layer of juicy chunks of seasonal fruits topped with a thick layer of nutty, oaty crumble crisp. With most of the sweetness coming from the fruit itself and apple sauce in the topping, with just a smidgen of agave syrup, this is one virtuous crumble. I also added white chia seeds to the fruit mix to bulk up the sauce and also give an extra nutritional kick, but these are entirely optional.

Use whichever fruits you like- here I used apple, raspberry and blueberry, but you could use pear instead of the apple, plums instead of the berries or maybe even mango for a tropical trip...combine that with some coconut flakes in the topping!!

P.s it seems that my ‘mugcake’ poacher idea is finding a few fans! Thanks guys.


Recipe: Breakfast crumble crisp

Serves 3

Ingredients

Filling:
2 apples or pears cut into chunks (skin on)
½ cup blueberries or raspberries
Squeeze of half a lemon
1 tbs whole or ground chia seeds
½ tsp cinnamon
Pinch salt
1-2 tsp agave syrup (optional to taste)

Topping:
3 tbs apple puree
1 tbs coconut oil- melted
2 tbs agave syrup
1 cup oats
½ cup puffed brown rice (or other cereal)
1/3 cup nuts and seeds mix
½ - 1tsp cinnamon

Method

Mix all filling ingredients together in a medium bowl and spoon into the bottom of a smallish oven proof dish.

For the topping, in a separate bowl mix the wet ingredients together first and then add in the dry  topping ingredients. Mix until well coated then press down firmly and evenly over the fruit layer.

Bake at 180C for approx. 20 mins until topping is golden.

Serve with soy cream or yoghurt if desired.


For tips and info on recipe measurement conversions, ingredients, substitutions and the methods behind how I do things.... check out my 'baking tips' tab at the top of the page.

you may also like

Related Posts Plugin for WordPress, Blogger...