Showing posts with label crackers. Show all posts

Wednesday, 16 January 2013

Citrus spiced polenta crackers

Following on from my roasted red pepper soup are these spiced polenta crackers, the perfect compliment. Slightly crisp around the edges and perfect to scoop up some thick creamy soup.


This recipe was another simple last minute answer to the question, 'what can I have with my soup?'  I'm not gluten intolerant myself but do like to limit wheat and so I fancied something of the non-bread variety. These crackers were a great solution since they take just 5 minutes to prepare and then a little baking time whilst you go off and make the rest of the lunch or dinner.... or putting the washing on, or unloading the dishwasher, or if you are me a few minutes to grab your photography gear and prep the table ready...that kind of thing!

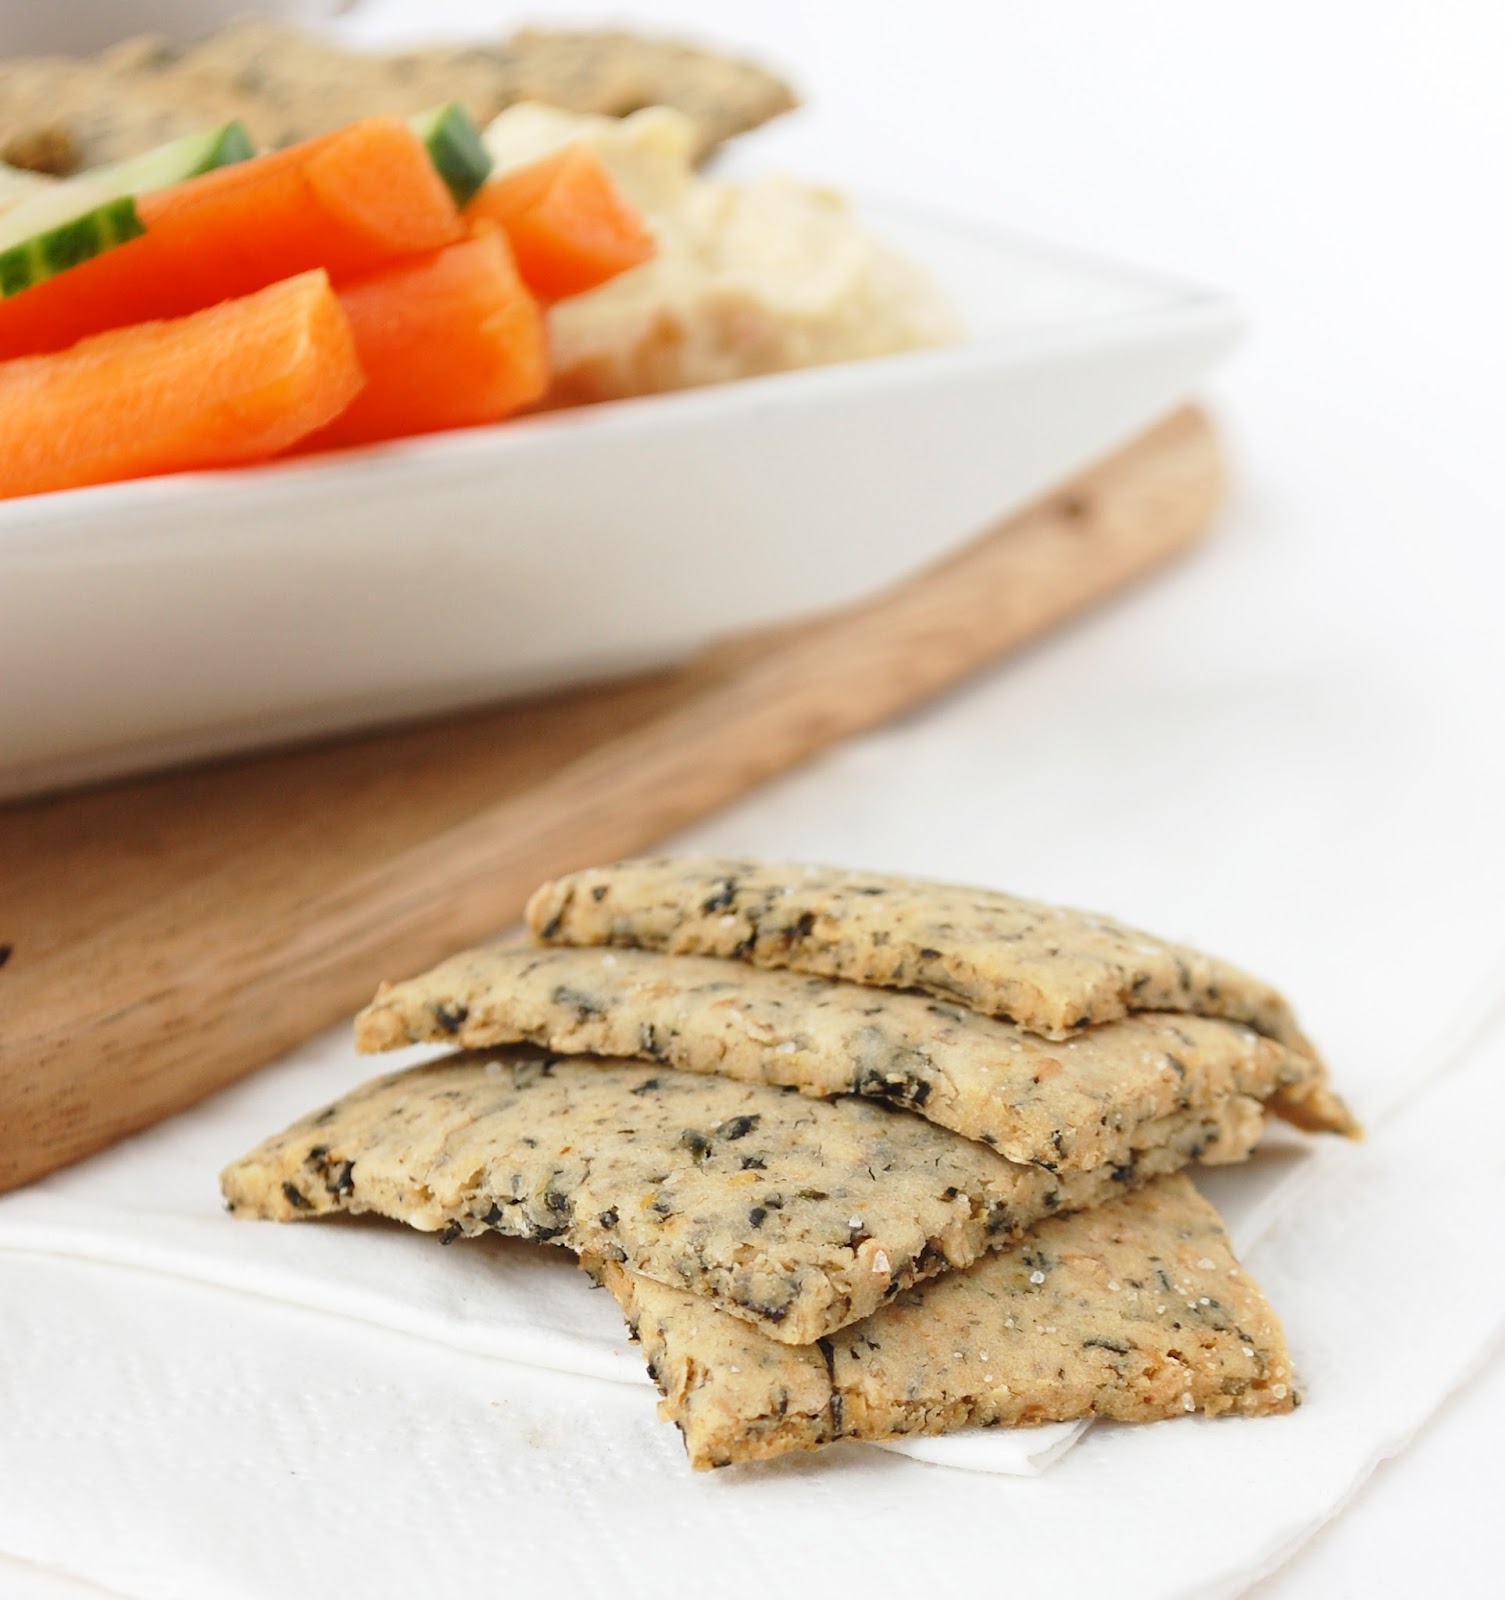
You can add any spices or mix-ins you like really, the only required elements are the polenta and the liquid ratios, so everything else is open to interpretation. To prep the crackers ready for the oven I spread the polenta mixture onto a lined baking sheet (do this quickly whilst its still very hot as it will spread more easily) and then in a moment of genius I grabbed a wooden roller and lightly rolled the surface of the crackers to get a uniform thickness, this worked really well  and wasn't at all messy as I was expecting. You'll want to roll the crackers to about 1-2mm thick for a cracker that bakes quickly and crisply.  Then slice into squares with a pizza cutter....and you are good to go!

Another great 'dippable' recipe coming up soon!


Recipe: Spiced polenta crackers

Ingredients:

1/4 cup quick cook polenta
1/2 cup orange juice
1/2 cup water
1 tsp roasted garlic powder
1 tbs nutritional yeast
1/2 tsp chilli flakes
1 tsp lemon zest
salt to taste

Method:

Add the polenta in a steady stream to a pan of boiling liquid ingredients and bring back to the boil strirring continuously. Add the remaining ingredients and simmer for approx 3 minutes and then whilst still hot pour onto baking sheet spreading it out as best you can.

Use a roller to flatten to an even layer as required. Using a pizza cutter to slice into squares, you could use a knife but I find a knife edge 'drags' on the polenta giving less neat edges!

Bake for approx. 15-20 minutes depending upon the thickness of the polenta. Keep an eye to make the sure the edges don't burn too much but get crispy.


For further guidance on making gluten free choices please see this post.

For tips and info on recipe measurement conversions, ingredients, substitutions and the methods behind how I do things.... check out my 'baking tips' tab at the top of the page.

Wednesday, 24 October 2012

DAY TWENTY FOUR: Dark chocolate oatmeal thins

You got a sneak preview of these in yesterday's Halloween post!  

The original intention wasn't as halloween crosses (surprise surprise!) but as my own copy-cat version of Nairns Dark Chocolate Oat Biscuits.


I came across a packet of these biscuits for the first time a few weeks ago and they tasted so good...a cross between a biscuit and a crackers, thin and crisp like a biscuit but much more substantially filling and also a semi-sweetness which I really loved, perfect for when you want a slightly indulgent but not sugar-coma inducing snack. 

It took me a couple of attempts before I succeeded with the flavour, these are subtly sweet and spiced biscuits so I wanted to get the right balance. I used a little rapadura along with cacoa nibs for an intense and slightly bitter chocolate hit and just a tad of cocoa powder. I also included a little salt, cinnamon and a pinch of chilli to give some subtle undertones. You could use dark chocolate chips for a slightly sweeter taste but I can't vouch for how they will alter the overall flavour. I would also advise using a granulated sweetener such as rapadura or coconut sugar, others such as fruit sugars may work but won’t have the slight caramelly depth of flavour.

The biscuit base is so easy to make up in a food processor and I really encourage you to taste test as you go so that you can add a little extra sugar, salt or spice as you need it to make sure the flavours work for you, it is down to personal taste after all. I still think these could do with a little extra work to get a really crisp bite...but the recipe as it stands still tasted good to me so I thought I would share it with you.  Feel free to let me know any changes you made to the recipe!

Similar to this recipe are these bitter chocolate thins posted way back at the beginning of this blog! 


Recipe: Dark choc oatmeal thins

Makes approx. 10 round biscuits (or Halloween crosses)

Ingredients

1 cup oats- coarsely ground
3 tbs buckwheat flour (or other mild GF flour)
1 tbs ground chia/flax
3 tbs rapadura
¼ heaped tsp salt
1 tsp cinnamon
Pinch chilli powder
2tsp cocoa powder
¼ heaped tsp baking powder
2 tbs softened coconut oil
1 tsp vanilla extract
Up to ¼ cup soy milk to mix
3 tbs cacoa nibs

Method

Process the oats (or just use coarse oatmeal) and add all ingredients other than the soy milk. Process/pulse to combine and achieve a crumbly mixture. Add the soy milk a little at a time to reach a slightly sticky dough that holds together well.

Roll thinly (approx. 3mm thick) on a silicone or parchment lined and floured baking sheet and use a cookie cutter to make circles.  Or slice and overlay to form crosses before baking to use for the ‘Halloween graveyard’.

Bake at 180C for approx. 10-12 mins until just beginning to turn golden at the outside edges.


What Vegan MOFO means to me.


For further guidance on making gluten free choices please see this post.

For tips and info on recipe measurement conversions, ingredients, substitutions and the methods behind how I do things.... check out my 'baking tips' tab at the top of the page.

Friday, 27 July 2012

Cracking crackers…two ways


Continuing the savoury kick with this month’s Daring Bakers challenge….

“Our July 2012 Daring Bakers’ Host was Dana McFarland and she challenged us to make homemade crackers! Dana showed us some techniques for making crackers and encouraged us to use our creativity to make each cracker our own by using ingredients we love”.

As I type this post, I site with my laptop rested on my knee pausing every other sentence to watch the very beginning of the opening ceremony of the London Olympics 2012….this post could take some time!  This is Britain at is best, full of its quirks, its love of routines, it classics and it’s food.  If I’d thought ahead I may have gone for my take on a more ‘classic British cracker’ like a water biscuit or a cream cracker but these are very neutral plain crackers and I love to get the taste buds going with the cracker itself not reliant on toppings.

So back to the challenge… I do love snackety foods and dips of all kinds, so what better accompaniment but crackers! Particularly crackers that are full of tasty good-for-you things…..wholesome, gluten free, vegan…what more?!

The challenge required us to make two different types of crackers with two different presentation methods which was interesting in itself. Now since I don’t have any form of pasta/cracker roller machine, I went for a ‘roll thinly and score’ option and the ‘roll into a log and slice into rounds’ option.

I had a lot of fun with flavourings to make sure these were big on taste without using butter and cheese as many of the cracker options seems to entail. You can vary the flavours as you like to achieve you own taste preference, these crackers have such a simple ingredients list you can really go to town with experimentation. The chickpea crackers in particular were a pure shot in the dark, instead of using chickpea flour I opted for chickpeas themselves and to my delicious surprise  they give a lovely chewiness to the cracker that itself has a crisp exterior. The nori crackers are loosely based on these crackers so I was more certain of their success from the outset, although the addition of brown rice was a new twist. The nori crackers were inspired in part by this recipe since I had some leftover sheets of seaweed that caught my eye as I opened the cupboard for inspiration.

These crackers retain their crispness for a couple of days but you may want to crisp them up in the oven beyond that.

Right, that’s me done…now to sit back and watch the amazing creativity and ‘organized chaos’ (words just uttered by the commentator) that all goes on behind the scenes to create a truly memorable opening sequence to the Olympic Games.


Recipe: Nori crackers

Makes approx. 12-16 crackers

Ingredients

½ cup brown rice flour
½ cup cooked brown rice
¼ cup roasted nori seaweed
½ tsp salt
2 tbs sesame seeds
Up to 3tbs water
1 tbs sesame oil

Method

Blend all ingredients together in a food processor, adding the water last a little at a time to reach a slightly sticky dough consistency. The dough should be sticky enough to bind but easy to roll out thinly.

Roll as thinly as possible (approx. 2mm thick), cut into squares and bake in a preheated oven at 180C for approx. 20 minutes until lightly golden.

Allow to cool fully before serving.


Recipe: chickpea sesame crackers

Makes approx. 8 crackers

Ingredients

¾ cup chickpeas
3tbs tapioca starch (or other starch)*
3 tbs gluten free flour (I used buckwheat)*
½ tsp baking powder
¼ tsp salt
¼ cup sesame seeds
1 tbs fresh coriander (or ½ tsp dried)
Pinch chilli flakes (or other spice as optional)
1 tsp sesame oil
1 tsp chia and 2 tbs water

Method

Blend all ingredients together in a food processor to get a fairly smooth and even crumb mixture. Form into a ‘log’ with your hands and cut into rounds with a sharp knife. If it is too soft to cut chill for up to 30 minutes.

Bake in a preheated oven at 180C for approx. 25 minutes until lightly golden.

Allow to cool fully before serving.


* for further guidance on making gluten free choices please see this post.

For tips and info on recipe measurement conversions, ingredients, substitutions and the methods behind how I do things.... check out my 'baking tips' tab at the top of the page.

Saturday, 30 June 2012

Crispy polenta crackers

I found myself in a polenta frame of mind this morning, triggered by this chocolate shortbread, of which there is now a gluten free version…recipe coming soon!

It had been so so long since I’d made that shortbread, and I’d forgotten has delicately crisp and crumbly it was.

Anyway back to the polenta. There it sat in it packet on the kitchen worktop, waiting to be buried back inside my baking box, until another recipe then popped into my mind. Another recipe I’d first tried out months and months ago, and I seem to remember at the time the Boy had said, ‘Mmmm, this tastes like crackling’! Er, well I didn’t think it tasted like crackling so don’t worry. But I do understand what he meant…these crackers are super duper crispy, you’d think they’d been deep fried to get that intense crunch, but nope they are simply baked.


The healthy way to a dip chip!

The key is to slice the polenta as thinly as possible and then bake the slices on a lower heat for longer, and then double bake for extra crispiness. You can mix up the seasonings however you wish. I went for a slightly Mexican theme as I teamed these with my veggie chilli.


Recipe: Polenta crackers

Makes one bowlful

Ingredients

½  cup instant polenta
2 cups water
2 tbs nutritional yeast
1 tsp cajun spice mix (chilli, garlic etc)
¼ tsp salt

Method

In a sauce pan mix polenta with water, add remaining ingredients and simmer for approx. 5 minutes stirring continuously until mixture begins to thicken but is still pourable.

Pour/spoon into a small loaf tin, smoothing the top as much as possible and allow to set then firm up in the fridge.

Once set firmly, remove the polenta loaf from the tin and using a sharp knife slice as thinly as possible, laying each slice on a greased/lined baking sheet

Bake at 150C for approx. 20-30 mins depending on the thickness of the slices. If the slices are not yet crispy in the centre but the edges are done, allow to cool and then re-bake for a further 10 minutes or as long as necessary.


For tips and info on recipe measurement conversions, ingredients, substitutions and the methods behind how I do things.... check out my 'baking tips' tab at the top of the page.

Thursday, 21 June 2012

Cheezy crackerbread

Recently I’ve been testing out some new ingredients courtesy of Real Food Source, and this little recipe was a great way to do so.

The main ‘new thing’ for me is red palm oil, there are loads of links to shops and resources out there, but for further reading I came across this article. Red palm oil has a very strong deep yellow/orange colour and a distinctive savoury taste that’s hard to describe, I would suggest using this for savoury foods instead of sweet unless you have a very strong dominant sweet flavour such a chocolate or spices. It can be used in place of coconut (or other oils of choice) and has amazing health properties in part due to its rich red hue which is rich in carotenes.


I really wanted to exploit its colour and so a ‘cheezy’ recipe seemed the obvious answer. Teamed up with nutritional yeast and some spices… these little dipping crackers have a lovely mild and nutty cheesy flavour, perfect served with a dip, relish or chutney. I also went one step further and made a cheezy roll using  a combination of salsa, sundried tomatoes and fresh and dried herbs spread across the rolled out dough, and the wrapped this up into a roll. If you do this be careful as the dough is quite fragile and will also expand as it cooks so it is likely to will get cracks across the surface of the roll. The sundried tomatoes tasted amazing in this combination so you may like to simple roll some chopped sundried tomatoes onto the surface of the dough, score into slices and then bake as slices instead of rolling it up.

As you can see from the photos, these crackers are soft and more like a dense bread slice than crisp crackers. I have used coarse coconut flour here, but regular coconut flour (or other  GF grains) should work although it may alter the texture, I haven’t tried this. You could also sub part polenta meal if using regular coconut flour as this should assist with creating a grainy texture if desired. The recipe itself is ideal as a basis for experimenting with alternative types of flour and oils. If you give it a go let me know how you get on.


Recipe: Cheezy crackerbread

Makes approx. 7 strips (or double the recipe and roll into a pinwheel)

Ingredients

¼ cup coarse coconut flour
¼ cup fine almond flour
¼ tsp baking powder
3tbs nutritional yeast
¼ tsp salt
Pinch garlic powder
Pinch mustard powder
2 tbs red palm oil- melted
2 tbs ground  chia plus 5 tbs hot water
1 tbs sesame seeds (optional)

Method

Mix the dry ingredients together in a medium bowl then add the wet ingredients and mix well to form a dough. The dough should be neither too crumbly nor too sticky to roll out on a piece of baking parchment. The dough may crack as it is rolled, but just aim to get as even a sheet as possible.

Slice the rolled dough into inch thick strips and bake at 180C for approx. 10 mins until golden at the edges. Allow to cool before serving.

Great served with a dip, relish or chutney.


For tips and info on recipe measurement conversions, ingredients, substitutions and the methods behind how I do things.... check out my 'baking tips' tab at the top of the page.

Tuesday, 7 February 2012

My first guest post!

When I do things I like to do them properly.  It’s part of my competitive nature I guess. I like a challenge and I like to prove that something can be done when others would have assumed otherwise. Take the concept of a healthy dessert…..to most people that would sound like a contradiction!

So it follows that I also like to do my research. Whether it be finding new recipe concepts, analysing ingredients and how things can go together, getting the best prices for my baking supplies or finding good companies who share some of the same principles as me.

A few months ago I came across a new company that did just that.  I was doing a lot of investigation in to Chia seeds at the time and The Real Food Source offered the best price I had come across anywhere in the UK. Shortly after they expanded their product range further to include many other ingredients I already used on a daily basis- coconut oil, ground almonds and agave syrup to name a few.

A new relationship was born!

Today I am very excited to announce my first guest post over at The Real Food Source. My original speedy seedy crackers were a winner with my family and friends and have been made on numerous occasions, but here I have tweaked the original recipe again to experiment a little further using these new seeds and grains and including a generous serving of chia seeds!

I’d love for you to take a look, and if you feel inclined leave a little comment.  My first guest post is an exciting time for me.   Here’s a little teaser to get you going….!


Note: I have also updated my ‘baking tips’ tab.


Friday, 11 November 2011

Speedy seedy crackers

I love to have something on hand to pick at… whether it be my home made ‘nakd’ bars,  or a bowl of chocolate frosting hiding away in the fridge waiting for a spoon to come a-dipping! But, sometimes  I just fancy a savoury kick to keep me going till tea time (particularly if I know there is dessert not far away). 

These crackers are perfect…. on their own, with this dip, or a dollop of nut butter. The inspiration came from this post on Oh She Glows, so simple and quick to make and so many possible variations of flours, seeds and herbs to investigate now I know how good these crackers are.

The essence of the recipe also inspired an alternative twist that I just couldn’t wait to test out…but more on that tomorrow!


Recipe: Speedy seedy crackers

Makes approx. 20 crackers

Ingredients

1/2 cup brown rice flour
3/4 cup ground almonds (if making your own do not over process so that oils are released)
2 tbs tapioca flour
2 tbs polenta (this just gives it extra cruchiness)
2 tbsp ground flax
1 tbsp nutritional yeast flakes
1/4 tsp garlic powder
1/2 tsp salt
1 ½ tsp Italian herbs
1/4 tsp bicarbonate soda
2 tbs sesame seeds
2 tbs poppy seeds
1/4 cup water
1 tsp olive oil

Method
In a large bowl, mix together the dry ingredients. Add wet ingredients and mix well with spoon. Knead dough with hands until it comes together. Place ball of dough on parchment paper or a non-stick mat. Roll out dough until it’s about 1/8th inch thick, or as thin as you can get it without ripping. With a  sharp knife slice into squares.

Preheat oven to 180C and line a baking sheet with parchment. Bake for 18-20 minutes until slightly golden in colour. Cool on baking sheet, then store in air-tight container once fully cool.


you may also like

Related Posts Plugin for WordPress, Blogger...