Showing posts with label side. Show all posts

Saturday, 29 June 2013

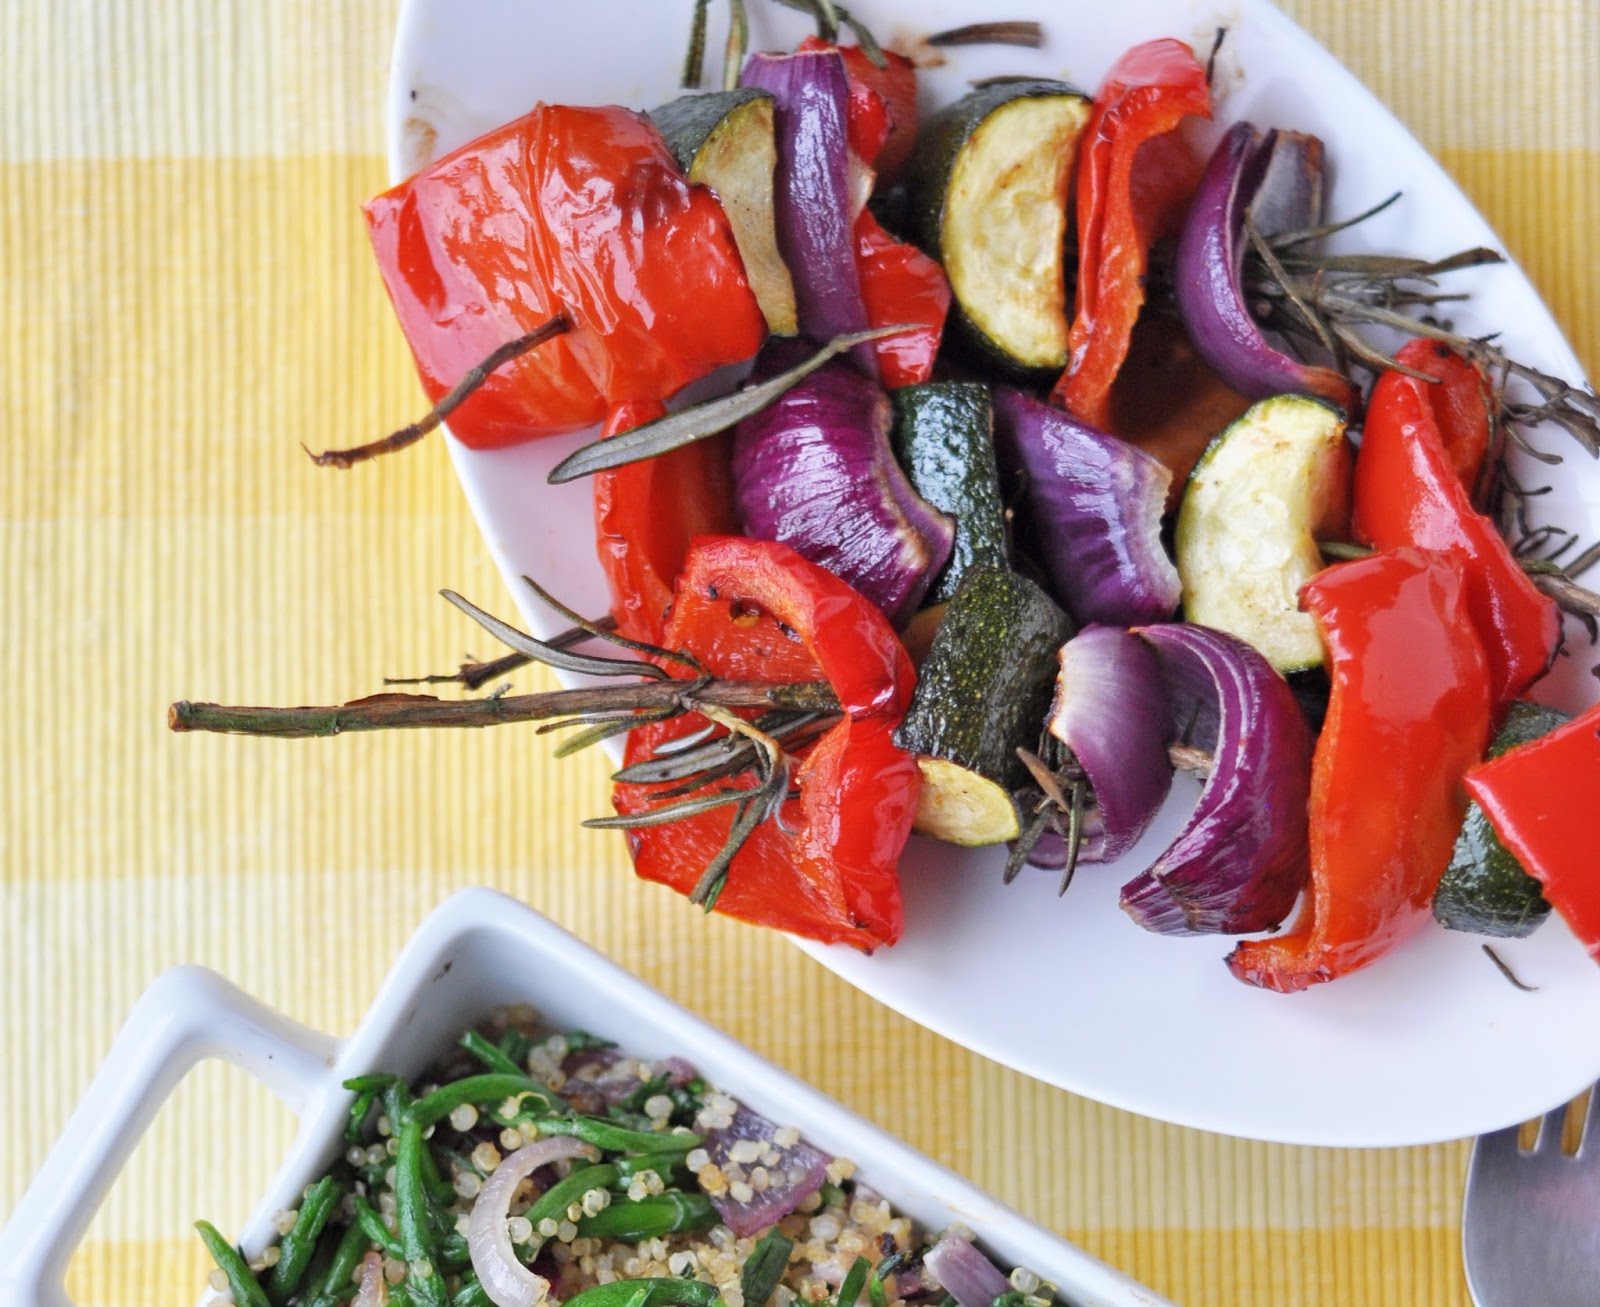
Roasted rosemary veggie skewers


I loved this concept so much and I wanted to share it with you. It's not so much of an amazing recipe- more just the quirky skewer thing going on ;-)


Perfect for BBQ's or summer dining al-fresco, the flavours are fresh and enticing and it will make your dinner companions smile.

There are two simple requirements for this dish:
1- some veggies that can be skewered
2- robust fresh rosemary 'stalks' to act as the skewers

I have a rosemary plant in the garden so had easy access to cut some skewers, some of the skewers I cut were not quite robust enough but they still do the trick and infuse the veggies with flavour. I used my fingers slide the veggie chunks onto my plate just before I ate them and many of the rosemary leaves came away too- yum!

The light oil baste over the veggies was kept simple here so the flavour of the herbs could do their thing, but you could add some more spice if you liked with chipotle sauce or chilli flakes. I served the skewers as a side dish along with the samphire quinoa dish and flatbread wedges.

Bon apetite!


Recipe: Roasted rosemary veggie skewers

Serves 2 as a side

Ingredients:

2 cup worth mixed veg- (I used 1 red onion, 1 red pepper and 1 courgette)
2 tsp oilve oil (or preferred oil)
1 tsp mixed herbs and spices of choice (i.e chili or cajun)
4 robust rosemary stalks to act as skewers

Method:

Prepare the vegetables to be skewered and toss in the oil and spices.

Carefully thread the veg pieces on the rosemary stalks, going along the direction of the leaves so that they largely remain intact).

Toast the skewers under a medium grill for 5-10 minutes until golden along the edges.


For further guidance on making gluten free choices please see this post.

For tips and info on recipe measurement conversions, ingredients, substitutions and the methods behind how I do things.... check out my 'baking tips' tab at the top of the page.

Thursday, 27 June 2013

Fig and Olive Flatbread- gluten free


The other day in a whim I bought some fresh figs, they were discounted and forlornly looking for a home on the shelf of my local supermarket and so I took pitty on them.  I have never used fresh figs before though I have come across plenty of recipes over the years that do, so I was keen to try.


It seems that goats cheese it a common companion, but obviously that was out of the equation for me, so I had a rethink and decided upon olives and herbs in a flatbread combo. You could try adding some of this feta to the mix!

I have previously posted the flatbread inspired experiments below with success so it seemed like a good opportunity for my figs too...a sweet and salty Mediterranean vibe!

Check out...


The basic GF flatbread (the one that started it all off)
10 min pizza
Mediterranean foccacia
Fruity coconut sweetbread

...or rip up and double-bake the basic flatbread to make these crazy crunchy croutons!

The basic flatbread recipe works both with GF flour mix and spelt (spelt is a little lighter) so feel free to use the flour combos you are most familiar wih, similarly I anticipate that any dairy-free yoghurt (or regular for non-vegan) could be used here though I have only tried soy.


Slice the flatbread into fingers or wedges for a great summer salad topper or to accompany a dip. I loved the more unusual sweet and salty flavour, and the moist squidgy fig pieces.


Recipe: Fig and Olive Flatbread- gluten free


Makes 2 flatbreads

Ingredients:

100g GF self raising flour (I used Doves Farm mix which contains rice, potato, tapioca, maize and buckwheat flours) or regular flour/spelt if non GF
1 tsp dried thyme or rosemary
2 tsp balsamic vinegar
75g vegan yoghurt
30m water
2 fresh figs- quartered
Handful of olives- sliced
Sea salt
Coconut oil to glaze

Method:

Prepare the figs and olives and set aside.

Mix the flour and dried herbs and salt in a medium bowl then add the yoghurt, balsamic vinegar and water and stir through, using your hands at the end as necessary. This should result in a lovely soft dough.

Divide the dough into 2 equal sized pieces and form circular patties with your hands approx. 1cm thick. Dust lightly with a little more flour if they are quite sticky to touch. Lay on the parchment lined baking sheet.

Press the fig and olive slices cut side up into the dough. Drizzle or brush the surface of the dough patties with a little melted coconut oil and then sprinkle with the sea salt

Bake in a pre-heated oven at 200C for approx. 20 mins until the tops are slightly golden and fruit caramelised. Serve immediately.


For further guidance on making gluten free choices please see this post.

For tips and info on recipe measurement conversions, ingredients, substitutions and the methods behind how I do things.... check out my 'baking tips' tab at the top of the page.

Tuesday, 25 June 2013

Simple samphire with quinoa

This week I have a tri-part 'side dishes' recipe collection that all formed part of this gorgeously colourful dinnertime set up. The photos were all worthy in their own right and as each of the recipes was so simple, I want to do them the honour of individual posts. Therefore the skewers and flatbreads will follow on later this week!


This is a beautifully simple side dish. I had never tried or even come across Samphire until a few weeks ago and so was curious to give it a try.

A brief spot of 'googling' came up with a few easy options, many of the recipes I found involved fish and sea food on the basis that samphire is a coastal plant and so the dishes reflected that, but this lovely vegan quinoa version caught me eye, so off I went to try it out! 

I wanted to fully appreciate the delicate nature and flavour of the samphire itself and so added the bare minimum of ingredients to compliment it. The result was simple and delicious, I would have also been happy with this as a main dish, maybe with a few roasted veggies. But in this instance I was having a creative kitchen eposide so served the dish as part of a collection.  The sauteed onion with garlic works really well with the light salty flavour of the samphire and the bed of quinoa makes the perfect base to mix it into.


For me, one of the best things about samphire is the speed in which it cooks. Due to its form and large surface area it simply need a few minutes to steam or saute and you're ready to go. If like me, you have pre-cooked quinoa portions at the ready this meal will literally take 5 minutes to come together...you know how happy that makes me!


In the top photo i'd also added a few chunks of my vegan feta cheese.


Recipe: Simple Samphire

(serves 2 as a side)

Ingredients:

1/2 cup cooked quinoa
100g samphire (1 packet which was approx 1 packed cup)
1 tsp olive oil
1 medium red onion sliced
3 tbs lemon juice
2 garlic cloves- crushed
2 tbs fresh chives- chopped

Method:

Prepare the quinoa (if uncooked) and set aside.

Meanwhile fry the onion and garlic in the olive oil for approx. 5 minutes until softening.

SautĂ© the samphire in a separate pan for 2-3 minutes and then add along with the quinoa and lemon juice to the frying pan with the onion. Toss to fully coat for a minute adding the fresh chives in the final seconds. 


For further guidance on making gluten free choices please see this post.

For tips and info on recipe measurement conversions, ingredients, substitutions and the methods behind how I do things.... check out my 'baking tips' tab at the top of the page.

Tuesday, 22 January 2013

Pure potato crisps...fat free!

I know some recipes are simple...but I think this one might beat the lot!

potato...slice...cook

Erm that's it. I'll be off then.


Not so fast. These crisps are a great alternative to regular crisps and chips that would otherwise find their way into the tub of salsa or hummus. I took this recipe from the Forks over Knives Cookbook I received as a Christmas present. It has a great number of recipes as well as the intro to a plant based lifestyle...amazingly (considering how many cook books I have) many of the recipes gave a new spin to things in ways I hadn't come across before, so lots for me to try. I won't talk about the book any further as this isn't intended to be a promotional post of any sort, simply a link back to the recipe itself.

I served the crisps with a bowl of soup, it was a variant of this recipe with the beans I had to hand at the time (black beans) hence it doesn't look quite so appetising as the original. Since there is no oil, the crisps don't 'crunch' in the same way that regular crisps or chips do, so please don't expect them to as you'll likely be a little dissapointed. I enjoyed them in their own right as they have a crisp yet soft quality all at the same time, and they are firm enough to scoop dip onto, or in my case, soup.

The crispsness and length of cooking time, does very much depend on how thinly you slice the potato, obviously the edges will crisp before the middle of the chip does. I would advise using a mandolin (or similar) so that you can get a thin uniform slice approx 1mm thick, I sliced mine by hand and they were less uniform and up to 2mm thick on average. 


Feel free to sprinkle a little seasoning if desired. I appreciate that microwaving a potato to this degree might not be considered theoptimal nutritional standpoint, and I would totally agree with you, but these chips have no oil, and no other additions...pure potato with a little seasoning. So as an alternative to a deep fried chip I think this is a pretty healthy option indeed. A day later I also tried oven baking these chips, this method also works well, just be sure to use a non stick liner so that the chips can be removed easily from the baking sheet.


Recipe: pure potato chips

Ingredients:

1 potato (or as many as you like to make a larger batch)
seasoning to taste (I used approx. 1/4 tsp mixed cajun seasoning)

Method:

Slice the potato thinly and evenly- the thinner the better (unless you are aiming for a softer chip). Wash the slices to remove the starchy coating and lightly dry with kitchen towel.

Lay the slices in a thin even layer on a non stick lined baking sheet (if baking), or on a microwaveable plate, season if desired and bake for approx 15-20 mins at 140C (lower temp for longer to prevent edges burning too quickly). Or for approx 10 mins in the microwave (checking twice to flip over). Timings will vary depending on thickness.


For further guidance on making gluten free choices please see this post.

For tips and info on recipe measurement conversions, ingredients, substitutions and the methods behind how I do things.... check out my 'baking tips' tab at the top of the page.

Saturday, 12 January 2013

Roasted cauliflower salad

This was my lunch yesterday...it was delicious, so much so I might make it again today as I have the remainder of the cauliflower that needs using up.


I love roasted cauliflower. It's one of those vegetables you often don't think to roast, I'm more used to roasting root vegetables, but in recent months i've recently taken a liking to all things cauliflower...

...Even in more unusual ways, like my baked banana bread oatmeal and this risotto.

The original recipe came from the BBC Food website, as it popped up when I was having a browse for salad recipes of a little more unusual variety. I changes a few of the flavours up a bit and i found it didn't take as long to cook as they'd suggested...so it is a pretty speedy dish. The perfect light lunch or side dish. I made a single serving but I have doubled the quantities below to serve two since that may be more likely. You can use herbs of your choice although I loved the rosemary in this dish, it had a real strength of flavour that was a great compliment.


Recipe: Roasted cauliflower salad

Ingredients:

2 cups cauliflower- chopped into small florets
a little olive oil- to coat cauliflower
1 small red onion- sliced thinly
2 tbs balsamic vinegar and 2 tsp agave-mixed together
small handful raisins
2 tbs flakes almonds (toasted or natural)
handful of fresh rosemary
2 handfuls spinach or salad leaves (I used a salad mix)

Method:

Toss the cauliflower with the olive oil in a medium bowl, seasons with salt and pepper.

Lay in an even layer on a baking sheet and bake at 180C for approx. 10 minutes. Meanwhile prepare the onion and toss with the oil remnants n the same bowl that the cauliflower was in. After 10 minutes the onion to the cauliflower tray and continue to bake for approx. 10 minutes until golden.

Meanwhile prepare the balsamic/agave mix and add the raisins to soak.

Pile a handful of spinach/salad on each serving plate, and pile the cauliflower mix on top. Finish with the raisin dressing and a sprinkle of almonds and fresh rosemary.


For further guidance on making gluten free choices please see this post.

For tips and info on recipe measurement conversions, ingredients, substitutions and the methods behind how I do things.... check out my 'baking tips' tab at the top of the page.

Tuesday, 1 January 2013

Coconut lentil dhal

A new year...that feels pretty good! A bubble of excitement and potential....anything could happen in the next 365 days!

At the end of last year I quit my job to pursue my passions in the blogging/nutrition/photography/fitness/coaching arenas (yep I couldn't just pick one!) so you should see a few changes in coming weeks and months as I develop, blend and refine my thoughts and decisions further.

For those that follow my Facebook page, you will already have seen my Manifesto. I decided to create a graphic collage of some of my favourite quotes, it is to be printed on a canvas for my bedroom wall  to keep me focussed when at times I flounder.

The New Year is the perfect chance to start a fresh, to act on intentions and set the year off on the right foot. I am actually looking forward to a 'cleaning eating' January....Christmas brought with it way to much sugar and I am looking forward to getting back to basics. Many of my posts this month will be of the savoury variety...though i'm sure I will end up sneaking a few sweets in here and there. ;-)

So, first up....coconut and lentil dhal. I made this side dish along with this chana masala for the New Years Eve party my friend and her fiancé held. We had an Indian feast! I had a smaller portion of the dhal for my lunch (gotta test it out before letting it loose on my friends!) and here I topped it with pan fried onions and some slithers of mango which made for a lovely contrast of flavours.

I hope you enjoyed your own New Years celebrations!


Recipe: Lentil Dhal with onion and mango
Closely inspired by this recipe.

Serves 4 as a side (note the photo only shows approx. 1/3 of the recipe)

Ingredients:

250g red lentils 1 can (400ml) coconut milk
2 medium chopped tomatoes

2 tsp turmeric
1 tsp garam masala
1/2 tsp chilli flakes
1 onion finely sliced
300ml water

Topping:
2 tsp olive oil
1 onion roughly sliced
1 tsp mustard seeds

1 tsp cumin seeds
1/4 cup mango slices

Method:

Add all ingredients (other than topping) to a saucepan, season with salt and pepper and simmer for 20 minutes, until the lentils are tender.

Meanwhile, fry the sliced onion until softened and crisp at the edges adding the mustard and cumin seeds during the final couple of minutes. Mix with the sliced mango, and serve immediately spooned over the dhal.


For further guidance on making gluten free choices please see this post.

For tips and info on recipe measurement conversions, ingredients, substitutions and the methods behind how I do things.... check out my 'baking tips' tab at the top of the page.

Saturday, 14 April 2012

Simple Mediterranean focaccia- gluten free

Gosh, this weekend has become quite eventful!

It’s not something I’ve drawn a lot of attention to, but I have mentioned it in this post, and I also gave a little teaser in this silent sunday that I am a pole fitness instructor, having recently qualified and looking to set up more classes of my own. Well, fingers crossed but all seems as though it could be coming together, I have a venue and now just need to drum up some interest for people to sign up for a taster session this coming tuesday…..so it is all very exciting! My phone has been 'dinging' with text and facebook notifications all morning.

Friday is often my main day of baking, but yesterday ended up being so chaotic running in and out the house I barely had half an hour to sit down. This recipe was a thought in the back of my mind a few days ago, I had scribbled some notes on paper and was then reminded of it as I realised I needed a quick and speedy lunch. I was so happy when it turned out so much better than I’d anticipated!

So here you have it, a super quick and simply gluten free focaccia. Note, this is not an ‘authentic’ focaccia as it doesn’t use yeast but is in effect a quick bread based on this flatbread recipe.  I baked the bread instead of grilled it since I could not flip it over with its topping in place, it worked so well and the olive oil glaze creates a lovely crisp crust to the soft bread dough below. Of course you could use regular flour instead, I tried using spelt with my flatbread recipe and that worked just fine.

This would make the perfect starter, or you could pair this with a summery Mediterranean salad or simply as a ‘rip and dip’ bread teamed up with something like this.

Oh, and the pungent aroma from the oven of the freshly baked rosemary leaves was amazing, I was sad I had to go out since I could have stayed in the kitchen all with that lovely lingering Meditteranean smell!


Recipe: Simple mediterranean focaccia

Makes 3-4 rounds (depending on size)

Ingredients

1 small onion- sliced
2 handfuls of cherry tomatoes- halved
Small handful of fresh rosemary leaves
Olive oil- for drizzling
Sea salt- for sprinkling on top
--------------
200g gluten free self-raising flour mix (I used Doves Farm mix which contains rice, potato, tapioca, maize and buckwheat flours) or regular flour if non GF
1-2  tsp mixed dried herbs
150g soy yoghurt (or natural yoghurt if non vegan)
Up to 50ml water
½ tsp salt to taste
2 tbs nutritional yeast- optional

Method

Prepare the onion and tomatoes and set aside.

Mix the flour dried herbs and salt in a medium bowl then add the yoghurt and water and stir through, using your hands at the end as necessary. This should result in a lovely soft dough.

Divide the dough into 3-4 equal sized pieces and form circular patties with your hands approx. 1cm thick. Dust lightly with a little more flour if they are quite sticky to touch. Lay on the parchment lined baking sheet and sprinkle with salt and pepper if desired.

Press the onion sliced lightly into the dough and gently press the cherry tomatoes cut side up into the dough. Drizzle or brush the surface of the dough patties with olive oil and then sprinkle with the rosemary and the salt

Bake in a pre-heated oven at 200C for approx. 20 mins until the tops are slightly golden. Serve immediately.


For tips and info on recipe measurement conversions, ingredients, substitutions and the methods behind how I do things.... check out my 'baking tips' tab at the top of the page.

Wednesday, 11 January 2012

Super simple gluten free flatbread

One morning last week I was cosied up on the sofa with a big mug of spiced apple and camomile tea (I’m really into spiced herbal teas at the moment) and a warm snuggly blanket, whilst flicking through cookbooks for soup inspiration for the coming weeks.

I happened to come across a ridiculously simple recipe for flatbread.  So simply I could barely believe it could actually work and to top it off, it was also gluten free.  I was intrigued and hurried off to make a small batch straight away. The original recipe comes from BBC Good Food: 101 Soups and Sides, I made a few modifications (primarily substituting the natural yoghurt in the recipe for soy yoghurt so that it is vegan- but feel free to use natural yoghurt if that’s more your thing).

I am not very experienced with typical GF breads, so it is difficult to compare, but for me I would not have questioned this bread as being anything other than made with regular ingredients. I'd be interested to hear from others who have more experience in this area if you do try this recipe out! I have since made another batch to go with my spicy lentil and chickpea soup that i'll be posting shortly, this time I used wholemeal spelt flour to get a comparison. The spelt made for a slightly lighter, fluffier bread, but im not sure if that was in part due to the ratio of baking powder used since the GF flour in the original recipe was self-raising so I did not add baking powder separately.

The original recipe states that the bread should be served straight away whilst still warm.  I would emphasize that this is important since the GF bread did become tougher after a few hours once cooled and less fresh, though you could by all means freshen up in the oven. Since the flatbread is so simple to make- 15 minutes tops, there is no reason why you wouldn’t make these fresh whilst you are preparing the rest of the meal. 

When freshly grilled, the flatbread has a lovely crisp outer crust and a soft and quite dense inside…perfect for ripping and dipping into a hearty warming soup. Also, feel free to jazz up the seasonings however you wish.

The flatbreads would also make a great base for mini grilled toasties, hummous or nut butter open sandwich creations. 


Recipe: Gluten free flatbread

Ingredients

200g gluten free self-raising flour mix (I used Doves Farm mix which contains rice, potato, tapioca, maize and buckwheat flours)*
1-2  tsp toasted cumin seeds
150g soy yoghurt (or natural yoghurt)
50ml water
½ tsp salt to taste
1 tbs nutritional yeast (optional- I added this but it was not in the original recipe)

* you could alternatively substitute the GF flour for spelt flour plus 3tsp baking powder.

Makes 4 small saucer sized flatbreads

Method

Heat the grill to medium and dust a baking sheet with a little flour. Toast the cumin seeds in a dry pan for a minute or so to release a better aroma. Mix the flour, cumin seeds and salt in a bowl then add the yoghurt and water and stir through, using your hands at the end as necessary. This should result in a lovely soft dough.

Divide the dough into 4 equal pieces and form circular patties with your hands approx. 5mm thick. Dust lightly with a little more flour if they are quite sticky to touch. Lay on the floured baking sheet and sprinkle with salt and pepper if desired.

Grill for approx. 3-5 minutes on each side (depending on the strength of your grill) until lightly golden and puffed up.

Note: for a future batch, once laid on the baking sheet I may brush the top surface with a little soy milk before sprinkling with salt and pepper to achieve more of a golden glazed finish. This hasn’t yet been tested so feel free to experiment.


For tips and info on recipe measurement conversions, ingredients, substitutions and the methods behind how I do things.... check out my 'baking tips' tab at the top of the page.

you may also like

Related Posts Plugin for WordPress, Blogger...