Showing posts with label bbq. Show all posts

Tuesday, 2 July 2013

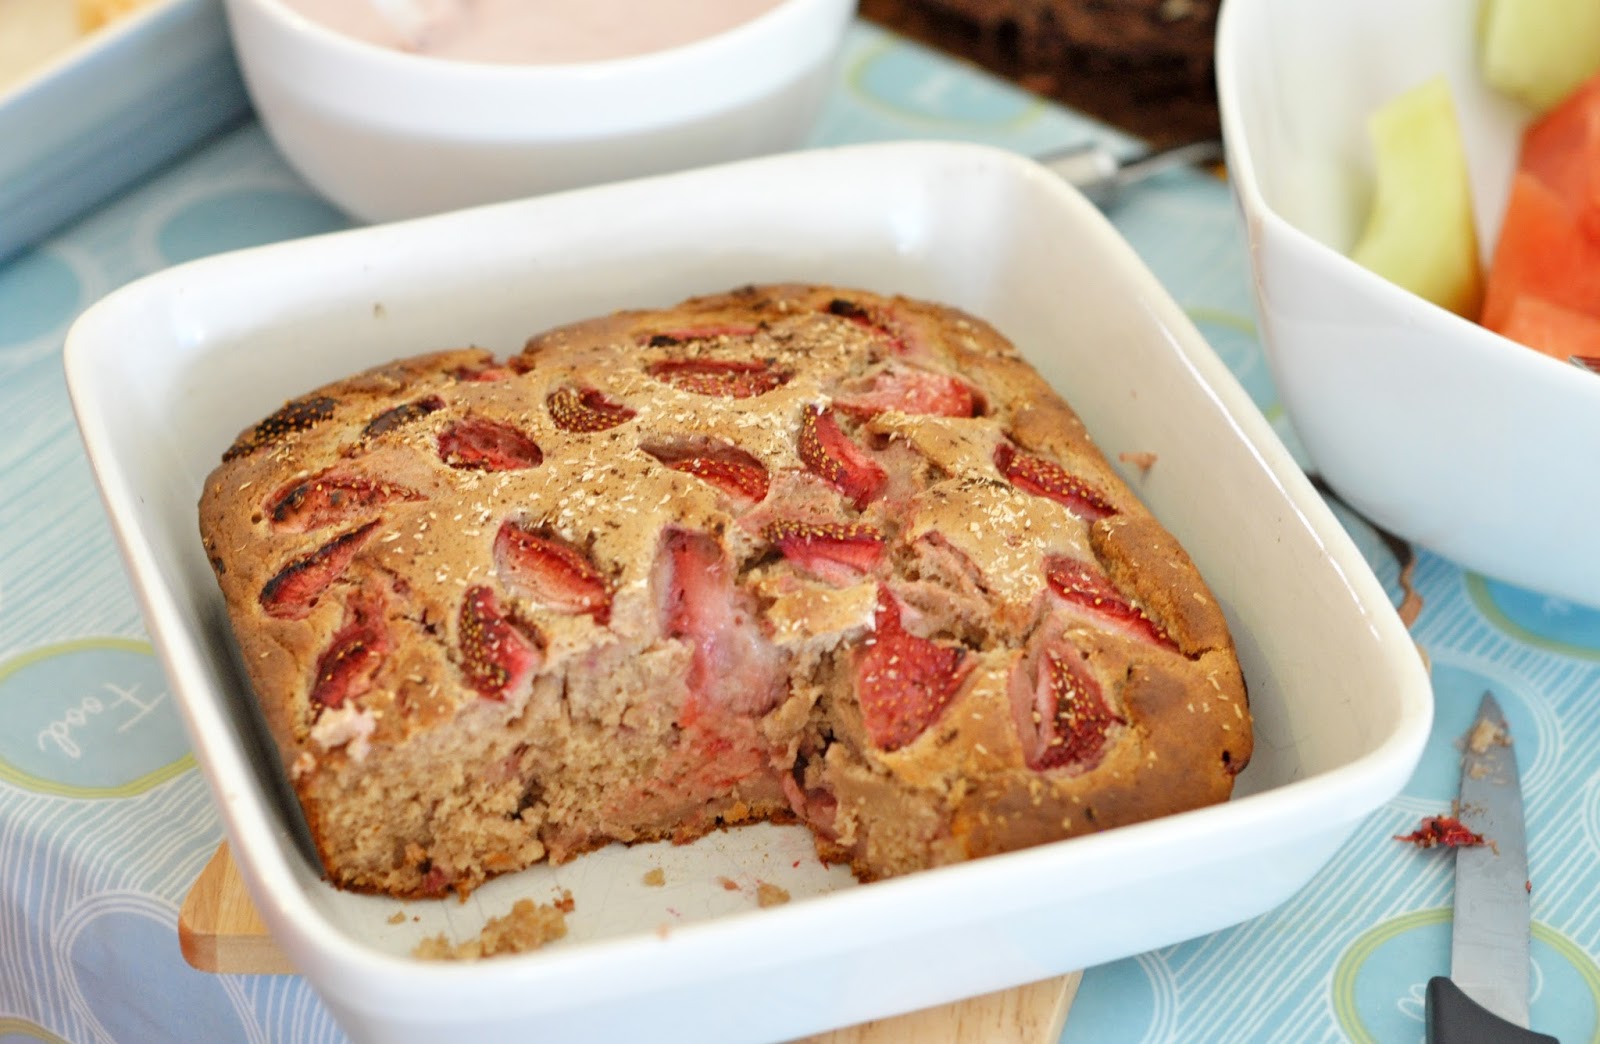
Strawberry dessert cake with strawberry cream

My weekend was all about sunshine… and strawberries!


Strawberry time is now in full swing over here in the UK… what with the sunshine finally out in the skies and the Wimbledon tennis on the TV there's just no denying it! I love any opportunity to get outside spend time in the sunshine (or even rain) and in particular spend time with friends just relaxing… Something many of you know I am notoriously bad at doing. 

At the weekend I was invited to a barbecue, obviously I was going to be bringing desert (amongst a few other bits and pieces including veggies burgers) and so strawberries were on my mind and in my mouth pretty much the whole of last weekend.

Some of the goodies that were brought to the party (yes there was quinoa...and samosas...I love samosas and even though I don't eat much wheat I caved in for these!)

I also had another challenge- I wanted to create a strawberry themed desert cake that was also totally sugarfree- even agave, coconut sugar and maple syrup were off limits- as I would usually use a little of one of these alongside stevia. One of the ladies coming to the barbecue is very sugar intolerant as well as chocolate intolerant (shock horror) and so I really wanted to be up to create a non-chocolate and sugar free cake that she could enjoy along with everyone else!

So, this is what I came up with loosely based on my banana blondie recipe and using as much fresh fruit and fruit purees as possible as the main sweetness then bumped up with stevia. I was careful to get the balance right so that the stevia didn't overpower and taste odd. To assist with the rising I actually added just two teaspoons of coconut sugar as when I tried a similar recipe a short while ago it sank a bit when it came out the oven and I wasn't sure whether this had anything to do with the total lack of sugar… may well just be coincidence! P.s if you omit the tiny bit of sugar it may well be ok and even if it does sink it's still good, just denser!

I served this up warmed through with a tofu based strawberry cream/mousse so that the cake became even more dessert-like. Perfect for a garden party carrying on into the evening hours... I know I certainly went back for more! Whilst you're serving your strawberries and relaxing with your friends why not have a little extra fun and play this bingo game* while watching the tennis. Summer time bliss!


Recipe: Strawberry dessert cake

Ingredients:

2 bananas- pureed
1/4 cup sugar free strawberry jam
Scant 1 cup chickpeas
1/4 cup coconut oil- melted (or oil of choice)
2 tsp vanila
30 drops vanilla stevia (I tend to use NuNaturals)
1 cup apple juice (or other fruit juice)
-----------
1/2 tsp cinnamon
1 1/2 tsp baking powder
1/2 heaped tsp baking soda
pinch salt
2 tsp unrefined sugar (optional add in- see note)
1 1/2 cups white spelt flour (or GF flour- if so I would use a mix of buckwheat, ground almonds and starch)
-----------
1 cup chopped strawberries- for filling
1/2 cup chopped strawberries, sprinkle of coconut and vanilla bean- for topping.

Sauce/mousse Ingredients:

1/2 cup strawberries
1/2 cup silken tofu
1 tbs coconut oil
vanilla stevia to taste

Method:

Blend the wet ingredients together until smooth. Mix the dry ingredients together in a large bowl and then add the wet mixing gently but well. Stir through a cup of chopped strawberries in the final strokes.

Spoon the mixture into a round of square cake tin approx. 8" diameter. Smooth the top and press the remaining strawberries in along with a dusting of coconut and pure vanilla bean powder- optional but yummy!

Bake at 180C for approx 30-40 minutes- I needed to lightly cover with foil after 25 minutes to prevent the top from becoming too brown before the centre had cooked through. Check with a toothpick for done-ness. Note: it is a fairly dense moist cake anyway, but cook for as long as possible to maximise 'cakiness'.

To make the 'cream' simply blend the ingredients together well and chill in the fridge for an hour to thicken up for a more mousse like dessert. You can omit the coconut oil if you want to go for a creamy drizzle. Note if you had some beetroot you could add a tiny amount to intensity the pink colour without it coming through in the flavour (I didn't have any beetroot!)


*Note:  This post is in association with Ladbrokes Bingo. The strawberry dessert recipe is all my own creation and was due to be posted exactly as it is regardless, it just happened to tie in nicely with the some extra Wimbledon fun. Enjoy :-)


For further guidance on making gluten free choices please see this post.

For tips and info on recipe measurement conversions, ingredients, substitutions and the methods behind how I do things.... check out my 'baking tips' tab at the top of the page.

Saturday, 29 June 2013

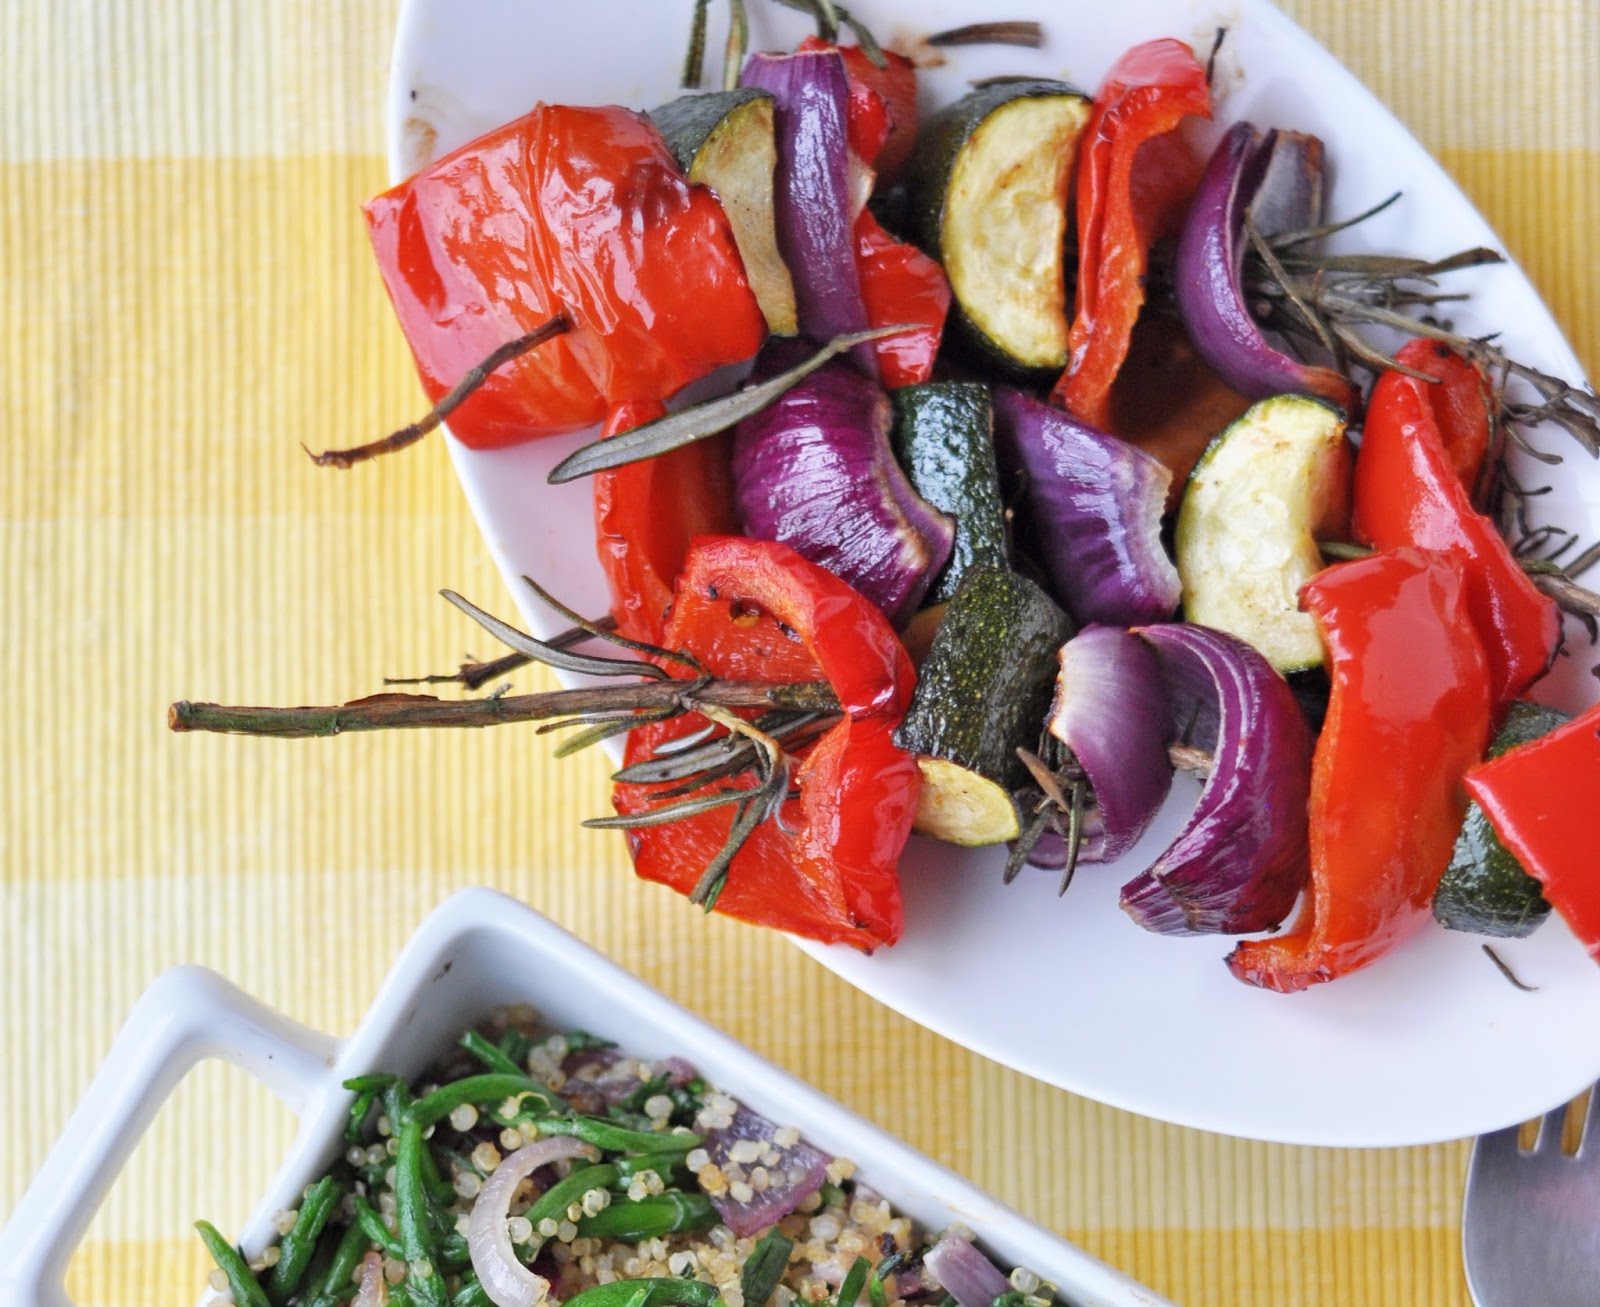
Roasted rosemary veggie skewers


I loved this concept so much and I wanted to share it with you. It's not so much of an amazing recipe- more just the quirky skewer thing going on ;-)


Perfect for BBQ's or summer dining al-fresco, the flavours are fresh and enticing and it will make your dinner companions smile.

There are two simple requirements for this dish:
1- some veggies that can be skewered
2- robust fresh rosemary 'stalks' to act as the skewers

I have a rosemary plant in the garden so had easy access to cut some skewers, some of the skewers I cut were not quite robust enough but they still do the trick and infuse the veggies with flavour. I used my fingers slide the veggie chunks onto my plate just before I ate them and many of the rosemary leaves came away too- yum!

The light oil baste over the veggies was kept simple here so the flavour of the herbs could do their thing, but you could add some more spice if you liked with chipotle sauce or chilli flakes. I served the skewers as a side dish along with the samphire quinoa dish and flatbread wedges.

Bon apetite!


Recipe: Roasted rosemary veggie skewers

Serves 2 as a side

Ingredients:

2 cup worth mixed veg- (I used 1 red onion, 1 red pepper and 1 courgette)
2 tsp oilve oil (or preferred oil)
1 tsp mixed herbs and spices of choice (i.e chili or cajun)
4 robust rosemary stalks to act as skewers

Method:

Prepare the vegetables to be skewered and toss in the oil and spices.

Carefully thread the veg pieces on the rosemary stalks, going along the direction of the leaves so that they largely remain intact).

Toast the skewers under a medium grill for 5-10 minutes until golden along the edges.


For further guidance on making gluten free choices please see this post.

For tips and info on recipe measurement conversions, ingredients, substitutions and the methods behind how I do things.... check out my 'baking tips' tab at the top of the page.
Sunday, 9 September 2012

Double banana blondies

It’s bbq time!

It’s been a super hot weekend so far, summer has not fled just yet. I went to a bbq with friends and my contribution to the party was a batch of double banana blondies. I know these are always a pretty safe bet, ever since the original blondies that first made an appearance at a friend’s party way back last year. Since then I’ve also made this variation on the theme that was shared with my work colleagues….always a winner!

So, here I have simply combined the two recipes, and as such I felt it was deserving of a recipe write up all of its own. But before I get onto that, back to the bbq. There was so much food…food that I could actually eat and not once did I feel limited for choice or like an awkward guest. The guests brought home-cooked dishes and there was food from so many non-eurpopean cultures where the classic dairy infused dishes is not so much the norm that I was a very happy girl!  


My favourite dish was the chickpeas (I assume a form of chana masala?)  I asked the host for the recipe so hopefully I’ll have this up on my blog before long. Also to my delight, fresh bbq’d corn on the corn and sweetly charred plantain slices…..Mmmmm.


On a random note..this made my laugh and so i had to photograph it! Ever thought of growing your herbs in an old bathroom suite? This is a dramatic case of Upcycling if ever I saw one!


With all that food, I barely had room for cake (although to be honest I’d had enough tastings of the batter prior to cooking I didn’t fancy any more….shhhh!) In case you are wondering, the blondies were a great success, disappearing within a couple of minutes, and nobody could guess the secret ingredient! Beans in cakes- it’s always a fun discussion point, I love to make people think twice, to realise that there are ways of going beyond the norm and simply doing things a little differently. By the time the cakes came out it was too dark for my camera so you'll have to make do with these shots I took just before I left home.

Double banana blondies

Makes 16 squares

Ingredients

1 cup cooked chickpeas
¼ cup soy yoghurt
¼ cup soy milk
1/3 cup coconut butter
1 cup GF flour (I used 1/3 cup each of almond meal, buckwheat flour, tapioca flour)
1 banana mashed
1/3 cup agave plus ½ tsp stevia
2 tsp vanilla extract
½ tsp baking powder
¼ tsp baking soda
A pinch salt
1 tsp cinnamon
1/3 cup dark chocolate chips
1 banana cut into chunks- for the top

Method

Blend wet ingredients in food processor until very smooth. Pour into a bowl, add dry ingredients (except choc chips and banana chunks) and stir together until well mixed. Fold in chocolate chips.

Spoon mixture into a parchment lined 8x8 baking tin and smooth top. Press the banana chunks lightly into the surface. Bake in oven at 180C for approx. 15 mins. Check with a toothpick and remove when just cooked. Allow to cool fully before slicing into squares.


For tips and info on recipe measurement conversions, ingredients, substitutions and the methods behind how I do things.... check out my 'baking tips' tab at the top of the page.

Saturday, 25 August 2012

Mexican bean burgers


As you read this post I will be battling my way across the Derbyshire countryside on a camping/hiking trip with friends this bank holiday weekend.

I’ve just bought myself my very first tent (having shared other peoples for many years) and it was of the pop up variety…. notorious for being difficult to pack down again once they’ve ‘sprung’ into shape. I popped it up on the garden lawn to give it a test run and thankfully it wasn’t too difficult…fingers crossed I manage to do it again at the end of the camping trip itself as a field full of bemused onlookers is not what I have in mind!

Back to food!

A BBQ was on my mind again as we’ll be hoping to have one or two during our trip (please don’t rain!) and so these burgers, that were the accompaniment to the BBQ sauce from earlier this week, came to mind. I may well whip up another batch to take with me.

The burgers with BBQ sauce were a match made in heaven! I do love a good veggie burger as they are always so versatile…served in buns, on salads, with cous-cous or quinoa, or even just served cold as finger food on their own. You can use any seasonings you wish, I simply went for a Mexican kick as the mood took me. The potato also holds them together nicely; see my notes below for choice of potato.

You can find more ideas for snacks and bbq sides here.


Recipe: Mexican bean burgers

Makes approx. 6 burgers

Ingredients

1 tin black beans (400g)
1 medium carrot- grated
1 small red onion- diced
2 cooked medium to large (fist sized) white or sweet potato (see note)
1 cup sweetcorn (I used frozen)
Seasonings to taste. I used 2tsp mix of cumin coriander and chilli. You could use fresh coriander
Salt and pepper to taste
¼ cup chia seeds
¼- 1/3 cup gram flour or oats* (as needed to achieve burger patty consistency)

Method

Chop the potatoes into small cubes and cook for approx. 10 minutes until just tender.

Meanwhile prepare remaining wet ingredients and roughly mash together in a large bowl. Add seasonings and chia seeds and mix through.

Add the cooked potato to the bowl and mash into the mixture until you have a lumpy mixture. Depending upon the potatoes used (see note) the mixture may still be too wet to form into into firm patties. If so, mix gram flour or oats/oatmeal through until a firmer mixture is formed.

Using your hands form fist sized patties and place on a line baking sheet. Bake for approx. 20 minutes until golden turning once after 15 minutes (or bake for 5 mins to increase firmness and then finish of on BBQ like I did!)  Alternatively these could be pan fried- note I have not tried this method.

Potato note:  I used sweet potatoes which are softer and retain more moisture than regular potatoes. Make sure you allow all water to drain once cooked and using kitchen towel lightly ‘dry’ the potatoes to further reduce excess water. White potatoes are firmer and regular draining should be sufficient.


* for further guidance on making gluten free choices please see this post.

For tips and info on recipe measurement conversions, ingredients, substitutions and the methods behind how I do things.... check out my 'baking tips' tab at the top of the page.

Tuesday, 21 August 2012

Smoky BBQ sauce

Rich and smoky….

Reminiscent of hot summer cinders, a dwindling fire and a full belly….

Welcome the BBQ dip!


The perfect marinade, sauce or dip…it’s so rich and full flavoured that a little dab will go a long way.

As a bonus there is no cooking required…so no slaving away over the stove on a hot summer’s day.

This recipe is largely based on this recipe by Healthy Happy Life  as I was keen to have a go at making a deep rich but healthy bbq sauce and the recipe ticked all those boxes. I actually changed very little (other than the odd ingredient here and the overall quantities). This sauce was made specifically for a BBQ we had last weekend with my family, my brother was visiting from Southampton as an early celebration for my mum’s birthday and it was great to spend time together in the sunshine!

I’m not a big fan of ketchup (shock horror) although my homemade version was a million times better than the sweetly synthetic stuff bought in shops (oops..sorry Heinz), however I have always loved a bit of BBQ sauce and so a healthy homemade version has been on the cards for a while now.

Give it a go…it won’t disappoint! I used it as a baste over a batch of Mexican bean burgers (made especially for the occasion- recipe to come soon) and also as a marinade for the veggie skewers. Also pictured is my super speedy satay sauce which makes for another fabulous marinade. Both sauces were total winners with my family.

 
Recipe: BBQ dip

Makes approx. ½ cup

Ingredients

2 tbs apple cider vinegar
2 tbs molasses
1 tbs agave
1 tsp lemon juice
1 tsp chipotle smoky hot sauce (or similar)
1 tsp olive oil
Pinch dry mustard
1 tsp soy sauce*
3 tbs tomato puree
1-3 tbs water (depending on thickness desired)
1 tbs arrowroot powder
Salt and pepper to taste (I used approx. 1/6th tsp each)
¼ tsp paprika
¼ tsp cumin

Method

Mix everything together really well by hand or in a mini blender until, you have a smooth thick paste. Best made in advance and allow flavours to meld for an hour in the fridge before using for dipping/basting.

Add between 1 and 3 tablespoons of water depending on desired thickness. I used the thicker version for basting and would use a thinner version for dipping or drizzling.


* for further guidance on making gluten free choices please see this post.

For tips and info on recipe measurement conversions, ingredients, substitutions and the methods behind how I do things.... check out my 'baking tips' tab at the top of the page.

Friday, 25 May 2012

Mini picnic quiche

The sun is shining, summer is here ….and it’s BBQ time!

Sunshine always gives me the feel good factor, but today just didn’t feel quite right. You know sometimes you just get those days when you feel a bit bummed out, sometimes there’s a logical reason and sometimes there’s not.

Sometimes I just feel lonely. There have been a few things playing on my mind recently, and at times like that I am reminded of the downside to ‘doing things differently’ and not simply following the crowd without questioning.  I haven’t got anyone to turn to in the same way as I did before and I have no-one that truly understands me anymore, I mean I’ve barely begun to understand myself yet!

I will never regret going down the paths I have taken, and the ways in which my life has changed, but sometimes I wish, just for a few moments, I didn’t have to think, I could just be and go with the flow and not worry about the consequences or what will become. I sometimes wish someone else could make the decisions and just tell me what to do…working it all out for yourself is mighty hard! But I also know it’s the only way to truly live the life you want.

Well, that’s enough of all that philosophical talk. That’s what happens when it’s silly late at night and I’m tired…but determined to get the post written up before going to sleep!

It’s been a hot sunny day…happy happy happy. And I am happy, really, life is good. I’m just having a silly moment.

So let’s talk BBQ’s, since this evening’s dinner was a cosy little BBQ at my friend’s house. I took along a couple of things to add to the food collection.

Guess which one was mine?


If you read this post you may have guessed!  Yep it was the black bean beet burger towards the back. Looks pretty authentic though, right?

I also made a few mini quiches to share. These mini's are perfect for BBQ's or picnics. The recipe was prety much identical to this quiche recipe, but this time without a crust and served cold as mini snack bites, so they seemed totally different; the perfect light bite. This is such a simple recipe and I have provided it again below. I would strongly recommend silicone mini muffin pans as this will make it easier to pop the quiches out. Also allow the quiches to fully cool before handling them as I also found it a little more difficult to remove from the pan whilst still warm (I was in a rush to get to the BBQ so couldn't wait for as long!)

In typical Bristish style the sun began to set and the breeze got up just as we sat own to eat. It was a little on the chilly side, after having been so hot all day, so as soon as we’d eaten we cosied up inside for an evening of girlie chat.


Recipe: Mini picnic quiche

Ingredients:

½ tsp garlic powder
½ cup chickpea flour
1 tbs potato starch (or other starch)
3 tsp nutritional yeast
1 tsp mustard
½ teaspoon salt
¼ tsp mixed herbs
pinch paprika
Large pinch baking powder
1 tbs olive oil
1 cup water
Veggies- I used ½ grated courgette, 1 small pepper diced, 1/3 cup  each sweetcorn and soy beans. Feel free to use whatever other veggies you have to hand, ensuring you chop the pieces small enough.

Method:

In a medium bowl whisk together the ingredients, other than the water. Once a smooth paste is achieved add the water and whisk again until smooth. It should be about the consistency of pancake batter and have no lumps.

Pour the batter into mini muffin pans filling them  half way. Add the vegies equally between each muffin pan.

Bake for approx. 30 minutes, until the filling appears well set and pulls away from the side of the muffin tray. Let cool in tray before removing.


For tips and info on recipe measurement conversions, ingredients, substitutions and the methods behind how I do things.... check out my 'baking tips' tab at the top of the page.

Thursday, 17 May 2012

Tomato ketchup

So, you remember this post from a couple of days ago…


Black bean beet burgers!

Well just peeking through in the corner of that photo is a little pot of tomato sauce. Homemade tomato ketchup, with a sweet  kick just like regular tomato ketchup but without all the sugar!  What provides the sweetness…plums! Helped out with a little agave syrup (you could omit this is you liked), the plums are a perfect complement to the fresh tomatoes.  I also added some ground chia seed stirred through right at the end to give a health boost and to act as a thickener. If you don’t have chia I would advise experimenting with some other form of thickener to achieve the right consistency for your sauce.

This will store in the fridge for a good for weeks and is the perfect companion for summer time. I can already picture the burgers on the BBQ now! It’s best to store this sauce for a couple of weeks before consuming as it will allow the flavour to mature…nut feel free to dip in of you can’t wait that long!

This sauce would also work well as a basic pasta sauce or base for my super- speedy  GF pizza crust.


Recipe: Tomato ketchup

Makes approx. 500ml

Ingredients

1 large clove garlic
400g ripe vine tomatoes
120g ripe plums
2tbs tomato puree
20g agave
1tsp molasses- optional (gives a slightly deeper richness)
50g white wine vinegar
1 bay leaf
2 cloves
1 small chilli pepper with seeds removed
Salt to taste (I added approx. ¼ tsp)
3-4 tbs ground chia seed

Method

Roughly chop the garlic and add to a food processor along with the tomatoes and plums, pulse to achieve a coarse even ‘paste’.

I used my Thermomix for the entire cooking process, but for those without, transfer the tomato mixture to a medium pan, add the remaining ingredients (except chia) and simmer for 30 minutes, stirring as required to avoid sticking. Add the ground chia in the last  minute.

Remove the cloves and bay leaf (if you can find them) and then transfer the mixture to a blender (or use a stick blender in the pan) and blend until you have a smooth mixture.

Pour into a sterilised bottle or jar and store in the fridge. The flavour matures over a couple of weeks.


For tips and info on recipe measurement conversions, ingredients, substitutions and the methods behind how I do things.... check out my 'baking tips' tab at the top of the page.

Tuesday, 15 May 2012

Black bean beet burgers

Chant the title of this recipe over and over and you’ll have yourself a rap…or something of that sort! Either way these burgers are worth the chant (and the wait for those of you saw the sneaky picture I posted on my Facebook page when I’d first made them a week or so ago)

I know I still have a few recipes to share from my birthday post, and also another birthday related recipe (who doesn’t like to keep birthday’s alive for as long as possible?) but for today, I didn’t want to make you wait any longer for these burgers that have been grinning at me from the folder of photos on my computer desk top for too long!

Black bean beet burgers… Black bean beet burgers… Black bean beet burgers… Black bean beet burgers… Black bean beet burgers…

So I figure the title of this post gives them away rather but apart from having a slight purple tinge, I think they look pretty authentic, complete with chargrilled lines and all.  When I make these burgers again I may reduce the amount of beetroot slightly and also use a mix of cooked quinoa and rice for a variation in texture, since quinoa holds the firmness of the grain more so than rice which may be even more realistic for a meaty texture…just a couple of tiny thoughts to bear in mind, but here I have given you the recipe exactly as I made it.  It goes without saying that you could make a big batch and freeze some. You could also form balls and make meatballs…another variation on this theme.

Typically I don’t seek to replicate ‘meat’ in my meals, I simply don’t feel the need to and a just don’t miss it. I love the taste and textures that veggies and non-meat foods provide without trying to replicate meat…but this was simply a challenge I could not ignore. Plus I wanted to see how authentic I could make these, particularly for non- veggie friends. 

Another important side note to these burgers is that they are very ‘stable’ by that I mean they hold up very well to handling pre-cooking so I think they’d be great for a BBQ! I am definitely going to be making some of these this summer.  I found that the most authentic colouration came from part oven baking and part pan frying in a griddle to obtain the best colour and charred lines. The first batch I just oven baked and they tasted great but just lacked a little something in the visual department… me…perfectionist…never!

I teamed this meal with homemade tomato ketchup, cheezy mustard dip, avocado slices, and a homemade coleslaw. The burgers buns were simply baked versions of my gluten free flatbread with sesame sprinkled on top. Sweet potato fries sealed the deal! I have a recipe for the ketchup and cheezy mustard dip on the way soon….

Enjoy!


Recipe: Black bean beet burgers

Makes approx. 6 burgers

Ingredients

1 cup black beans- cooked
1 cup brown rice- cooked
1 cup oatmeal
1 small onion- finely sliced
1/3 cup cooked beetroot- shredded finely
2 tbs chia and 3 tbs water
2tbs tahini
2 tbs soy sauce
2 tsp mustard
Approx. ½ tsp hot chipoltle sauce (to taste)
1 tsp garlic powder
½  tsp chilli powder
½ tsp paprika

Method

Mash black beans and mix with all other ingredients until you have a well mixed but still textured (meaty) mixture. The mixture should be sticky but manageable.

Form into burger patties approx. 1.5cm thick using your hands or use a cookie cutter as a mould to achieve neat edges (perfectionist!). Lay the burgers on a lined baking sheet and bake for approx. 10 minutes until they are just beginning to brown and then fry on a griddle pan for a few minutes each side to complete the cooking and achieve seared pan lines.

Can be frozen.


This recipe was shared in Allegy Free Wednesday's

For tips and info on recipe measurement conversions, ingredients, substitutions and the methods behind how I do things.... check out my 'baking tips' tab at the top of the page.

you may also like

Related Posts Plugin for WordPress, Blogger...