Showing posts with label quick snack. Show all posts

Tuesday, 5 February 2013

'5 minute' miso stew

Today I am off on a little holiday... to a cottage in the Derbyshire Dales with friends, and it's due to be very chilly and potentially snowy so I've packed all my thermals and waterproofs just in case!  Food was of course on my mind over the last few days- prepping lots of snacks and quick meals to take along with me.....so quick soups and granola bars it is then! Such that this post seemed quite appropriately timed.

A few days ago I needed a really quick fix lunch. I had no soup to hand (other than in the freezer) and I didn’t fancy a cold platter of salad or hummus and veg sticks. Hmmm?

What hot dish could I conjure up in a mere five minutes, that was full of veggies and wouldn’t weigh me down?


Then I remembered that I’d bought some instant miso soup sachets to try. I know what you’re thinking...instant miso soup? That’s not particularly healthy- you should make it yourself!  To a large extent I would agree with you, however I had not tried miso soup before (I know that might sound crazy) and so I wanted to get a feel for the flavours before attempting it on my own, plus this pack was organic and the ingredients list was not particularly bad, it was very similar to a vegetable stock really. I felt this would be a great base for some more substantial additions.

To that was the ‘soup base’ sorted, now to make a 5 minutes lunch!  So I grated up some veg to enable a quick cook and then added some brown rice noodles and some soy beans.  It was ready in 5 minutes flat....or there abouts...but who’s counting?

You can find more of my soup and stew recipes here.

P.S It's Chinese New Year this Friday and although this may be a Japanese inspired dish, it's still noodley and therefore I think it fits the bill. You could infuse Chinese spices will a sweet and sour style broth if you really wanted to play the part. :-)

P.P.S If I'm not able to respond to comments etc over the next few days it will be because I have no internet access. I will be back on Sunday... in the mean time I have a couple more posts lined up for you! :)

Recipe: '5 minute' miso stew

Serves 1

Ingredients:

1 sachet miso soup mix
1 cup boiling water
1 tsp sesame oil
1 small onion or shallot thinly sliced
1 small carrot grated
½ cup cabbage thinly sliced (use Chinese cabbage if possible, or a white cabbage)
Handful of frozen soy beans
¼- ½ cup brown rice vermicelli (very thin) noodles
Sesame seeds to garnish

Method:

Add the onion, carrot and cabbage to a frying pan with the oil (you could use any veg that could be chopped finely). Fry for 5 minutes, using extra water to steam fry as necessary.

Meanwhile boil the kettle and add the miso soup mix to the cup of boiling water- stir to combine and set aside. Add the rice noodles to another cup of boiling water and add the frozen soy beans to another cup of boiling water. Let stand for a few minutes whilst the vegetables cook.

Drain the soy beans and noodles. And add to a serving bowl. Pour the miso soup into the bowl and then add the vegetables. Finish with a sprinkle of sesame if desired.


For further guidance on making gluten free choices please see this post.

For tips and info on recipe measurement conversions, ingredients, substitutions and the methods behind how I do things.... check out my 'baking tips' tab at the top of the page.

Saturday, 17 November 2012

5 minute choc orange puddle cake

This dessert came totally on a whim!

I had a sudden chocolate craving and usually when such an attack strikes I have some choc-orange smoosh bars or healthy chocolate fudge to hand. However at this particular moment in time I had neither!


Since a taste for a chocolate orange combo had been planted in my mind, I set about using my silicone egg poacher trick to create a super speedy (I wanted that fix pretty quick!) healthy chocolate puddle cake using the dome shape to encapsulate a melty chocolate centre.

Oh my… 5 minutes later and one awesomely indulgent but healthy chocolate cake was all mine! Ok, so I would suggest reigning in a little self-control and not eating the entire thing in one sitting- it is quite large. (but I won’t tell if you don’t). 

I used buckwheat as my GF flour of choice but other flours of wholemeal spelt if GF is not a requirements are likely to work fine also. I also added in grated courgette for moistness, it works really well and you really can’t tell it’s there. Finely grated carrot or pureed cauliflower would also work well.

This puddle cake could be made into all sorts of flavours…how about substituting almond extract for the orange and adding flaked almonds on top of the cake (or in the silicone mould or bowl before pouring in the batter). Mix through some berries and sugar free jam for a fruity kick.  Or why not go all out and leave out the orange and spread this crazy healthy banana frosting over the top.


Recipe: Choc orange puddle cake

Serves 2-4 (depending on how hungry you are!)

Ingredients

¼ cup buckwheat flour (or whole meal spelt)
¼ cup finely grated courgette (carrot could also work)
2 tbs tapioca flour or arrowroot
Slightly heaped ½ tsp baking powder
Pinch salt
2 tbs cocoa powder or raw cacao
1 tsp ground chia/flax
1 tbs agave and a tiny pinch stevia
1/2 tsp orange extra
3 tbs orange juice
Grated orange zest- optional (I didn’t have any)
1 tsp mild flavoured oil
Approx. 1 tbs worth dark choc chunks (I broke off a chunk from  a dark choc bar)

Chocolate drizzle: 1 tbs agave mixed with 1 tsp cocoa powder.

Method

Add everything (except choc chunks) to a mini blender and blend until well mix and there are no visible courgette strands. You could mix by hand if the courgette strands are very fine.
Using a silicone egg poach or other lightly greased domed microwavable bowl (approx. 12cm diameter) spoon in half the mixture, place the choc chunks in the centre and then top with the remaining mixture.

Cook in the microwave on full power for 90 seconds. Allow to cool for 1 minute before loosening and tipping out into a serving plate.

Serve hot whilst the chocolate centre is still oozing. Serve with a chocolate drizzle if desired.


For further guidance on making gluten free choices please see this post.

For tips and info on recipe measurement conversions, ingredients, substitutions and the methods behind how I do things.... check out my 'baking tips' tab at the top of the page.

Tuesday, 5 June 2012

Celebrations all round……easiest ever fat-free vanilla sponge!


Today it is the official day of the Queen’s Diamond Jubilee. Street parties and bunting have dominated the country this (cold and rainy) weekend. All the packaging in the shops has also gone mad for the jubilee…take this for example:
image source

Well, it made me smile!

Myself, well I have another small reason to celebrate, well two in fact!

On Saturday I won a prize with a photo I’d submitted to a competition for nature photography, the image I submitted was this one. It meant a lot to me as I’m hoping to push my photography to the next level over the coming months and not just in the area of food photography, so this small element of recognition inspired my confidence!

Secondly, drum roll please…..

…..This post is my 200th post on this blog! Wow, that seems crazy to me and to think less than nine months ago none of this existed.   

To celebrate all of these things I wanted to make a jubilee inspired cake. For this occasion I have created my easiest ever fat free GF vanilla sponge.  It takes the form of a mug cake in its simplicity but here I have dolloped the sponge in the same way I did with this birthday cake to create a pretty stack! 

You could use other GF or spelt flours in place of the buckwheat as I have used.  Then let your imagination run wild with layering combinations…. Berries and cashew cream (or yoghurt for a lighter version) make the perfect summer pudding centrepiece with minimal effort!
 
If you have no celebration coming up…simply celebrate being alive, that in itself it pretty amazing after all!


Recipe: fat free vanilla sponge

Serves one as 3 dollops or 1 mug cake

Ingredients

3tbs buckwheat flour (or other mild flavoured GF flour)
1 tbs ground almonds
1 tsp agave
½ tsp vanilla extract
Scant ½ tsp baking powder
3tbs plain soy yoghurt (or regular yoghurt for non-vegan)

Method

Mix dry ingredients in a small bowl and then add wet ingredients and mix together well.

Either spoon into a microwavable bowl/mug for a mug cake or spoon in little round dollops on a microwavable plate to serve as flat sponges that can be layered up with fruit and cream in between.

Cook in the microwave  on full powder for 1 minute for flat dollops or slightly longer for a mug cake. Alternatively cook in the oven for approx.. 10-15 mins depending on size until ever so lightly golden.

Add-ins: substitute 1tbs flour for cocoa powder. Add a tablespoon of nuts/dried fruits /fresh fruit/choc chunks…..


For tips and info on recipe measurement conversions, ingredients, substitutions and the methods behind how I do things.... check out my 'baking tips' tab at the top of the page.

Tuesday, 22 May 2012

Apple oat bites

Oats never go away from my blog for long do they! It’s because they are always on my mind. Such a healthy, substantial, cost effective, simple, versatile ingredient…I truly believe oats are what make the world go round!

Oats are my breakfast every day, snacks in between on other days and occasionally dinner (when all I need is a quick post-gym snack). So when I need a quick and simple 2-minute breakfast, often the answer lies in my oats.

This recipe concept is based on my regular breakfast apple oats’ merged with the amazing breakfast cookieLast weekend, to shake things up a little instead of eating my regular oats as a very liquidy mix in a bowl, I reduced the liquid content right down, added some shredded coconut (for good measure) and then packed the mixture into a mini silicone muffin pan to cook them up. By the way, the mixture also tastes great pre-cooking…yes I was very hungry at that point and so very tempted to eat it all…but then I wouldn’t have any recipe for you!

Quick recap on the apple oats theory. I always grate a whole apple to mix through my morning bowl of oats for four reasons- it's a great way to get an extra portion of fruit in your day, it gives a subtle sweet taste without the need for additional sugar, it is fairly neutral so can easily accommodate other mix-ins to jazz things up, it bulks up the size of my breakfast without needing to add more oats so offers a great balance between being substantial and light.

The apple base mix is great…but what about the add ins. It’s always all about the add ins, that’s what brings sunshine and smiles to my day, amongst other silly things that make me smile….like a cat on it tiptoes drinking out of the bird bath (spotted this morning!)

So I spent a little extra time putting together a few simple flavour combos to get you started- the key thing for me is that they shouldn't take more than a minute to prepare since this is a speedy breakfast after all.  I also ran a test for microwave vs oven. I found the only real difference to be that the oven gave a dryer ‘baked’ exterior where as the microwave version stayed soft on the outside. The inside of both versions were very soft and moist. Take your pick!

You could also make a larger 'breakfast bombe' using my silicone egg poacher method. The photo below is a plain apple oats version with extra coconut flakes on top...still super yummy without anything more!

This is a cheeky little 'bombe' version of the origial apple oats without mixins.

Recipe: Apple oat bites

This makes approx. 6-8 mini oat bites (or a couple of breakfast bombes)

Ingredients

1 cup regular oats
1/3 cup unsweetened coconut flakes
2 tsp vanilla extract
1 large apple grated
2 tbs ground chia or flax
½ cup preferred milk alternative
Approx. ½ cup total mix-ins

Mix-in ideas: 
'carroke cake' (carrot and nutmeg), date and walnut, 'gingerbread' (fresh, ground and crystalised ginger plus mollasses) maple cacao....plus pretty much anything else you can think of!

Method

Mix everything together and pack firmly into silicone mini muffins trays (silicone for easy removal and microwave compatibility). Microwave on full power for approx. 90 seconds until the top feels firm.

my mix-ins of choice- I made two of each of the above listed flavour combos

basic mixture ingredients
wet basic mixture
oven version
microwave version
For tips and info on recipe measurement conversions, ingredients, substitutions and the methods behind how I do things.... check out my 'baking tips' tab at the top of the page.

Friday, 4 May 2012

Sticky orange and ginger cake

You know how much I love a super simple two-minute cake, right?

Well, can you imagine how excited I was a week or so ago whilst wandering through the bakeware section of the supermarket, when these caught my eye….


That’s right, they are silicone ‘pods’ for poaching eggs… ah, but I don’t eat eggs. Confused?

…can you see where my thoughts are going yet?

They are the perfect way to create a perfectly domed single serving ‘mug cake’ that can easily be removed for serving on a little dish.  So much prettier than eating straight out of a mug (though nothing wrong with that either!), and so much simpler than trying the line a mug with clingfilm (as I did with my carrot cake) so that the cake can be removed.

Go on treat yourself!

I’ve already tried a few flavour combo’s out…and I have another recipe for another time, but for now how about a bit of sticky orange and ginger cake?

The magic ingredient in this cake is sugar free orange and ginger jam (you could easily use sugar free marmalade and add your own ginger). I use these ‘jams’ for all sorts of things… and they come in loads of flavours (I’d just run out of my blueberry). Great as a glaze, or as a juicy surprise centre like in these coconut tarts. They are sweetened with fruit only.


So onto the recipe itself, I have used white spelt flour but you could easily sub a GF mix (my usual one is equal measures of ground almonds, buckwheat flour and tapioca starch). Some of the jam is mixed through the batter or used as a surprise melty centre and the rest is melted over the top of the freshly cooked cake as a glaze. You will need very  little extra sweetener (if any) so go sparingly!

This sweet and citrusy dessert was the perfect pick me up for my Friday afternoon…and I certainly needed it after I’d given blood in the morning and then without heeding the nurses order of ‘rest and no strenuous activity’ for the rest of the day…I spent it on my feet for 5 hours in the kitchen, and as you know that is often a very strenuous activity. Ooops!

Resting with some cake now. All is better in the world.


Recipe: Sticky orange and ginger cake

Serves 1 (or double up for a sharing portion!)

Ingredients

3 tbs white spelt flour (or GF mix)
½ tsp baking powder
Tiny pinch salt
¼ tsp ground ginger
1 tbs melted coconut oil
1 tsp orange jam (for centre or mixed through) plus extra for glaze
1 tsp agave syrup (if needed to taste)
Up to 2tbs  orange juice

Method

Mix dry ingredients together in a small bowl. Add wet ingredients and mix well.  You can either add the jam to the mixture or reserve it to add as a melty centre.

In another greased/lined small microwaveable dish (or use a silicone egg poach!) spoon half of the mixture, add a dollop of jam to the centre (if preferred) and then spoon the remaining batter on the top.

Microwave for 40 seconds on full power. Test with a finger and if the sponge springs back you’re done. Cook for another 20 seconds if necessary.

Serve cake on a plate and spread a little more jam to glaze whilst the sponge is still hot. Decorate with mango or orange pieces, soy yoghurt/cream and a dusting of ginger.


(look at the gooooey melty centre peeping out at you....!)


For tips and info on recipe measurement conversions, ingredients, substitutions and the methods behind how I do things.... check out my 'baking tips' tab at the top of the page.

Saturday, 28 April 2012

Chewy coconut granola bars

Remember I mentioned my coconut overload? Well, I’m still hot on the coconut infused recipes and this one is no exception, although you can easily change things around and sub the coconut if you want as it’s a super versatile concept.

This recipe was originally generated by accident…following a batch of chocolate granola gone wrong. That will teach me to mess with things when they are perfect as they are. Anyway, this particular batch was a little lacking in flavour and was very crumbly, still edible but not enjoyable as a snack on its own.

So chewy granola bars to the rescue!  This could easily have been a no-bake recipe as the banana holds everything together, however to me they were like chunky versions of smoosh bars, and  I wanted something a little firmer… so I baked them for 10 minutes. Just enough to firm them up but so they still retained the lovely chewy texture.

You can use any fruits and nuts you like and if you don’t have granola you can toast some oats and use those. I used chocolate granola, but if yours is plain feel free to throw in some cacoa powder or maybe even some cocoa nibs for a bit of raw chocolately goodness!


Recipe: chewy coconut granola bars

Makes one 8” pan

Ingredients
1 medium banana- mashed well
2 tbs chia seeds
1 cup mixed fruit ( I used raisins/dates/cranberries/figs
½ cup coconut flakes (or crushed nuts)
1 cup granola (I used homemade choc granola)

Method

Blend all ingredients, except the granola, together in a food processor on medium speed (so the fruit doesn’t break up too small) or mix well by hand. Add the granola last, mixing through well.

Press firmly into a lined square pan. You can either keep these raw and simplychill until firm or you can bake them for approx.10 mins at 180C.

Once cooled/firm cut into bars and store in the fridge for up to 1 week.


For tips and info on recipe measurement conversions, ingredients, substitutions and the methods behind how I do things.... check out my 'baking tips' tab at the top of the page.

Tuesday, 10 April 2012

Blueberry pie breakfast cookie

Remember my chocolate chunk breakfast cookie?

…How could you forget! It was very good.

Well, for those among us who simply cannot contemplate chocolate in any form for breakfast, I now have a little fruity offering. The perfect breakfast… or brunch.  I also have a little admission to make here, when I woke up this morning  I was so busy with bits and pieces on my laptop upon waking that I didn’t actually make it out of my bedroom until just before midday when my stomach started shouting at me for food…I had no idea how late it had got! So, I doubled the recipe and had one massive cookie. It was very filling indeed. Ok so that’s my little guilty admission!

So, the photos below is for one biiiiiig ‘double’ cookie however the ingredients below are for a regular sized cookie more like the original choc chunk version…. Double it if you dare!! (p.s if you do you’ll need to microwave it for longer- mine took approx. 2 ½ mins to cook through in the middle, no dramas if it is a little soft. Also it will be too big for your hands so you'll simple need to spoon and spread it onto the plate in a neat circle). I had another thought once I made this cookie, and I’ll give it a try on another occasion but I reckon you could substitute the yoghurt for a small mashed banana for a blueberry-banana combo, this will also help to sweeten and you can reduce the maple syrup. Let me know how it works out for you if you try this.

The photos look much less ‘oaty’ than the previous chocolate cookie, I think that’s simply because I whipped the ingredients together fairly ferociously, so it had more of a cakey texture. Either way tastes good to me.  I used blueberries but you could use any berry you fancy. I advise using frozen blueberries as they will hold their shape as you push them in and they will be perfectly cooked through after 1 minute in the microwave, no need to thaw first.

One last note- I suggest you taste the batter before cooking to test for sweetness. As its for breakfast I prefer a mildly sweet cookie but you may prefer to modify this, particularly if you make it for a dessert or snack.

Well, I think I’ve just about caught up with my life now that I’m back from my holiday. It’s been a day of bits and pieces, I was so glad for the Easter bank holiday!  I still have a few things to tick of the list for today, not least dinner that is currently in the oven.  If successful that will a post for later this week…Oh the excitement!


Recipe: blueberry pie breakfast cookie

Makes one fat cookie

Ingredients

¼ cup oats
2 tbs buckwheat flour (other flours  would probably be fine too)
¼ tsp baking powder
1 tbs ground flax/chia
Ground cinnamon and vanilla extract to taste (approx. ½ tsp each)
1 tbs flaked almonds (or other nuts of your choice)
1 tbs maple syrup
3 tbs soy yoghurt (or regular yoghurt for non-vegan)
Handful of frozen blueberries

Method

Mix and mash all ingredients (other than almonds and berries) together well to form a thick sticky ball of dough. Roughly flatten the ball with your palms and place on a small microwaveable plate. Push the frozen blueberries into the surface evenly across the cookie dough. Sprinkle the flaked almonds over the top and dust with a little extra cinnamon if desired.

Cook on full powder in the microwave for 1 minute. Press with your finger and if it springs back and there are no visibly sticky bits and the berries are fully cooked you’re done!


For tips and info on recipe measurement conversions, ingredients, substitutions and the methods behind how I do things.... check out my 'baking tips' tab at the top of the page.

Thursday, 5 April 2012

‘Indulgent’ chocolate breakfast oats

Oats... Oats... Oats

I figured a breakfast post about one of my favourite foods ever would be the perfect subject for a post whilst I am away on my holidays. Particularly with this spring weather we are having...sunny one minute, chilly the next. It often looks lovely and warm through the window but is actually quite chilly when you get outside. (yes i have bee  caought out a few times). So we are most definitely not relegating bowls of oatmeal to the 'winter recipe' box just yet...oh no never!

On days when the sun is hidden or I am feeling a little fragile and in need of some self-indulgence upon getting out of bed, what better way than to glam up a bowl of oats to provide a ‘lets-make-everything-better’ chocolately hit… whilst still providing the fuel to power me through the morning.

Actually I haven’t felt in that frame of mind for quite some time but not one to miss out on an opportunity for a little bit of healthy indulgence, this also makes an amazing mid afternoon snack if you feel in a bit of an energy slump…or are in one of those fidgety ‘not sure what to do with myself type of moods’ (yep that’s me on a frequent basis).  For an afternoon pep me up I halve the quantities below.

So this simple little concoction provides the perfect calming influence….it’s pretty much a hug in a mug!

You don’t have to add the extra chocolate chunks if you don’t want to (are you crazy!) but I really only added a sprinkling here and if you grate the chocolate it appears as if you have a lot more than you really have…deceptive! If you use a very ripe banana (I freeze chunks of ripe banana for future use at times like this) then you probably shouldn’t need any additional sweetener- but it’s up to you! This is another recipe where carob powder could also be used in place of, or mixed in with the cocoa for extra depth and sweetness and a twist on the usual taste…I tentitively tried the carob version recently and I was very pleasantly surprised, it tatsed really good and not so dissimilar the the original cocoa version. The banana and carob flavours compliment each other really well and neither are overpowering.

Oh how I love thee oats….hmmm this inspires a little Ode to the faithful Oatmeal now that I have so many oat-based recipes…but more on all that tomorrow!


Recipe: ‘Indulgent’ chocolate breakfast oats

Makes 1 bowl

Ingredients

½ cup rolled oats (or modify the amount depending on how hungry you are!)
Approx. 1 cup  soy milk or any dairy alternative
1 tbs cocoa powder (or carob)
1 ripe banana- mashed but a few lumps are ok
2 tbs coarsely chopped hazelnuts or walnuts
1 tbs dark chocolate chunks or grated chocolate
Sprinkling of cinnamon- optional

Method

Mix and mash together the oats, ‘milk’ cocoa powder and banana. Heat in the microwave for 90 seconds and mix through. This is the consistency I like it (thick but still liquidy) but feel free to microwave longer if preferred. Top the mixture with the nuts and chocolate chunks finishing with a sprinkling of cinnamon.

I always microwave my oats as I like the consistency this way (and the speed and reduced washing up) but I appreciate many of you like to use the stove top, so feel free to modify the method about to suit.


Above- a big bowl of cocoa oats, below- a mini portion of carob oats (all tucked up in bed)


For tips and info on recipe measurement conversions, ingredients, substitutions and the methods behind how I do things.... check out my 'baking tips' tab at the top of the page.

Tuesday, 20 March 2012

Bakewell oat-tart

So on Sunday it was Mother’s Day here in the UK. You may have noticed I gave you a little sneak preview as to the subject of today’s post….

Mmmmm, raspberries and almonds! I figured this was a very underused combo on my blog but I love bakewell tart so I can’t believe I haven’t attempted a healthy version before now. Plenty of time for all that, but this little oatcake certainly did the trick, and yes this is another single serving cake of the microwave variety. Oh how I do love them!

Perfect for mother’s day breakfast.


The original idea for this cake came via this recipe, when I was doing some ‘oatmeal’ research, and it simply looked too good to not to try out. I made a few tweaks to the ingredients, and the quantities simply because I wanted to make more of a single serving (though I’ll definitely be making a larger batch from now on!) I then also took the leap of faith and use the microwave to turn it into a super quick breakfast/brunch/dessert, and also because I resent having to turn the oven on for a single cake! 

It worked really well in a muffin case in a silicon muffin pan, as you can then simply peel away the paper case once cooked (you may well not even need the paper cake case). To me these had the lovely dense texture of oatmeal without the creaminess of a bowl of cooked oats (I love that too but I know some people don’t). It's really a kind of porridge cake but that doesn't sound as good as it tastes! Having not tried the oven version I was not able to compare the methods, I imagine the oven version would maybe have more of a crust on the top and simply taste more ‘baked’ so if that’s your preference go for it!

I tried this recipe on the Saturday (in preparation for Mother’s Day) and ate the first ‘cake ‘plain and then the second with a dollop of super thick melted cashew cream, oh yeah…I’d recommend going for the topping!  By Sunday I’d run out of topping…so I served them with soy yoghurt for our mid-morning brunch which was still yummy!


Recipe: Bakewell oat-tart

Makes 2 cakes

Ingredients:

2/3 cup oats
1 tbs agave
¼ cup apple puree
¼ cup soy milk (or any milk alternative)
½ tsp almond extract
1 tsp ground chia or flax
Handful of fresh or frozen raspberries (I use frozen as they don’t ‘bleed’ so much)
Flaked almonds for decoration (add some extra to mixture if desired)

Method:

Mix all ingredients together in a small bowl, adding the raspberries last so the mixture doesn’t turn totally pink, unless that’s what you are aiming for!

Spoon into two silicone cupcake/muffin cases (or anything suitable for microwaving) and cook on full power for 2 minutes, though I would advise checking after 90 seconds to see if they are ready to your desired consistency since microwaves are all different.


For tips and info on recipe measurement conversions, ingredients, substitutions and the methods behind how I do things.... check out my 'baking tips' tab at the top of the page.

Saturday, 10 March 2012

Single serve carrot cake

I’ve enjoyed making my ‘2 minute breakfast cookies’ so much recently, more for dessert than breakfast! I’ve tried out lots more flavour combinations so I will be sharing those with you soon, but today I fancied a single serving more of the mug cake variety.

Using this gluten free raspberry cheesecake mug cake recipe as a basis I set about making a super nutritious ‘fill me up’ type dessert with some added oats for oomph. To make smaller portions you could divide the mixture into two small ramekins to serve two.

Instead of serving it straight from a bowl or mug I decided to line the ramekin with lightly oiled clingfilm so that once cooked I could easily lift it out and peel away the clingfilm to serve. It worked pretty well although if I’d waiting a couple of minutes for it to cool and firm up slightly it probably would have been even easier….me impatient…never!

Using orange juice instead of soy milk really helps to bring out the flavour of the carrot, and the ground almonds really help add to the moistness of the crumb, you could probably get away without the added oil since the texture was in no way dry. You could serve it with a dollop of nut butter or a creamy cheesy style frosting. Here I served mine with a thick cashew cream made with much less water than usual.

Single serving 'microwave' cakes are great as a time saver and also as an ingredient saver particularly when being a bit adventurous or experimental and you don’t want to make a whole batch of cake to find it tastes awful! Today this ‘5 minute cake’ really did the trick and meant that I could have a 10 minute time-out before rushing off the do the next thing on my list…so much to do today…busy busy busy, I will reveal all very soon!


Recipe: single serve carrot cake

Serves 1!

Ingredients

2 tbs GF flour mix
1tbs ground almonds
1 tbs oats
1 tbs rapadura
Tiny pinch salt
¼  tsp baking powder
¼ tsp baking soda
1 tsp mild flavoured oil (coconut or rapeseed)
1 small carrot grated- approx. 3tbs
½ tsp vanilla extract
¼ tsp cinnamon
2-3 tbs orange juice
Nuts to sprinkle on top- optional

Method

Add all the ingredients to a small bowl adding orange juice last just enough to achieve a medium thick batter. Mix well so there are no lumps or dry patches of unmixed flour.

Pour into a mug or large ramekin (line it with clingfilm if you want to be able to take it out to serve). Note the mixture should only fill no more than just over half the height of the mug/ramekin. Sprinkle nuts over the top if you like. 

Cook on full power (900W) in microwave for 1 min. check with a cocktail stick until stick comes out almost clean. Cook for 20 seconds more if necessary (up to two times) until cooked.


For tips and info on recipe measurement conversions, ingredients, substitutions and the methods behind how I do things.... check out my 'baking tips' tab at the top of the page.

Saturday, 18 February 2012

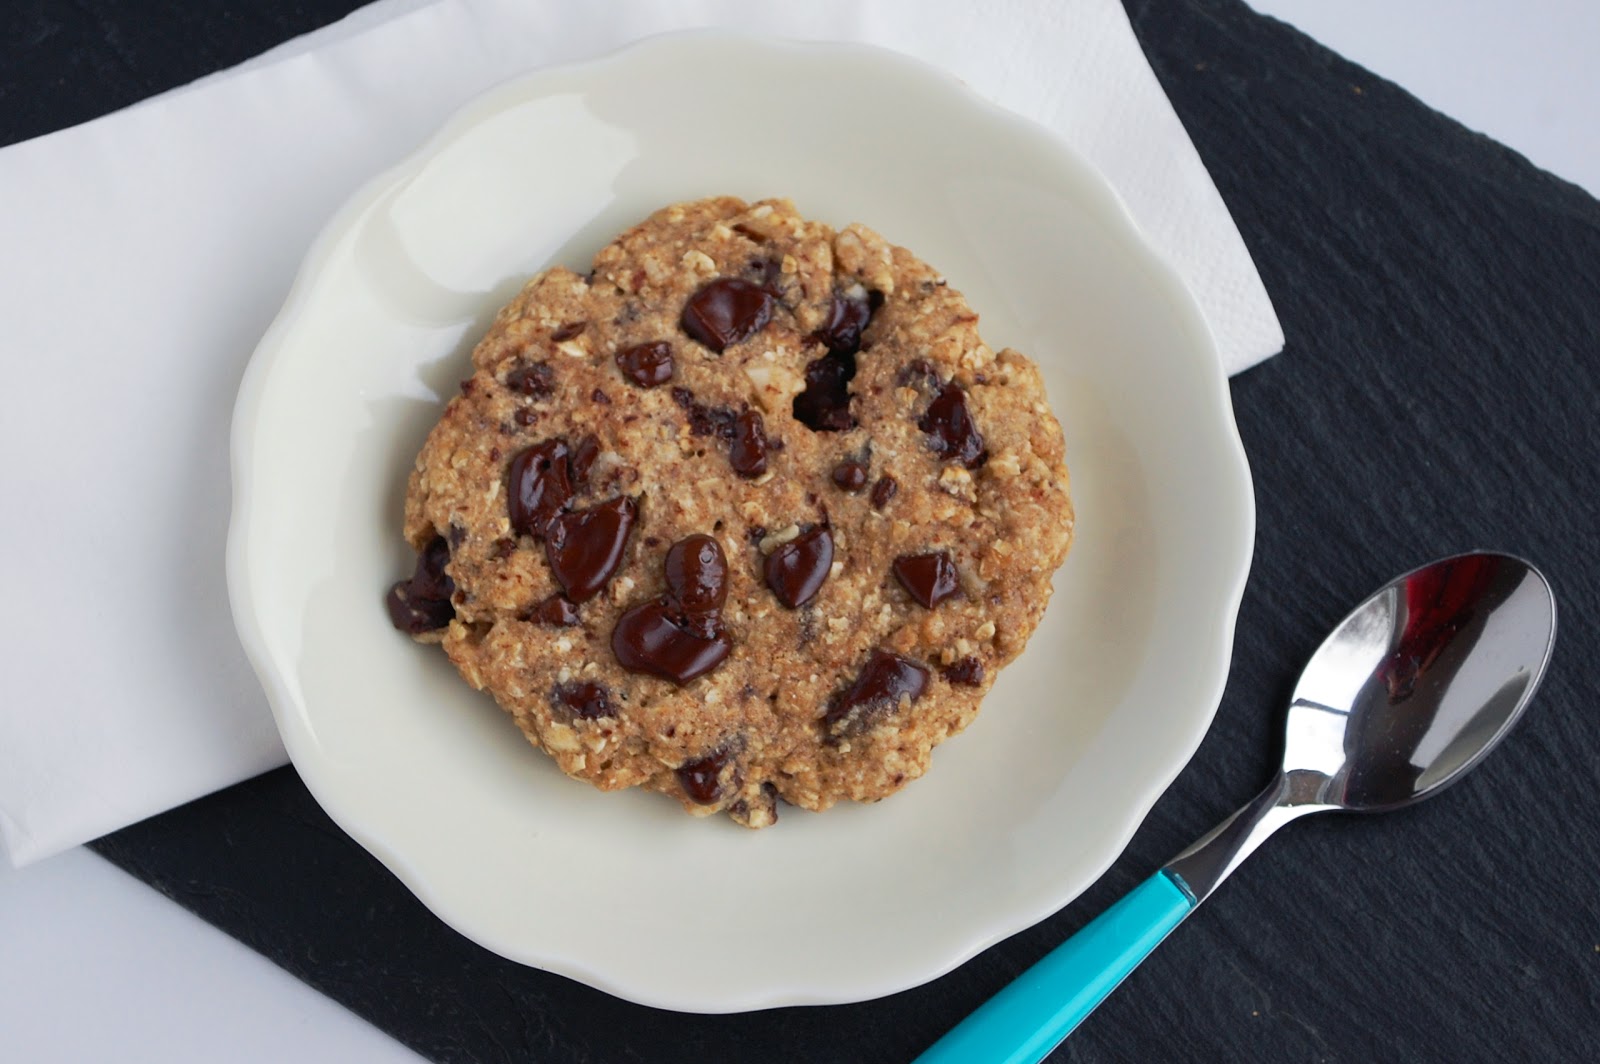
Choc chunk breakfast cookie

I love the weekend mornings…all the more because I can spend a little longer in my PJ’s, spend a little longer pondering how to fill the day, spend a little longer contemplating breakfast…..

Mmmm….Saurday morning breakfast! Today we have another new twist on my oats (you know I love oats, right?!) This breakfast snack (or any time of day snack) was inspired by this recipe by Ashley at the Edible Perspective, such a perfectly simple concept and with a few tweaks of my own I was ready to roll.

Please let me introduce  the ‘Choc Chunk Breakfast Cookie’

A super speedy, healthy but ever so slightly indulgent breakfast cookie….made in minutes. Ticks all the boxes, right? You could of course double or triple this recipe and form into two or three patties but for me the one was enough to fill me up and give me a morning boost (until my next snack in a couple of hours!)

This cookie is soft and ‘cake’ like with a lovely chewy moistness and contrasts of the chunky nuts and melted chocolate adding to the cakeyness. Without the chocolate it might be  a little dryer so feel free to add a tsp of oil to the mixture if this is more your thing.

You could make this recipe with other fruit and nut combos and omit the chocolate chunks if you were wanting to be really virtuous, (I am planning on testing this out soon) but for me the melty chocolate really hits the spot… and it is the weekend after all. The recipe below contains no additional fats (other than the choc chunks and good fats in the nuts,  and with its whole grains it’s still healthy and filling…so go ahead and enjoy your chocolate moment and start your weekend with a (chocolatey) smile!

If you're already done with breakfast and fancy a super speedy mid morning snack....treat yoursef to another little indulgence of the microwave variety....may be my chocolate mug cake or rasberry cheesecake will give you a bit of inspriation.

Right, better get on (and out of my PJ’s) I have lots of plans to investigate today, too soon to give anything away but I will hopefully be able to fill you in on all the happenings in a few weeks time!


Recipe: Choc chunk breakfast cookie

Makes one fat cookie

Ingredients

¼ cup oats
2 tbs buckwheat flour (other flours would probably be fine too)
¼ tsp baking powder
1 tbs ground flax
Ground cinnamon and vanilla extract to taste (approx. ½ tsp each)
1 tbs choc chunks
1 tbs chopped nuts or your choice
1 tbs agave or maple syrup
3 tbs soy yoghurt (or regular yoghurt for non vegan)

Method

Mix and mash all ingredients together well to form a thick sticky ball of dough. Roughly flatten the ball with your palms and place on a small microwaveable plate.

Cook on full powder in the microwave for approx. 1 minute. Press with your finger and if it springs back and there are no visibly sticky bits you’re done! Eat immediately whilst chocolate is melty!


For tips and info on recipe measurement conversions, ingredients, substitutions and the methods behind how I do things.... check out my 'baking tips' tab at the top of the page.

Saturday, 4 February 2012

Chocolate granola

I feel like i'm surrounded by a sea of chocolate....

You could say i've had a bit of a chocolate kick this last week, with new recipe trials and a few repeats of old favourites.


So far this week i've been munching on chocolatefudge, chocolate orange smoosh bars, my newest chocolate frosting, some trials for an up and coming healthy chocolate bar, and last but not least....

chocolate granola!

This has become something of an obsession, with three batches made so far (although some of that was then given away to others). This follows my previous two granola recipes and, for me, is a winner by far (although my mum and sister who have tested out all the options preferred my regular granola for breakfast). This is the perfect 'indulgent' (but still super healthy) breakfast treat, the perfect alternative to pop corn or your finger-picky snack of choice, great as a dessert topping...the list goes on.

I do have to admit that a fair amount of the mixture didn't make it into the oven....oops!

I have used cacoa powder and cacoa nibs for a super healthy mix but you could easily substitute cocoa powder and semi-sweet dark chocolate drops if you prefer.  I've found that the bitterness of the cacoa nibs is an amazing compliment to the subtle sweetness of the granola coating and it gives such a depth of flavour. The other bonus is that the cacoa nibs don't melt and in the oven (although melty chocolate could be a good thing?)

Such a simple recipe, so if you haven’t tried making your own granola yet I really advise you gets to it right away. I promise you won’t regret it!

P.S I didn’t eat all that chocolate by myself!!


Recipe: Chocolate granola

Makes 3 bowls

Ingredients

1 ¼ cup oats
2 tbs chia seeds
1 cup mix of nuts (I used cashew, walnut and hazelnut)
2tbs each of sunflower and pumpkin seeds
2tbs ground flax
3 tbs raw cacoa powder
2-3 tbs raw cacao chips
3 tbs apple puree
1 tsp vanilla extract
2 tbs coconut oil- melted
2 tbs agave syrup
1 tbs rapadura/palm sugar

Method:

Mix together dry ingredients in a medium bowl. Melt the coconut oil into other liquid ingredients then add to the dry.  Spoon onto 2 lightly greased baking sheets making sure you have a thin even layer with some clumpy bits. Bake at 170C for 10-12 minutes until almost beginning to brown- keep a close eye to avoid burning. Allow to cool fully before storing in an airtight container. Stores in the cupboard for a few weeks.


For tips and info on recipe measurement conversions, ingredients, substitutions and the methods behind how I do things.... check out my 'baking tips' tab at the top of the page.

Thursday, 2 February 2012

Ten minute pizza (gluten free)

On weekday evenings, when I go straight to a gym class after work, I often get in quite late.  On these days a super speedy dinner is in order.

I have to admit, I often resort to a big bowl of oats with their endless variations of toppings. Other times I might opt for a defrosted portion of one of my soups, (this one is my current favourite), or a bowl of cous-cous and veg.

Earlier this week I made pizza…the fasted pizza I’ve ever made! 10 minutes from first having the idea the pizza was on my plate ready to eat (ok, I had to allow for a 5 minutes photo shoot first!)

The pizza base is also gluten free as it is made using my flatbread dough, I simple made a larger flatbread to act as a pizza base. The original recipe made 4 small flatbreads but I doubled them up to make 2 larger pizza bases (in actual fact I halved the recipe to make a single serving).

I obviously haven’t used ‘cheese’ here, as I really don’t think it needs it. The tomato-hummous base is full of flavoursome. You could add some cheese/vegan cheese if you fancied when you pile the veg on top of the bases.


Recipe: Ten minute pizza (gluten free)

Serves 2 

Ingredients:

1 batch of flatbread dough (formed into two large rounds)
2 tbs tomato puree
2 tbs hummous
Mix of vegetables for roasting (chopped small)- I used peppers, tomatoes, courgette, onion
1 tsp olive oil plus ½ tsp seasonings of choice
Handful of sweetcorn and/or canned beans (defrost sweetcorn if frozen)

Method: 

Prepare the pizza base dough according to the flatbread recipe- form into two larger pizza sized rounds.

Place the pizza bases on a lightly floured baking sheet under a pre-heated grill.  Grill for 3-4 mins each side until lightly golden.

Prepare the vegetable for roasting and coat in the oil and seasoning mix. Spread it n a baking sheet and place in the oven for 5- 10  minutes (depending on size of pieces) and roast until just cooked.

Briefly remove the pizza bases from the grill and spread with 1 tbs each of the tomato puree and hummous. Top with the roasted veg and add the sweetcorn/beans. Place back under the grill for 2-3 minutes to finish cooking.

Serve with a salad if you like.

Did that take 10 mins?....ok well maybe 15 tops!


For tips and info on recipe measurement conversions, ingredients, substitutions and the methods behind how I do things.... check out my 'baking tips' tab at the top of the page.

you may also like

Related Posts Plugin for WordPress, Blogger...