Showing posts with label bars. Show all posts

Tuesday, 23 April 2013

Choc chip chunks- no bake!

This recipe originally formed the basis for one of the Wholeplus Energy range, but then my flavours changed tack and this got nudged out. They are delicious though so they couldn’t be sidelined without a big shout out on here!


So simply- just three key ingredients. I use cocoa nibs which are amazing in these bars, they give a harder crunch and a bitter chocolate taste, but of course if your prefer to swap in dark chocolate chips then feel free to do so.

I used a little vanilla bean powder in this recipe, I sometimes find that liquid extracts made with an alcohol base have a slightly bitter aftertaste in no bake treats- use the oil based versions if you can. Some people also find that a touch of  almond extract gives more of a cookie like flavour.  Don’t skip the salt as it really makes the flavour come together and pop!

For more no bake treats and bars, you’ll find them here.


Recipe: Choc chip chunks

Ingredients:

50g cashews or almond (use blanched for a lighter colour)
100g dates ( I use deglet noor)
20g cacoa nibs
Up to 10g ground oatmeal (only if mixture is too sticky)
1/2 tsp vanilla extract or 1/4 tsp vanilla bean powder (or almond extract if referred)
Pinch sea salt
1 tbs maca powder (optional-gives a slightly ‘malty’ flavour)

Method:

Coarsely process the nuts and set aside.

Blend the dates until they form a paste. Add all the remaining ingredients and pulse to fully combine whilst keeping coarse chunks. The mixture should be slightly sticky.

Form bars by pressing the mixture into the bottom of a lined mini loaf pan, and allowing to chill to firm up before slicing. I then chopped the bars into cubes.


For further guidance on making gluten free choices please see this post.

For tips and info on recipe measurement conversions, ingredients, substitutions and the methods behind how I do things.... check out my 'baking tips' tab at the top of the page.

Saturday, 2 February 2013

Apricot and ginger flapjack...no bake

Ok, so I have a super healthy, super speedy, sweet treat recipe for you....what’s new?

We actually a lot is new!


A few milestones have been passed these last few days....I’ve been keeping things quietly under wraps to a large extent but I think now comes the time to share a little more with you. It’s all still an ongoing work in progress, but that’s life at it’s best don’t you think?

I shared a few changes and achievements so far this year in yesterday's monthly roundup; namely the fact I have just completed my Certificate in Plant Based Nutrition...exciting times! Also the fact that I have teamed up with The Real Food Source (who I have previously written recipe posts for) and we are looking to launch a range of products via their newly revamped website (work still in progress).

But in other news, two other important milestones (they are a big deal to me anyway). My facebook page reached 400 ‘likes’ last week. I know that may sound pitiful to some and pails in comparison with some of the big bloggers out their who’s work I admire and respect so much, but to me that means a lot and I am very thankful...I will keep on pushing forward, onwards and upwards! 

Secondly this post marks my 400th post on this blog! Wow, I can barely believe i’ve kept things going this far and actually had 400 things to write about...with more and more ideas constantly cropping up in my mind! I remember when I sat down to write my first post, I didn’t have much idea how things would pan out, but I do distinctly remember writing down a list of about 20 recipes before running out of ideas, but thinking to myself ‘well that will keep me going for a few months at least’. 

Anyway, that’s just a little taster of what I’ve been up to....I will update you on everything in greater depth very soon.

If you’re still reading at this point...I applaud you!  Any thoughts or questions let me know as I‘m open to all ideas as this point in my development. After all this blog is as much for you as much as it is for me!

So, on to the recipe itself! Sugar free, fat free, no bake, simple, sweet...what more could you ask for? Instead of using dates- my usual go to natural sweetener. I opted for apricots and a little ginger for a warming kick. Make sure you use organic apricots, these are browner in colour as they are not processed with sulphur dioxide which is used to help the regular dried fruits retain their colour.


Apricot and ginger flapjack
 
Makes approx 8-10 slices

Ingredients

½ cup dried apricots
2 tbs ground flax
¼ cup whole almonds
Pinch of pure stevia (approx 1/6th tsp)
1 tbs heaped fresh grated ginger (use more or less to taste)
½ cup oats

Method

Place the apricots in a food processor and blitz for a few seconds until you have a sticky paste. Add the flax, stevia, ginger and almonds and pulse to mixture until the almonds are broken up into coarse chunks. Add the oats last and pulse gently to mix through without breaking them up too much.

The mixture should be firm but sticky, add a few extra oats if necessary.

Press the mixture into the bottom of a small lined tin and chill for an hour or so before slicing into squares.


For further guidance on making gluten free choices please see this post.

For tips and info on recipe measurement conversions, ingredients, substitutions and the methods behind how I do things.... check out my 'baking tips' tab at the top of the page.

Tuesday, 11 December 2012

No bake Christmas candy collection


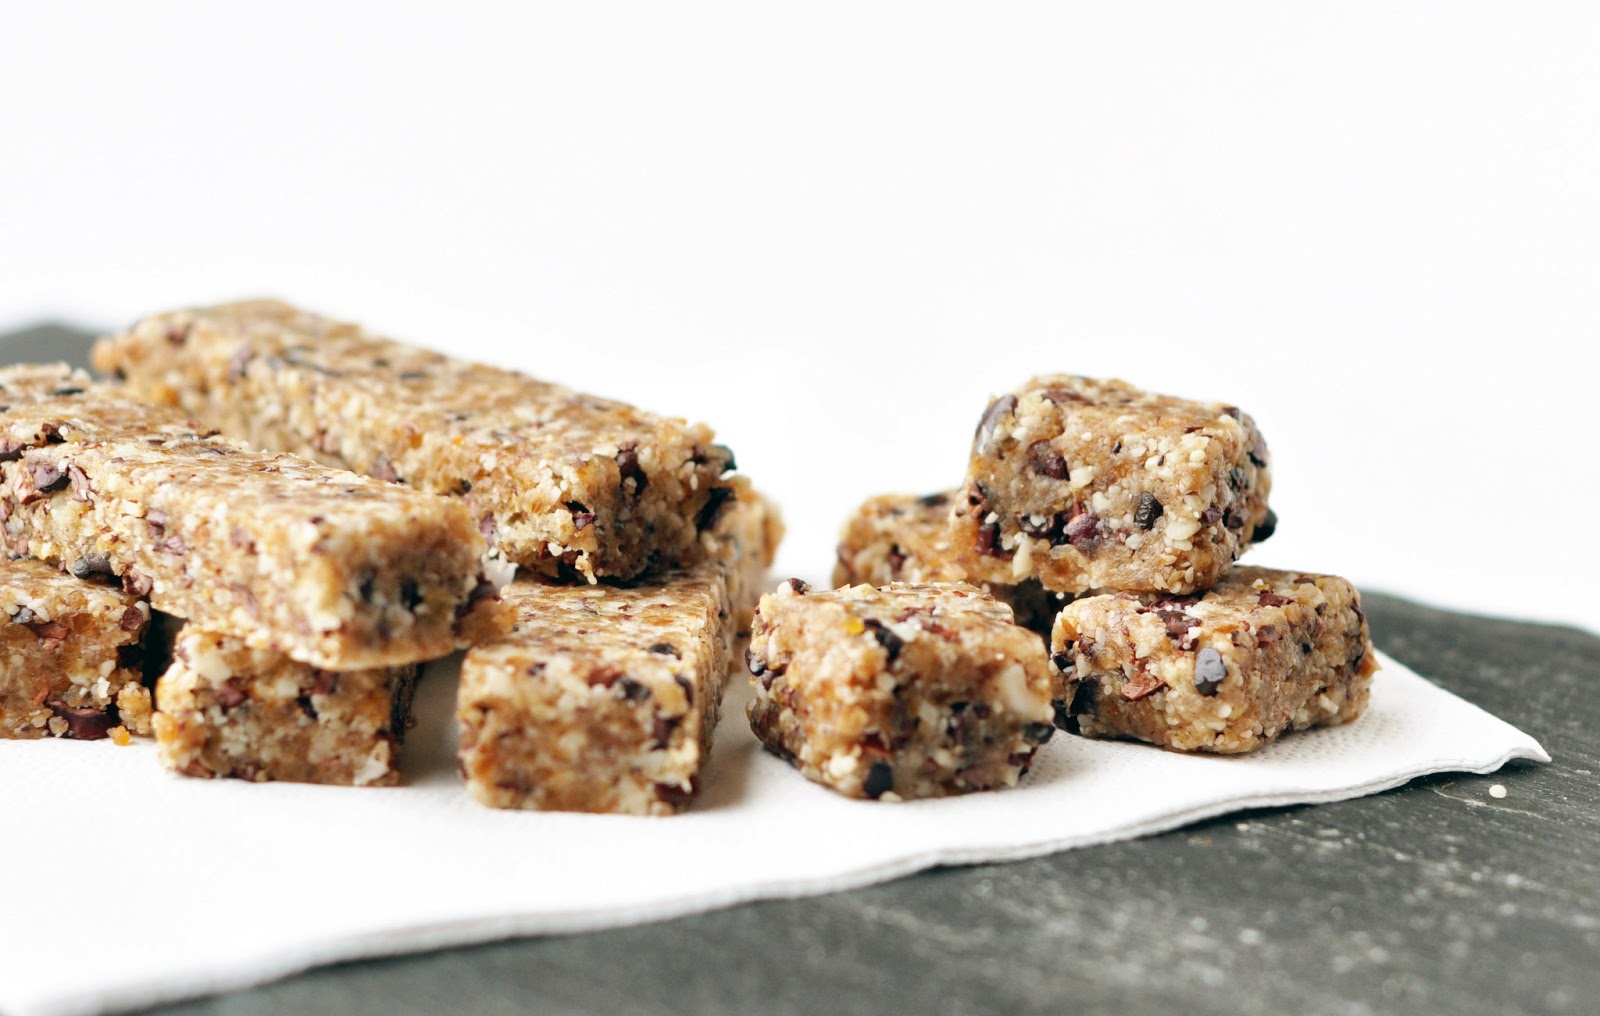
Well I actually call these ‘smoosh bars’…if you’ve been following for a while you’ll have probably already figured that out since they pop up quite a lot (read: I am a little obsessed!)’ Smoosh Bars’ was a name that my family began to call them since when asked what they were I simply said ‘its just lots of healthy ingredients all smooshed together.’  It stuck!


I figured smoosh bars  was maybe an odd title for the post…probably less likely to entice people over, and then they’d be missing out on all the fun…(these bars are a lot of fun). So no- bake Christmas candy collection it is since today I am sharing with you my entire collection so far, but the variations are almost limitless, I’d love for you to share your own favourite flavour combos since I know many of you make this sort of thing yourself too!

Below you’ll find the links to previous smoosh posts, note that most of these bars contain nuts. In more recent weeks I have been running low on my cashew and almond supplies and have had a surplus of sunflower seeds, so to readdress this balance I made all the flavours linked below with sunflower seeds in place of the nuts to see how they worked out. The result was almost identical. If I absolutely had to choose I’d maybe say the nut version slightly won over the seed, but there is very little in it, so here we have the perfect most versatile bar collection perfect for school lunches and nut allergy sufferers… and in actual fact perfect for pretty much everyone!

Take your pick and go play!

Oh and last but not least…do you remember these mini Christmas puds?…they were my favourite thing last year!

I still love these mini puds...the clove in the top infused the flavour and makes them taste so authentic!

Now, here I have two new recipes to excite you:

Recipe: Marzipan almond smoosh

Makes approx. 10 bars

Ingredients:

70g dates
70g raisins
100g almonds (or sunflower seeds) I did use almonds to make it more aurthentic
50g buckwheat flour (or oatmeal)
30g dessicated coconut
30g dried cranberries
1tsp almond extract*

Topping (optional): 50g cashews or blanched almonds, few drops almond extract and 2 tbs agave syrup. Extra flaked almonds to decorate.

Recipe: Chocolate peppermint smoosh

Ingredients:

70g dates
70g raisins
100g sunflower seeds (or mild flavoured nuts)
40g buckwheat flour (or oatmeal)
30g dessicated coconut
20g cocoa powder
1tsp peppermint extract*

Topping (optional): 50g cashews or blanched almonds, few drops peppermint extract and 2 tbs agave syrup. If desired you could decorate with mini choc drops as a nice contrast.


Method (for both):

Blitz the nuts/seeds in a food processor for a few seconds until they are coarse. Add all remaining ingredients and blitz until you have a fine sticky ‘dough’.

Press the dough into a square container or smallish loaf tin lined with parchment (tin should be approx. 10x15cm) and pack down firmly, I use the flat end of a rolling pin to do this.

To make the top layer, blitz cashews or blanched almonds (make sure there is no skin as it will discolour the result) until they begin to get sticky, add a little agave and flavouring to taste and process a little longer.

Press a thin layer of nut mixture over the bottom layer and decorate with flaked almonds if desired.

 Chill for a couple of hours until firm enough to slice neatly.

Note: you could form into balls instead of making slices.

*use oil based and not alcohol based extracts if possible since the alcohol based versions have a slightly bitter taste due to the alcohol not being ‘burnt off’ as the bars are not baked.


 chocolate peppermint bar
almond marzipan bar
roasted peanut and cranberry bar

For further guidance on making gluten free choices please see  this post.

For tips and info on recipe measurement conversions, ingredients, substitutions and the methods behind how I do things.... check out my 'baking tips' tab at the top of the page.

Thursday, 29 November 2012

Hemp protein superfood ‘candy’ bars

I wouldn’t want to mislead you in any way with the wording on this title…but these bars are like ‘candy’!

I don’t mean the synthetic sugar rush induced by candy, but  instead I mean 'popping candy' which is exactly what the little hemp seeds in these bars reminded me of as they ‘pop’ when you bite into them…such a fun texture, why have I not played around with hemp seeds before!


I have made a few versions of these bars now, modifying the proportions of hemp protein each time to try and achieve the optimum taste vs highest protein content, after all these bars were originnaly conceived  as a high protein hit so this ratio was important to me.

 I’ve think I’ve nailed it with this recipe….but of course everyone is different, so if you find it a little too ‘hempy’ for your taste simple reduce the protein powder content accordingly or add more of the other ingredients into the mixing bowl to reach your desired effect.

These bars are also a superfood bar infused with chia seeds and maca powder…my perfect training buddies. I have recently read Thrive Fitness by Brendan Brazier, and even though I’d be aware of Maca before I wasn’t so aware of it ability to assist the body in post workout recovery and ‘adrenal fatigue’. Feel free to add any of your own superfood supplements if you fancy, just make sure you watch the balance of wet to dry ingredients since these bars will become very crumbly if the dry ratio is too high. I also experimented with adding a teaspoon of greens powder, but for me that tasted to green- some more experimentation needed I think!

I originally made these bars as a way to consume protein in a  non-smoothie form (not a huge fan in smoothies), so taste wasn’t the main factor for me…but these surpassed my expectations on that front, even my family agreed they were a great all round snack bar. A perfect alternative to my usual smoosh bars.


Recipe: Hemp protein ‘candy’ bars

Makes 8 x 45g bars (approx.)

Ingredients

1/2 cup (80g) pumpkin seeds
½ cup (50g) shredded coconut
¼ cup (40g) hemp seeds
¼ cup (50g) hemp protein
2 tbs chia seeds (15g)
1 tsp cinnamon
2 tbs cacao powder
1 tbs maca powder
1 tsp vanilla
½ cup packed raisins (or 10 dates)
3 tbs melted coconut oil
3 tbs oats or quinoa flakes

Method

Pulse the dry ingredients (other than oats/quinoa) together in a food processor so there are still coarse pieces remaining. Set aside whilst blending the dates/raisins with the coconut oil. Add dry ingredients and pulse to achieve a slightly crunchy sticky mixture. Mix through the oats/quinoa flakes last.

Press the mixture into the bottoms of a small loaf tin or form into balls. Chill for at least 1 hour before carefully slicing onto bars. Store the bars in the fridge.


For further guidance on making gluten free choices please see this post.

For tips and info on recipe measurement conversions, ingredients, substitutions and the methods behind how I do things.... check out my 'baking tips' tab at the top of the page.

Wednesday, 17 October 2012

DAY SEVENTEEN: PB&J chunky granola no-bake bars

At last...Success! 


I first had a go at making these bars over a year ago, at around the time I'd first discovered homemade smoosh bars. However my first attempt didn't go down so well and I attribute this to one critical factor- you must use roasted peanuts!! (ideally roast them yourself for 10 mins in the oven at 200C).  My first attempt just tasted off and didn't have any oomph- roasted peanuts taste so different to raw peanuts with such a depth of flavour. 

This time around I also left the mix a little more chunky and pressed some extra roasted chunks in to the top for good measure. I also changed some other ingredients up a bit and added a good dose of oats to the mix!!

I used a little sugar free strawberry jam and they were very sweet- indulgently decadently sweet, i'd even go so far as saying almost a little too sweet for me (almost... but not quite!)  you could probably use fresh berry 
puree instead for a slightly more subtle flavour or just use a little less jam...they will be perfectly sweet enough from the raisins.

You can use any dried red berries you wish, cherry or even goji if you are going for superfood factor- the sweetness of the jam should compensate for any tartness. This mix would also make a great raw crumble topping instead of packing it down into bars.


Recipe: PB&J granola no bake bars

Makes approx. 10 cubes

Ingredients

100g raisins
50g dried cranberries/cherries
80g roasted peanuts
50g oats (ground) 30g oats (unground)
20g chia seeds (optional)
½ tsp mixed spice
3 tbs sugar free strawberry or raspberry jam

Method

Add raisins, 50g ground oats, chia seeds and spice to a food processor and process for a few seconds to a paste. Add the roasted peanuts, dried berries, jam and remaining oats and pulse until the mixture is sticky and chunky.

Pack the mixture into a suitably sized tin and press some extra peanut chunks into the top. Chill for an hour before slicing into squares.  Alternatively you could form balls and roll in extra nuts.


You can find more no-bake recipes here.


What Vegan MOFO means to me.


For further guidance on making gluten free choices please see this post.

For tips and info on recipe measurement conversions, ingredients, substitutions and the methods behind how I do things.... check out my 'baking tips' tab at the top of the page.

Thursday, 27 September 2012

Apple spiced coconut slice

Last weekend I went out for a friend’s birthday. We were outside for much of the evening and I had to take a coat…a full on winter coat to guard against the chill! The crossover from summer jacket to winter coat is a deal breaker for me, that signifies that winter is truly on its way.

Today at work I also tucked up in a little scarf to keep me cozy until I’d warmed through.  All this winter talk could get me down, particularly when I feel like summer passed us by a bit this year…the odd hot day here and there….hmmm.

But there are two good reasons to be happy with the changing seasons. The first being the fact we have seasons! That may sound odd but the one things I really love about the UK climate is the dramatic seasonal changes with the golden leaves now emerging and the edge of a fresh chill in the air on a sunny day. It’s such a beautiful time of year and a great excuse to cosy in up in scarves and woollies for an evening stroll.

The second reason…oh just the fact that I am off on holiday to Turkey in 3 days time for a bit of longed for sunshine. It certainly helps soften the edge of this chilly weather…it’s always nice to think it’s cold back home for everyone else when you are sunbathing by the pool!

So here is my first autumn themed recipe of the season; a simple apple and cinnamon spiced slice. Since we also have a generous helping of coconut here, this bridges the gap between summer and autumn just perfectly. (P.s I am not promising I’m all done with the summer theme just yet though). I am also looking forward to getting on board the pumpkin train this year since I’m so inspired by my fellow bloggers across the pond. So watch this space.


Recipe: Apple spiced coconut slice 

Ingredients 

½ cup coconut butter (I use homemade)
¼ cup rapadura or coconut sugar
¼ cup agave
1 chia egg (1tsp chia and 3tbs water
½ banana- mashed
1 cup dessicated coconut
½ cup buckwheat flour (or other mild GF flour)
1 tsp ground cinnamon
2 medium apples- grated
Large handful of chopped dates

Method

Melt the coconut butter in a medium bowl and stir in the sugar, agave, chia egg and mashed banana. Add the dry ingredients and mix through well. Add the grated apple and chopped dates last and mix through evenly.

Spoon into a 8x8” parchment lined pan and pack down well. Press  some extra coconut flakes and dates onto the top if desired.

Bake at 180C for approx. 20-25 minutes until just golden. Allow to cool before carefully lifting from the tray and slicing.

Store in an airtight container. I have not tried freezing these bars, but I imagine they would freeze well.


For further guidance on making gluten free choices please see this post.

For tips and info on recipe measurement conversions, ingredients, substitutions and the methods behind how I do things.... check out my 'baking tips' tab at the top of the page.

Tuesday, 25 September 2012

Ginger pumpkin no-bake bars


A follow up from this post…I felt the ginger version deserved its very own write up..

The warming ginger and carob kick is the perfect flavour for when summer is not quite out, yet autumn is sneaking up on you from behind!


These were a treat made for my sister as a special request to take with her to the music festival she was going to a couple of weeks ago. Easy, healthy, portable snacks were the deal of the day.

Knowing how much she liked the regular gingerbread smoosh bars, I thought I’d indulge my new found love of seedy things and make a nut fee version, whilst also going a little more crazy by adding a carob dusting to the top. The great thing about the added carob is that it should help the bars stick together a little less when packaged together for her trip (alternatively just lay each bar between a layer of parchment). The carob also gives an almost 'velvety' appearance to the top which I really loved.

I am happy to report these bars were given the seal of approval!


Recipe: Ginger pumpkin no-bake bars

Approx. 10 bars

Ingredients

100g dates
80g mix of seeds (I used mainly pumpkin seeds with a few sunflower seeds)
50g raisins
30g ground oats*
30g buckwheat flour
1tbs sliced fresh ginger (optional)
1tbs ground ginger
½ tsp mixed spice
½ tsp cinnamon
Approx. 1 tsp carob for dusting

Method

Mix all ingredients in a food processor until you have a firm and fairly fine sticky mixture.

I formed bars by pressing the mixture into the bottom of a small loaf tin lined with parchment for easy removal. Sprinkle carob flour evenly across the top and gently rub with fingers to settle the powder.

Allow to chill for an hour before slicing into bars.


Sunday, 9 September 2012

Double banana blondies

It’s bbq time!

It’s been a super hot weekend so far, summer has not fled just yet. I went to a bbq with friends and my contribution to the party was a batch of double banana blondies. I know these are always a pretty safe bet, ever since the original blondies that first made an appearance at a friend’s party way back last year. Since then I’ve also made this variation on the theme that was shared with my work colleagues….always a winner!

So, here I have simply combined the two recipes, and as such I felt it was deserving of a recipe write up all of its own. But before I get onto that, back to the bbq. There was so much food…food that I could actually eat and not once did I feel limited for choice or like an awkward guest. The guests brought home-cooked dishes and there was food from so many non-eurpopean cultures where the classic dairy infused dishes is not so much the norm that I was a very happy girl!  


My favourite dish was the chickpeas (I assume a form of chana masala?)  I asked the host for the recipe so hopefully I’ll have this up on my blog before long. Also to my delight, fresh bbq’d corn on the corn and sweetly charred plantain slices…..Mmmmm.


On a random note..this made my laugh and so i had to photograph it! Ever thought of growing your herbs in an old bathroom suite? This is a dramatic case of Upcycling if ever I saw one!


With all that food, I barely had room for cake (although to be honest I’d had enough tastings of the batter prior to cooking I didn’t fancy any more….shhhh!) In case you are wondering, the blondies were a great success, disappearing within a couple of minutes, and nobody could guess the secret ingredient! Beans in cakes- it’s always a fun discussion point, I love to make people think twice, to realise that there are ways of going beyond the norm and simply doing things a little differently. By the time the cakes came out it was too dark for my camera so you'll have to make do with these shots I took just before I left home.

Double banana blondies

Makes 16 squares

Ingredients

1 cup cooked chickpeas
¼ cup soy yoghurt
¼ cup soy milk
1/3 cup coconut butter
1 cup GF flour (I used 1/3 cup each of almond meal, buckwheat flour, tapioca flour)
1 banana mashed
1/3 cup agave plus ½ tsp stevia
2 tsp vanilla extract
½ tsp baking powder
¼ tsp baking soda
A pinch salt
1 tsp cinnamon
1/3 cup dark chocolate chips
1 banana cut into chunks- for the top

Method

Blend wet ingredients in food processor until very smooth. Pour into a bowl, add dry ingredients (except choc chips and banana chunks) and stir together until well mixed. Fold in chocolate chips.

Spoon mixture into a parchment lined 8x8 baking tin and smooth top. Press the banana chunks lightly into the surface. Bake in oven at 180C for approx. 15 mins. Check with a toothpick and remove when just cooked. Allow to cool fully before slicing into squares.


For tips and info on recipe measurement conversions, ingredients, substitutions and the methods behind how I do things.... check out my 'baking tips' tab at the top of the page.

Friday, 7 September 2012

Seedy smoosh

I’m on a roll these week, getting back into the swing of things that the summer holidays threw out of sync!  So here we go, another recipe to knock your socks off and get you going full steam ahead.

Smoosh bars…my favourite. You know that right?  I want everyone else to be able to enjoy them too, but up until now those with nut allergies couldn’t join in the fun.  This recipe was in part inspired by a friend who is a teacher and requested some ideas for healthy school-friendly snacks that didn’t contain nuts. I love it when people set me a challenge!

Welcome my super seedy smoosh bars.  Full of seeds…no nuts!


I made sun butter for a first time a short while ago and figured this could be the perfect way to try it out, and I was not disappointed. I have since made my regular nut based smoosh bars simply substituting the nuts for seeds without the sun butter, and they also worked well, however in this recipe the roasted sun butter really adds an extra dimension…so good! I’m almost embarrassed to say I was surprised how good they were, I obviously didn’t have enough faith in these mighty seeds. Now I know better. 

The whopping serving of chia in these bars makes is enough to class them as a super-food in their own right...who's with me? If you don't have any chia seeds, no worries, other small or processed seeds would work just fine here too.

The perfect back to school treats for those whose schools ban nuts from the lunchbox, oh and just about anyone else who fancies a healthy snack….er. so that will be everyone then!

You'll find more no-bake treats and snacks here.

 
Recipe: Seedy smoosh

Approx. 10 bars

Ingredients

½ cup chia seeds
2/3 cup raisins
½ cup roasted sun butter (homemade roasted/blended sunflower seeds)
½ cup desiccated coconut flakes (plus extra for topping)
1/3 cup ground oats*
A squeeze of lemon juice and a little zest (optional- makes the flavours pop)

Method

Mix all ingredients in a food processor until you have a form sticky mixture that can be formed in to balls or bars.

I formed bars by pressing the mixture into the bottom of a small loaf tin lined with parchment for easy removal. Sprinkle extra coconut on the top and press down or roll the balls in it.

Allow to chill for an hour before serving.


* for further guidance on making gluten free choices please see this post.

For tips and info on recipe measurement conversions, ingredients, substitutions and the methods behind how I do things.... check out my 'baking tips' tab at the top of the page.

Thursday, 16 August 2012

Fudge topped gingerbread squares

Question: What do you get if you combine this…. 

 
... with this...?

 
Insanely delicious slices of gingerbread fudge of course!!

Chill them in the fridge for a firm nutty bottom layer and a soft and fudgy top layer to sink your teeth into…perfect for serving in pretty little squares.  

These fudge slice isn't really anything new as I simply combined and layered up two of my favourite recipes, but I think it sheds a whole new light on healthy sweets! So pretty and delicate and perfect for sharing as a tea time treat or to wrap in cellophane and ribbons and give as a gift.  

Think of all the flavour combos...you could have a peanut base with a strawberry frosting, chocolate base with a mint or banana fudge frosting, almond base with a marzipan frosting....all the variations are whizzing through my mind!

Ok that’s enough dreaming... the recipes for each element were originally posted here and here, but I have re-written them below for ease.  Prepare and chill the base and then then prepare and roll out  the frosting layer. Drape over the bottom layer whilst pressing firmly... et voila!  Cut into squares (or whatever shape you like).  Note: Slice into smaller pieces than in the photos as these are very dense and filling indeed!


Recipe: Gingerbread fudge

Makes approx. 20 small squares

Ingredients- gingerbread base (double these ingredients to match the fudge quantities)

120g dates
25g almonds
35g cashews
20g raisins
40g ground oats*
30g buckwheat flour
10g chia seeds
1tbs sliced fresh ginger
1tbs ground ginger
½ tsp mixed spice
½ tsp cinnamon

Ingredients- fudge topping

½  can black beans- rinsed and drained
1 mashed banana
½ cup cocoa powder (or raw cacoa powder)
1/3 cup dates
2 tsp vanilla extract
½  tsp cinnamon
½ tsp stevia
½ cup ground oats*
2 tbs ground flax
2 tbs chia seeds

Method:

Starting with the gingerbread base; blend the ingredients together very well.  Press the mixture into a loaf tin, or any tin of an appropriate size so that you have approx. 15mm thickness.

Chill the base layer in the fridge whilst you prepare the fudge.

Blend all the ingredients together to achieve a thick soft dough. Using two pieces of baking parchment, if necessary, roll the fudge to approx. 10mm thick. Remove the gingerbread from the fridge and lift from its tin.

Drape the fudge layer carefully across the gingerbread pressing firmly onto the surface. You may have some fudge remaining (you can form this into balls ro bars). Trim the excess and cut into squares using s sharp knife.

These will keep in the fridge for a week or two. They should also freeze well since I have successfully frozen the gingerbread and fudge elements individually.


You can find all of my 'no bake treats' here.

 * for further guidance on making gluten free choices please see this post.

For tips and info on recipe measurement conversions, ingredients, substitutions and the methods behind how I do things.... check out my 'baking tips' tab at the top of the page.

Saturday, 28 April 2012

Chewy coconut granola bars

Remember I mentioned my coconut overload? Well, I’m still hot on the coconut infused recipes and this one is no exception, although you can easily change things around and sub the coconut if you want as it’s a super versatile concept.

This recipe was originally generated by accident…following a batch of chocolate granola gone wrong. That will teach me to mess with things when they are perfect as they are. Anyway, this particular batch was a little lacking in flavour and was very crumbly, still edible but not enjoyable as a snack on its own.

So chewy granola bars to the rescue!  This could easily have been a no-bake recipe as the banana holds everything together, however to me they were like chunky versions of smoosh bars, and  I wanted something a little firmer… so I baked them for 10 minutes. Just enough to firm them up but so they still retained the lovely chewy texture.

You can use any fruits and nuts you like and if you don’t have granola you can toast some oats and use those. I used chocolate granola, but if yours is plain feel free to throw in some cacoa powder or maybe even some cocoa nibs for a bit of raw chocolately goodness!


Recipe: chewy coconut granola bars

Makes one 8” pan

Ingredients
1 medium banana- mashed well
2 tbs chia seeds
1 cup mixed fruit ( I used raisins/dates/cranberries/figs
½ cup coconut flakes (or crushed nuts)
1 cup granola (I used homemade choc granola)

Method

Blend all ingredients, except the granola, together in a food processor on medium speed (so the fruit doesn’t break up too small) or mix well by hand. Add the granola last, mixing through well.

Press firmly into a lined square pan. You can either keep these raw and simplychill until firm or you can bake them for approx.10 mins at 180C.

Once cooled/firm cut into bars and store in the fridge for up to 1 week.


For tips and info on recipe measurement conversions, ingredients, substitutions and the methods behind how I do things.... check out my 'baking tips' tab at the top of the page.

Tuesday, 24 January 2012

The worlds healthiest fudge

This wasn’t supposed to be a fudge recipe.

This was supposed to be an energy power bar recipe!

It still is an energy bar recipe…..it just so happened to turn into fudge too….crazy things do sometimes happen!

Now, before you get ahead of yourself, these little treats aren’t identical to fudge…so don’t go expecting a regular sugar loaded, melt in your mouth (furry teeth inducing) fudge morsel.  These little treats are full of healthy ingredients, are sugar free and have a really soft but firm, chocolatey,  fudgey bite to them, I find them really moreish and the only word I could use to describe them is…well…fudgey!

Perfect for a mid-afternoon pick-me-up or a post work-out protein boost.  What provides the protein…black beans of course!

I have lots of notes and saved recipes from websites and books for various types of granola bars, energy bars, baked bars, raw bars….. and these bars were inspired by Enlightened Cooking who’s power bar recipe can be found here.  I was intrigued by the simple concept, having used beans plenty of times in my baking before, but never in a raw form. My recipe followed closely along the same lines with a few tweaks of my own.

The ‘dough’ is so simple to prepare and very easy to handle. It is also very ‘accommodating’, and by that I mean it holds together really well, so I imagine it could take all sort of mix-ins without a problem….chunks of nuts, fruits, chocolate chips. Feel free to experiment with your favourite flavours. I have used both cranberry and coconut here.


Recipe: black bean energy ‘fudge’

Makes approx 10 slices

Ingredients

200g  or ½ can black beans- rinsed and drained
1 medium mashed banana
½ cup cocoa powder (or raw cacoa powder for an even healthier boost)
1/3 cup dates
2 tsp vanilla extract
½  tsp cinnamon
¼  tsp stevia
½ cup ground oats
2 tbs ground flax
2 tbs chia seeds (optional)

Optional:
Dessicated coconut to coat
Cranberries (or other dried fruit)- finely chopped and mixed through

Method

Combine all ingredients in a food processor and blend until a smooth dough is formed. Add additional dried fruit here also if using. The dough should be fairly tacky but not sticky and should be easy to handle.

Form a log of dough approx. 5cm in diameter. Roll the log in desiccated coconut if desired.

Using a sharp knife, cut the log into rounds approx. 1-2cm thick. Store in a sealed contained in the fridge for up to a week. (these also freeze well).

Note: to form ‘bars’ divide the dough and roll into individual logs and flatten slightly.

 The fudge log before it was cut into pieces, see how soft and malleable the dough looks...just waiting for all those creative mix-ins!


By now you probably already know I've used beans to pack a protein punch and substitute some of the fats in many of my recipes (i don't stop going on about them)..... check out my blondies, my brownie torte and my sticky toffee pudding.  I have also made a few raw energy bars.... like my absolute favourite choc-orange smoosh bars, my power cubes and my raw gingerbread.

For tips and info on recipe measurement conversions, ingredients, substitutions and the methods behind how I do things.... check out my 'baking tips' tab at the top of the page.

you may also like

Related Posts Plugin for WordPress, Blogger...