Showing posts with label slices. Show all posts

Tuesday, 6 November 2012

Toffee pumpkin squares

These dense and rich toffee squares are a seasonal variation of this original sticky toffee pudding recipe. However this time with a few tweaks to include pumpkin instead of sweet potato, and instead of serving these warm with a pouring sauce, I would serve these cold simply with their sticky topping….this is a ‘messy fingers’ situation!  Of course you could also serve these squares warm if you preferred.


In my original recipe I used spelt flour, but here I used my typical GF flour combo, you’d never know the difference. I’d encourage you to try with your own favourite flour mix since the relative ratio of flour is not particularly high so you should be able to substitute other ‘flours’ without compromising the taste or texture. If you want a more cakey texture increase the baking soda, and likewise if you want a really dense crumb you could omit the baking soda altogether.

I made these squares for a friend to take to a work event a week or so ago, gluten free was a specific requirement. I made 36 little cakes in all including these almond raspberry chocolate torte slices (as seen in the photo) and also these double banana blondies (still in the oven at the time the photo was taken!)….all the choices were at the request of my friend (good choices!)  I was up late into the night trying to get them finished for him to take to work the following morning, but it was all worth it when such a positive report rolled in the next day!


Recipe: Toffee pumpkin squares

Makes 16 small squares

Ingredients

1 cup cooked pureed sweet pumpkin
¼ cup soy yoghurt
1/3 cup coconut butter- melted
1/3 cup dates- softened
½ cup mashed/pureed chickpeas
3 tbs brown rice syrup (or maple syrup) plus ¼ tsp stevia
2 tsp vanilla extract
1 tsp cinnamon
1 cup spelt or GF flour (I used 1/3 cup each of almond meal, buckwheat flour, tapioca flour)
2 tbs cacao powder (or cocoa powder)
½ tsp baking powder
¼ tsp baking soda
A pinch salt

For sticky toffee top:

¼ cup softened blended dates
3 tbs brown rice syrup

Method

Blend the wet ingredients in food processor until very smooth. Pour into a bowl, add dry ingredients and mix together until well mixed. Spoon mixture into a parchment lined 8x8 baking tin and smooth the top. Bake in oven at 180C for approx. 8 minutes.

Whilst the cake is in the oven blitz the dates to form a paste and add the syrup.
Remove the pudding from the oven after 8 minutes and use a toothpick to make holes all over the top of the cake- approx. 100 holes. Spoon the toffee sauce over the top and smooth over allowing it to seep into the holes (much of the sauce will remain on top as a sticky layer).

Return to the oven for a final 5 minutes cooking time. Once cooked, allow to cool before slicing into squares.


For further guidance on making gluten free choices please see this post.
For tips and info on recipe measurement conversions, ingredients, substitutions and the methods behind how I do things.... check out my 'baking tips' tab at the top of the page.

Thursday, 27 September 2012

Apple spiced coconut slice

Last weekend I went out for a friend’s birthday. We were outside for much of the evening and I had to take a coat…a full on winter coat to guard against the chill! The crossover from summer jacket to winter coat is a deal breaker for me, that signifies that winter is truly on its way.

Today at work I also tucked up in a little scarf to keep me cozy until I’d warmed through.  All this winter talk could get me down, particularly when I feel like summer passed us by a bit this year…the odd hot day here and there….hmmm.

But there are two good reasons to be happy with the changing seasons. The first being the fact we have seasons! That may sound odd but the one things I really love about the UK climate is the dramatic seasonal changes with the golden leaves now emerging and the edge of a fresh chill in the air on a sunny day. It’s such a beautiful time of year and a great excuse to cosy in up in scarves and woollies for an evening stroll.

The second reason…oh just the fact that I am off on holiday to Turkey in 3 days time for a bit of longed for sunshine. It certainly helps soften the edge of this chilly weather…it’s always nice to think it’s cold back home for everyone else when you are sunbathing by the pool!

So here is my first autumn themed recipe of the season; a simple apple and cinnamon spiced slice. Since we also have a generous helping of coconut here, this bridges the gap between summer and autumn just perfectly. (P.s I am not promising I’m all done with the summer theme just yet though). I am also looking forward to getting on board the pumpkin train this year since I’m so inspired by my fellow bloggers across the pond. So watch this space.


Recipe: Apple spiced coconut slice 

Ingredients 

½ cup coconut butter (I use homemade)
¼ cup rapadura or coconut sugar
¼ cup agave
1 chia egg (1tsp chia and 3tbs water
½ banana- mashed
1 cup dessicated coconut
½ cup buckwheat flour (or other mild GF flour)
1 tsp ground cinnamon
2 medium apples- grated
Large handful of chopped dates

Method

Melt the coconut butter in a medium bowl and stir in the sugar, agave, chia egg and mashed banana. Add the dry ingredients and mix through well. Add the grated apple and chopped dates last and mix through evenly.

Spoon into a 8x8” parchment lined pan and pack down well. Press  some extra coconut flakes and dates onto the top if desired.

Bake at 180C for approx. 20-25 minutes until just golden. Allow to cool before carefully lifting from the tray and slicing.

Store in an airtight container. I have not tried freezing these bars, but I imagine they would freeze well.


For further guidance on making gluten free choices please see this post.

For tips and info on recipe measurement conversions, ingredients, substitutions and the methods behind how I do things.... check out my 'baking tips' tab at the top of the page.

Saturday, 9 June 2012

Raspberry ripple chocolate torte slices (fat free)

These chocolate torte slices are the perfect summery twist on my tried and tested chocolate brownie torte recipe. Super healthy and indulgent…yet light and fruity!


The perfect summer snack to put a smug smile on your face, knowing that you can indulge guilt-free without worrying about undoing all your hard ‘beach-body’ work.

These are also the perfect pick me up….or in this case the ideal ‘get well soon’ gift. The recipe below makes a small batch of 4 slices (you could easily double the recipe) as I created this recipe for a friend who was laid up and recuperating after an accident. The criteria was simple….low fat but not low taste!

I often use coconut oil or coconut butter in my recipes, as a healthy good fat which I rarely skimp on, but in this instance I wanted to lower the fat as much as possible or even eliminate it. The obvious choice was the brownie recipe, and so to change things up a bit and create a unique dessert, here you have the raspberry almond version. 

I used crushed frozen raspberries to mix through the batter as they hold up better when they are mixed through (although you can barely see the pieces in the photos). I also sprinkled a few extra pieces on the top and then once out of the oven I glazed them with a layer of sugar free raspberry jam.  I made sure these brownies were not too overly sweet as I love the richness of the dark chocolate and tartness of the raspberries contrasting with the sweet topping, but you can increase the agave/stevia slightly to taste. If you add more agave (up to 1/3 cup it might be advisable to increase the flour by a couple of tablespoons also).

These chocolate slices  are by nature more dense and gooey than cakey when bitten into, although they do have a lovely firm texture. I think they are best served warm as a dessert, maybe with a little vegan icecream or cashew cream with some extra berries on the side.


Recipe: Raspberry ripple chocolate torte

4 slices (approx. 3x9” pan)

Ingredients

½ cup silken tofu
¼ cup agave and a pinch of stevia
1 tsp almond extract
1/3 cup black beans
1tbs ground chia plus 2tbs hot water
½ cup wholemeal spelt (or GF mix)
¼ cup cocoa powder
¼ tsp baking powder
Pinch salt
¼ cup frozen raspberries- crushed
Handful cacoa nibs or dark chocolate chunks- optional
Handful flaked almonds
Handful frozen raspberries- crushed

Method

Blend all wet ingredients together in food processor until well mixed and smooth. Mix the dry ingredients together in a separate bowl and then add the wet ingredients, mixing lightly until well mixed, add the cacao nibs (if using) and the ¼ cup crushed frozen raspberries last and fold through the mixture.

Spoon the batter into a smallish tin or mini muffin pans, scattering the remaining frozen raspberry pieces and flaked almonds across the top

Bake in a preheated oven for approx. 25 mins (less time for mini muffins). Test with a toothpick in the centre to check when done.


For tips and info on recipe measurement conversions, ingredients, substitutions and the methods behind how I do things.... check out my 'baking tips' tab at the top of the page.

Saturday, 14 January 2012

Toffee granola bars

For me, the best granola bars are lovely and dense with a great chunky texture to really get your teeth into…also I love a granola bar to be slightly moist and cakey rather than hard and crisp like a biscuit. Most of the granola bars sold in stores seem to be of the ‘hard’ variety.

A lightly sweetened, moreishly moist, healthy, fill-you-up cakey bar to grab on the run…yeah I think that pretty much sums it all up!

I have saved a number of different ‘granola bar’ style recipes from various sources across the net and I’ll be sure to try them out (with various tweaks and modifications) over the coming days and weeks.  However, the recipe for today comes from an original experiment I did a few months back when I wanted to make my own date syrup to act as alternative sweetener. The bar is based on this recipe by Oh She Glows, I loved it’s description indicating a healthy yet more cakey style bar. True to form I had to go changing things round a bit and so this is my take on the concept.

This is the second time I’ve made these bars, pretty much sticking to the same ingredients each time. The bars are fairly soft inside and slightly crumbly to bite into, but I really like them that way- a great contrast to the firm exterior. Wrap them up in foil or clingfilm to hold them together and they are good to go to the office or to be popped in a handbag! These store well in an airtight container for around 1 week.

I have used homemade date syrup as the main source of sweetness and as the main sticky ingredient binding everything together. Dates naturally have a caramelly, toffee like flavour so made the perfect complement for creating a natural toffee-like granola bar.


Recipe: toffee granola bars

Ingredients 

1 ½ cups oats
¼ cup buckwheat flour (or other similar textured flours could be used)
2 tbs ground flax
1 tsp cinnamon
1/2 tsp salt
1 cup coarsely chopped nuts- I used cashews and hazlenuts
½ cup date syrup (homemade see note) or brown rice syrup- or a bit of each
2 tbs coconut butter
¼ tsp stevia
¼ cup peanut butter
1 tsp vanilla extract
½ cup  cacoa nibs or dark chocolate chunks

Makes one 8” pan. Approx. 12 bars

Method

Mix dry ingredients together in a large bowl (excluding cacoa/choc chunks). Add the wet ingredients (date syrup, coconut butter, peanut butter, vanilla) to a small microwaveable bowl and microwave on medium power for approx. 2 minutes until the coconut butter has melted. (alternatively melt in a saucepan over the hob). Spoon wet mixture over the dry and mix well- use your hands as the mixture is very stiff! Add cacoa nibs/chocolate chuncks last making sure mixture is cool  so chocolate doesn’t melt (if using).  Line an 8” pan with baking parchment and spoon the mixture in pressing it down as level as possible with  the back of a spoon. Bake at 180C for 25-30 minutes until the surface is beginning to go golden. Allow to cool completely in the tin on a wire rack for approx. 30 minutes before attempting to slice with a very sharp knife, as otherwise the edges have a greater
tendency to crumble.

Note: To make date syrup, soften dates with an equal amount of boiling water. let stand for 30 minutes or so until soft and then blitz in a blender/food procesor until smooth. you can also add a little vanilla extract if desired.


For tips and info on recipe measurement conversions, ingredients, substitutions and the methods behind how I do things.... check out my 'baking tips' tab at the top of the page.

Friday, 2 December 2011

‘Super healthy- super decadent’ chocolate brownie torte

Following on from yesterday's little teaser.....

....This is a brownie recipe that has come about through reading many other blogs and online vegan recipes and combining what I consider to be all the ‘best bits’ to create a healthy brownie of my own. This was one of the first ‘healthy cake recipes’ I ever created and it has undergone various refinements over time to maximise the balance between yummy and healthy. I don’t know why it’s taken me until now to get it up on the blog- you saw a little sneaky teaser way back here at the beginning (ok so maybe it wasn’t so long ago but if feels ages to me!!)

It contains a lot of fruit and veg… maybe it can even count as one of your ‘five a day’…. now wouldn’t that be amazing!

I have called this brownie a ‘brownie torte’ because to me the classic non-vegan brownies that use eggs (and all sorts of other things) tend to have a very characteristic delicate dry flaky top, I’m probably not explaining that very well…hmmm.  The vegan brownie recipes I’ve tried and tested seem to have a denser more moist consistency and don’t have that flaky topping. That’s not to say they are in any way inferior but I wanted to simply make a distinction so as not to evoke any pre-expectations.  Also, as I like to serve my brownies warm with a decadent soft and fudgey centre, as opposed to a more cake like bite the ‘Brownie Torte’ title seemed so much more appropriate. It is typically the amount of ‘flour’ (either spelt of GF) used and the cooking time that dictates the ‘cakeyness vs torteyness’ and this has been noted below.

The inclusion of the balsamic vinegar, prune puree and cinnamon all help to bring out the best of the chocolate flavour. The can be omitted/substituted if necessary  (i.e sub the prune for more apple puree or soy yoghurt).

This recipe also uses beans. The 'bean' theme in healthy baking seems to have become quite popular.  I also used beans in this amazing blondie recipe. The general idea is to use black beans for chocolatey cakes and white beans for lighter coloured cakes.

Note- brownies also taste better the next day once the flavours have had a chance to fully infuse and the texture becomes more ‘fudgey’ (not sure why this is!). They also freeze well...so make a big batch!

P.S these pics were taken at the 'veg patch lunch' at work during the summer- hence the warm glow (I could do with a bit of that sunshine now!) On this occassion I also frosted the top with some cocoa and agave nectar, but its perfectly fine without.


Recipe: Chocolate brownie torte

Makes 16 squares

Ingredients

1tsp ground flax seed mixed with 1tsp hot water and 1tsp balsamic vinegar
¾ cup silken tofu (150g)
¼ cup tinned prunes with juice
¼ cup apple puree
½ cup agave syrup and ¼  tsp stevia (more agave or maple syrup to taste if needed)
½ cup unsweetened cocoa powder
2 tsp vanilla extract
½ cup drained black beans
1 cup wholemeal spelt flour or for GF sub see below* (use up to 1 ½ cups to get a more cakey brownie)
¼ tsp baking powder (use ½ tsp to make more cakey)
¼ tsp ground cinnamon
¼ tsp salt
¼ chopped walnuts (or mixed nuts) optional
¼ cup dark chocolate chunks or cacoa nibs

Method

Mix the ground flax seeds with hot water and vinegar and set aside for 1 min. Blend all wet ingredients (including flax mix) and cocoa powder in food processor until very smooth. Mix all remaining dry ingredients (apart from nuts and chocolate chips) in a bowl and combine well. Pour wet mixture into dry and mix well. Add nuts and chocolate chips last and fold through. Pour batter into 8x8’ square baking tin lined with parchment paper. Bake for approx. 15 mins at 180C (bake for approx. 20 mins if you are going for a cakey brownie). Cool and cut into squares. Best stored in the fridge and heated for a few seconds in the microwave before serving!

Note: This mixture makes enough for a small 8x8’ pan at approx. 15mm thick. I have also made 1 ½ times this quantity and poured into a 9’ round cake tin cooked for 20 mins to get a slightly thicker slice and cut into wedges- when decorated with fruit and vegan cream this is a crazily decadent and rich desert!

* the spelt flour can be subbed with a mix of ½ cup almond meal and ½ gluten free flours- I use a mix of buckwheat and tapioca flour. I have tested this out and it tasted just as good as the spelt version!


For tips and info on recipe measurement conversions, ingredients, substitutions and the methods behind how I do things.... check out my 'baking tips' tab at the top of the page.

Sunday, 6 November 2011

Chocolate swirled blondies…that go with a bang!

Today I am very happy! It sometimes easy to underestimate how others may respond to a recipe, I worry that my tastes are different and that just because I enjoy my cakes- other people who are used to ‘normal’ cakes may not.

However, this time it can most definitely be said that these Blondies achieve top marks in the taste test!

The basic idea of including sweet potato came from a recipe in the highly regarded ‘Vegan Cookies Invade your Cookie Jar’, however I wanted to take healthy to greater heights!  This was a risk and I knew it! The plan was to make some cakes to take along to my friend’s fireworks party, so I knew I’d need to pull out all the stops to get it right.

There sat my plate of Blondies in amongst all the other non-vegan, non-healthy delicacies that had brought to the party....and by the end of the night… they had all disappeared! No one had guessed the secret ingredients and what’s more one of the guests at the party was diabetic and was so pleased upon realising he could eat my cake without any worry!

This first batch was made using spelt flour, but I figured since the amount of flour was already fairly low (as I’d subbed part of the flour for the chickpeas) it should be fairly simple to make a gluten free version.  I was on a role and so this morning I couldn’t resist making another batch for myself- this time with my favourite GF combo.

The result… I think I like the GF blondies even better!!


Recipe: Chocolate marbled blondies

makes 16 squares

Ingredients

1 cup cooked mashed sweet potato
¼ cup soy yoghurt
3 tbs water
1/3 cup coconut butter
¼ cup agave plus ½ tsp stevia
2 tsp vanilla extract
1 cup white spelt flour (or GF subs below)
½ cup mashed chickpeas
½ tsp baking powder
¼ tsp baking soda
A pinch salt
1 tsp cinnamon
1/3 cup dark chocolate chips

NB: GF flour substitute- 1/3 cup each of almond meal, buckwheat flour, tapioca flour

Method

Blend wet ingredients in food processor until very smooth. Pour into a bowl, add dry ingredients (except choc chips) and blend together well mixed. Fold in chocolate chips. Spoon mixture into a parchment lined 8x8 baking tin and smooth the top. Bake in oven at 180C for approx. 15 mins. Note- GF timings may be slightly shorter- check with a toothpick and remove when almost cooked. Allow to cool fully before slicing into squares.

Note- if the mixture is still slightly warm (from the sweet potato not being totally cool) the choc chips will melt slightly giving the batter a ‘marbled' effect. This was a happy accident which I actually love, but if you want to chocolate chunks to stay solid and the batter to remain ‘blonde’ than allow the potato to cool fully before mixing.


Monday, 31 October 2011

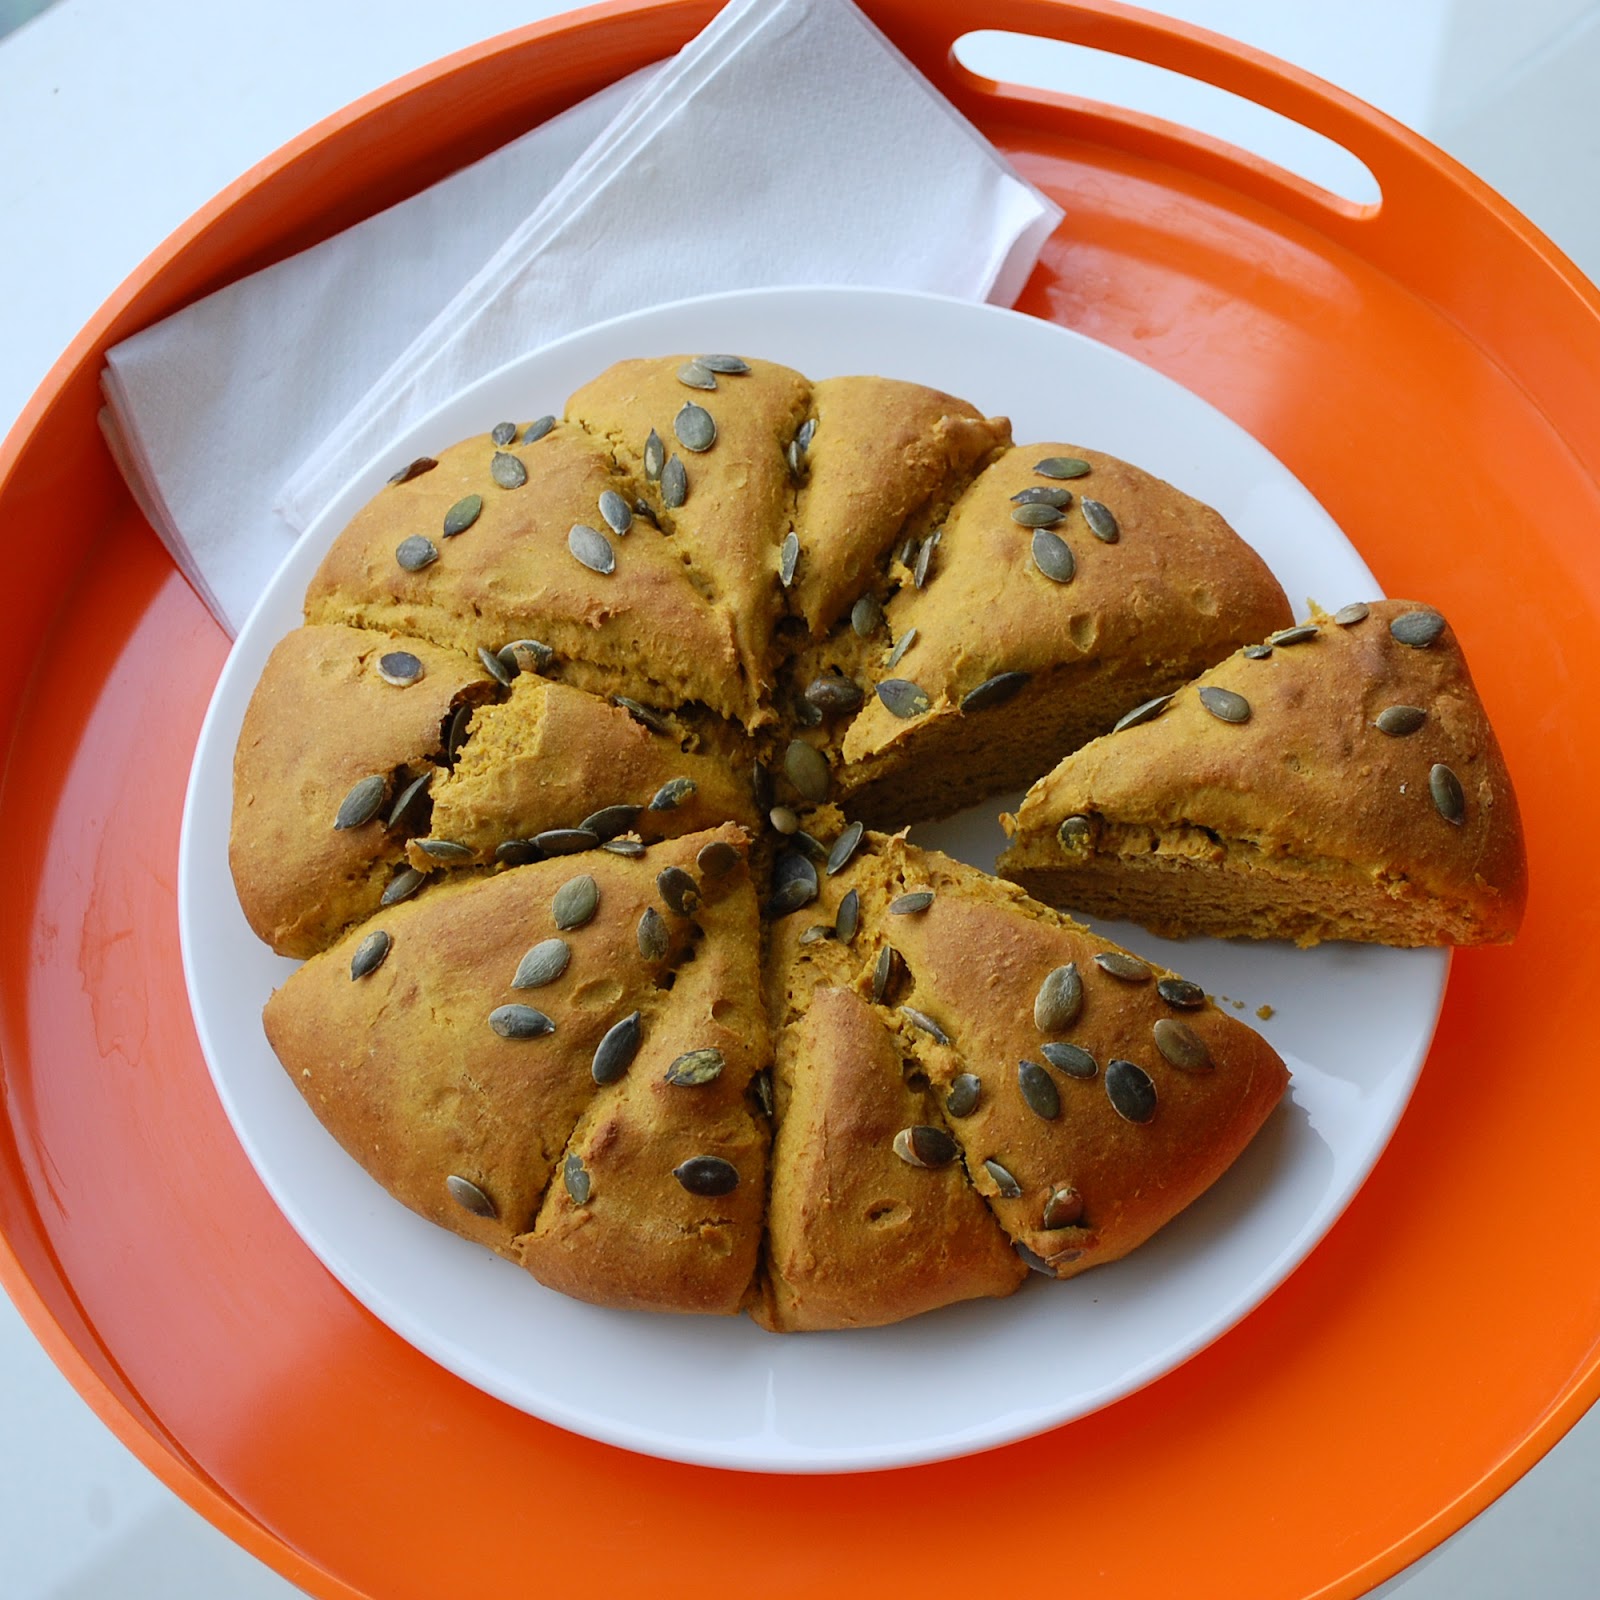
Pumpkin scones

I keep my promises…

…and as promised here is my pumpkin scone recipe to share with you all. It's late at night and my bed is calling but I was determined to post this recipe on Halloween itself- and I made it with 5 minutes to spare!

I took the entire batch of scones to work today to share with my colleagues as an afternoon snack. Everyone had a taste and there were many ‘noises’ of approval around the room. Maybe they were just being nice… well, why not find out for yourself!  Actually I’ll save you the guess work- they were very yummy indeed! Warming and delicately spicy just the way you would imagine a thick cut wedge of moist ochre coloured tea bread.

If autumn were a food she would definitely be a pumpkin scone!

We ate the scones warmed from the oven split open and spread with butter and drizzled with a little syrup (well, they did and I had a dollop of soy yoghurt). They are perfectly moist and moreish all on their on but a topping always finishes it off nicely- nut butter could also work well!

I have to admit I feel as though I somewhat cheated a little. I had planned on buying a pumpkin and preparing the puree from scratch, but all the ones I saw in the shops were huge pumpkins ready to be carved. Then I remembered I had a bottle of pure organic pumpkin puree already tucked away in my baking box. Teamed up with some pumpkin seeds sprinkled across the top and you have your perfect recipe for all year round. I imagine the pumpkin could just as easily be substituted for squash or even sweet potato!


Recipe: pumpkin scones

Makes approx. 12 wedges

Ingredients

1/3 cup rapadura plus ¼ tsp stevia
3 ½ cups mix of white and wholemeal spelt flour
2 tsp baking powder
½ tsp baking soda
3 tsp ground ginger
1 tsp cinnamon
Pinch of salt
½ cup coconut butter
2 cups pureed pumpkin
Handful of pumpkin seeds

Method

In a large mixing bowl, combine dry ingredients. Mix through partially melted coconut butter to achieve a crumb consistency to the mixture. Add pureed pumpkin and combine well until a dough is formed. On a lightly floured surface, knead the dough a few times, pushing it into a large circle a (generous) inch thick. Sprinkle the top with pumpkin seeds and press lightly into surface. Place dough onto a parchment lined baking sheet and score the dough into 12 (or 8 larger) triangular pieces. It is easiest to do this once the dough is on the baking sheets ready to go straight into the oven as it may be hard to transfer to the baking sheet once cut. Don’t worry if the dough is sticky and difficult to cut all the way through, the segments should just serves as a guide and can be cut fully once cooked. Bake at 200C degrees for approx. 15 minutes until golden. Allow to cool slightly before slicing and serving.


Tuesday, 18 October 2011

Raspberry crumb top cake

Well, I figured we were in much need of another sweet treat as I came to my attention that my last few posts were a little lacking that department!

I’d been meaning to tackle a ‘crumb top’ style cake for a while, and then one day one of my colleagues brought in a version that he’d made over the weekend.  Of course this contained the usual eggs, milk, butter and refined sugars, but I was curious to see whether I could come up with an equally yummy healthy alternative. A couple of days later, upon my request I found his recipe in my inbox, so the challenge was set!

The original recipe followed a different methodology to the route I eventually took at this use fresh yeast to create a kind of dough for the base, although it had the texture of sponge. I figured that my best bet was to opt for a more standard ‘sponge’ style with the fruit layer and crumb topping to boot. After doing a little research I settled on this recipe by The Post Punk Kitchen to give me my starting point.

This cake was pretty yummy. The sponge was light and the topping crumbly (in my opinion a bit too dry and crumbly to I’d be tempted to use agave as noted below). Also don’t skimp on the amount of jam/fruit as this gives the cake moistness and a beautiful layer of textures.


Recipe: raspberry crumb top cake

Makes one 9’ cake pan (round or square)

Ingredients

Cake base:
¾ cup soy milk
1 tsp cider vinegar/white wine vinegar
¼ cup rapadura plus ¼ tsp stevia
2 tbs coconut butter
2 tbs apple puree
1 tsp vanilla extract
1 ¼ cups white spelt flour
2 tsp baking powder
½ tsp salt

Topping:
½ cup sugar free raspberry  (or other berry) jam
½ - ¾  cup raspberries
1 cup white spelt flour
1/3 cup rapadura (using agave may be better as will be stickier)
1 tsp cinnamon
¼ tsp nutmeg
1/3 cup coconut butter melted

Method
Mix the soy milk and vinegar and set aside to curdle in a large bowl. For the topping mix the dry ingredients then add the coconut butter (and agave if using) and mix with fingers until the mixture clumps into fairly large lumps that don’t crumble away immediately. Add extra oil if needed. For the cake base, mix the remaining wet ingredients with the curdled soy milk. Add the dry ingredients and mix well until the batter is very smooth. Pour the batter into a greased/lined cake pan. ‘blob’ the jam onto the top and mix through a little. Break up the raspberries a bit and evenly cover the top of the batter. Sprinkle the crumb topping across the cake evenly and press down into the batter a little. Bake for approx. 30 mins at 180C until a toothpick comes out clean.
 

you may also like

Related Posts Plugin for WordPress, Blogger...