Showing posts with label oats. Show all posts

Wednesday, 29 May 2013

Tropical pineapple and coconut baked oatmeal


It’s like a holiday in a bowl....tropical paradise by the spoonful!


I love my baked oatmeal and I have been experimenting with different flavour combinations recently. This is one of my favourites and it definitely has the’ dessert factor’, in much the same way as this apple and blueberry pie did.

Use large flakes or coconut curls instead of desiccated coconut for the best appearance and texture. The pineapple is so sweet you barely need any additional sweetener but I added a touch of coconut sugar for good measure... just follow your taste buds. For extra indulgence use coconut milk as your ‘milk’ of choice. 

This is definitely one of those ‘mix it up and throw it in the oven’ bakes...healthy, foolproof’ and it simply tastes divine. I ate this as breakfast (with the help of my mum)...but it's totally desert worthy and once against ridiculously healthy in the desert stakes! No excuses...just make it now!

If it’s not hot and sunny where you are quite yet....this will transport you back to your holiday’s with one simple bite!

Do you want more bresert recipes?...sure, no problem...here they are!


Recipe: Tropical pineapple and coconut baked oatmeal

Serves 2

Ingredients:

½ cup oats
1 tbs ground flax
Pinch salt
1 tsp coconut sugar (or other sweetener of choice- optional)
2/3 cup fresh pineapple chunks (or 1 tin)
¼ cup chunky coconut flakes/curls
¾ cup non dairy milk of choice (I used almond but coconut milk would be great!)
1 tsp vanilla extract (or rum flavouring)

Note: for a more ‘grown up’ dessert you could try add some rum for part of the milk content- I haven’t tried this!

Method:

Mix all ingredients together in a medium bowl, adding the pineapple and coconut last, sprinkle a few of the coconut flakes over the top surface.

Spoon evenly into a medium pie dish- approx 20cm diameter (the mixture should be approx 2cm deep)

Bake at 180C for approx 30 mins until the top is golden.


Oooh get a little cheeky...cheeky! :-)


For further guidance on making gluten free choices please see this post.

For tips and info on recipe measurement conversions, ingredients, substitutions and the methods behind how I do things.... check out my 'baking tips' tab at the top of the page.

Saturday, 11 May 2013

Apple and blueberry 'birthday' baked oatmeal (or Mother's Day breakfast!)

I hadn't been planning to post today... My big birthday was going to be a nice chilled out morning followed by a trip out this afternoon. Relaxing...what's that!?!

It ended up being a brief trip to the gym, followed by this amazing breakfast (a last minute idea), a few presents to open, a this blog post write up.... and then my trip out, all because I couldn't contain the excitement of this breakfast and quite a few of you on Facebook saw the picture, got curious and wanted the recipe (I don't blame you!!)  This would make the most amazing Mother' Day brunch for those of you in parts of the world that have Mother's Day this weekend- hence why I wanted to post it for you!!

Saying that I did have an hour or so spent 'pottering' about the house, and my pottering took the form of looking through old photo albums and smiling over childhood photos.  Gosh has 30 years reqally gone by...!

This one in particular tickles me.... already behind the camera!  I also seem to have spent a of of time in my underwear?!  I made a little montage for you. I think actually come across as a lovely 'quiet and calm' child....ha ha that's not quite the story my mum would tell you :-)


The recipe is right below. I'm not going to go on and on describing how to make it, how to tastes, ways to vary it etc etc. Quite simple because it tastes amazing (think breakfast brunch or dessert!), it's ridiculously simple and also because....I wanna go out!  Byeeeeeee

P.s I will have more birthday related foodie things to come...just ran out of time this week with my business launch!!


Recipe: Apple and blueberry 'birthday' baked oatmeal

Serves 2 (or 3)


Ingredients

2/3 cup oats
tiny pinch salt
1 1/4 cup apple juice
1 apple- grated
1 tbs chia/flax seed
1/2 tsp mixed spice or cinnamon
large handful frozen blueberries (I haven't tried with fresh so I am not sure of cooking times)
small handful of pumpkin seeds (or other seeds/nuts as preferred)


Method

Mix everything together reserving most of the blueberries and pumpkin seeds to add on the top last. Spoon into a medium oven dish and add the blueberries pumkin seeds. Sprinkle with exra sugar if you like, but this was seriously sweet enough for me (I would even serve it as desert) just from the fruit and fruit juice.

Bake at 180C for approx. 25 mins until the topping is golden. Serve immediately.  


For further guidance on making gluten free choices please see this post.

For tips and info on recipe measurement conversions, ingredients, substitutions and the methods behind how I do things.... check out my 'baking tips' tab at the top of the page.

Tuesday, 7 May 2013

Fruit and nut slice...no bake!

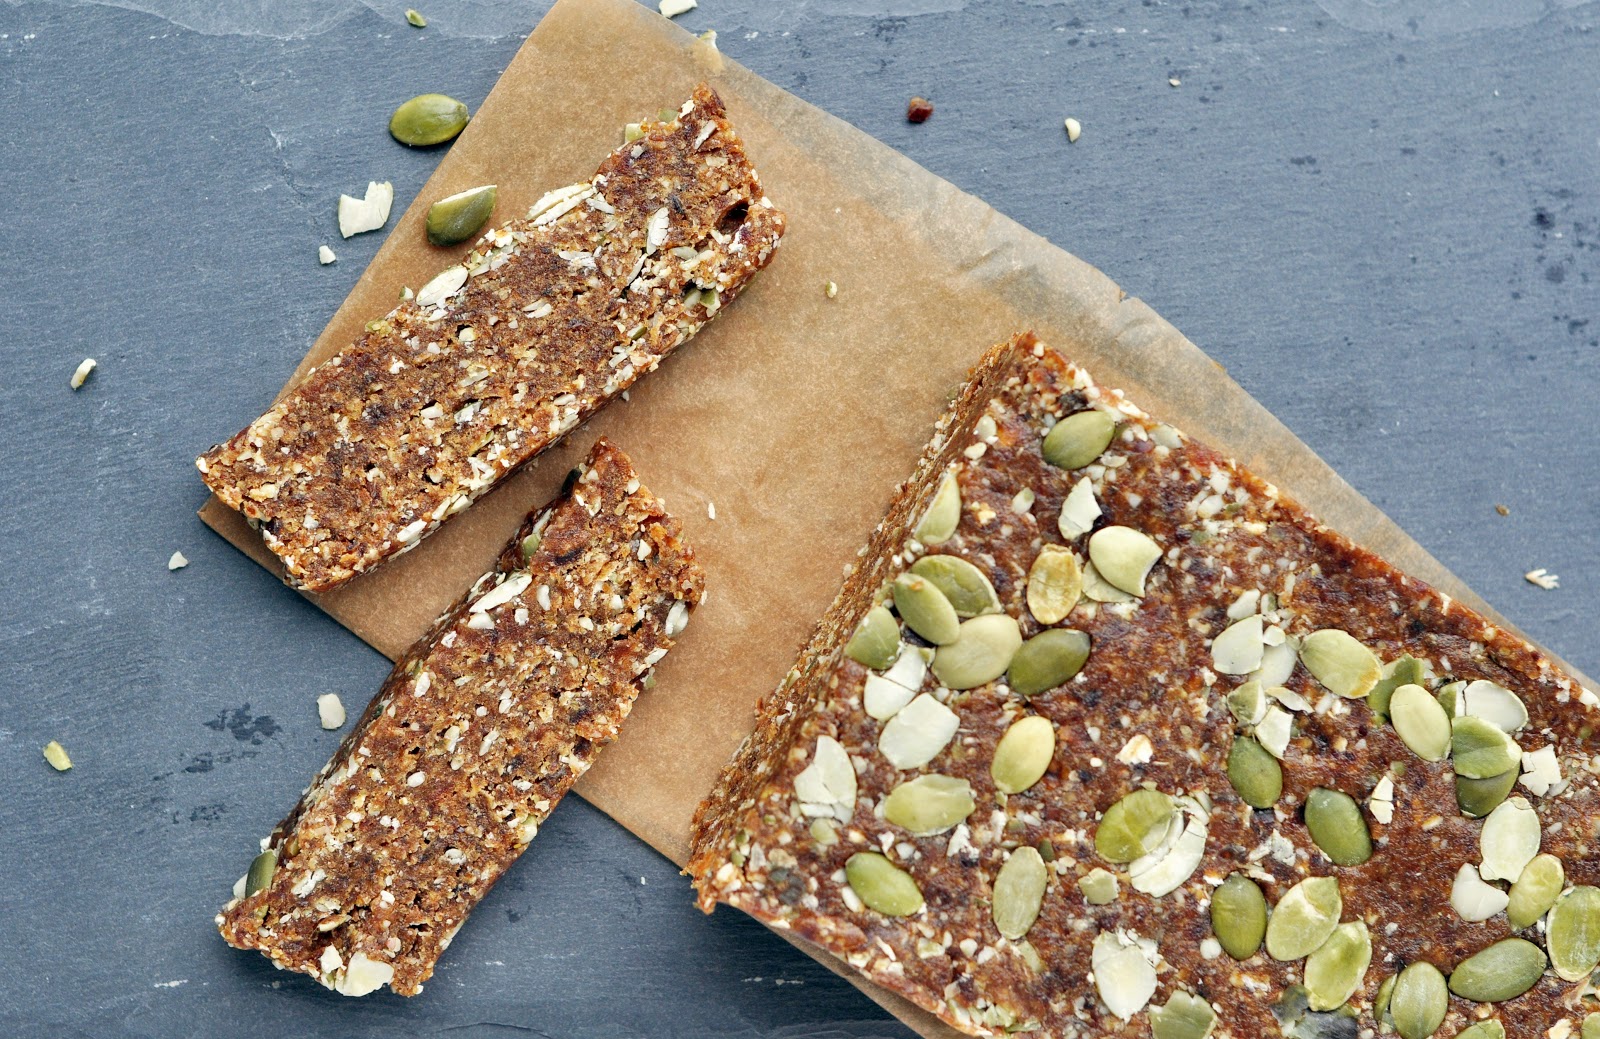
It’s all about the ‘smoosh bars’ at the moment! With all the recent recipe testing I have an abundance of dried fruits and nuts.


Also my dad recently went all the way and purchased a Thermomix after seeing how much I use mine for everything from nut flours and butters to soup. Though his is an old style one he bought second hand, I wanted to put it through it’s paces to see how it fared against mine….a little blitzing of some fruit and nuts was the perfect test.

Instead of forming the mix into balls or bars, I figured I would keep it as a loaf stored in the fridge, so that he could simply slice off a slither when the desire struck. The flavours and textures work beautifully and give this loaf a really authentic 'fruit and nut' loaf feel. Keep the seeds and nuts fairly chunky whilst maintaining a fairly sticky mix, you can also press a few extra into the top.  Add a few more oats or dates as needed to get the right consistency to form a loaf.

Obviously it’s a lot denser than your regular cakey loaf so a little goes a long way. It’s very moreish so I will warn you now… you may well find yourself slicing of a little slither and then a little more! If you’d prefer individual balls or bars then go right ahead, the choice is yours.


Recipe: No-bake fruit and nut slice

Makes a shallow 20x10cm loaf

Ingredients:

300g dates (or sub some raisins)
70g oats
70g cashews (or other nuts or mixture of choice)
20g flax
70g pumpkin seeds
1 tsp ground mixed spice
1 tsp ground cinnamon


Method:

Process the cashews, oats , flax seed and spices until just coarse (not to fine). Remove from processor.

Process the dates  to form a paste, this can still containas few chunky bits if necessary.

Add all ingredients and pulse to mix through well whilst keeling a chunky consistency.

The mixture should be sticky but manageable- add a tsp or so of water if too dry and extra oatmeal if too sticky.

Spoon the mixture into a lined loaf pan (or similar sized tin) and press down (I use the back of a rolling on) until well packed. Chill in the free before slicing to serve.

Check out my other no bake treats here!


For further guidance on making gluten free choices please see this post.

For tips and info on recipe measurement conversions, ingredients, substitutions and the methods behind how I do things.... check out my 'baking tips' tab at the top of the page.

Tuesday, 30 April 2013

Carrot cookies


I love a cookie...especially a breakfast cookie as that usually means tasty but super healthy!


The recipe for these breakfast cookies came from Abel and Cole and looked so tasty I couldn’t resist giving them a go myself, ok I changed things up ever so slightly using oatmeal as the entire cookie base instead of part spelt (they seemed more breakfast-like that way) I also increased the carrot content and made a few other minor healthy swaps...couldn’t resist!

They were so good, deliciously fat and chewy and they held together well- don’t skimp on the flax (or you can use ground chia). The date sugar gave a lovely caramelly flavour and a slight crispness, you could use another unrefined granulated sugar here but I would suggest that the texture wouldn’t be quite the same just using a liquid sweetener.

 I went for a pumpkin seed and cranberry combo as I loved the contrast in colours against the carrot, also because I seem to have a bit of a thing for pumpkin seeds at the moment. Use whatever dried fruit and seeds or nuts you fancy..how about date and walnut...?

I reckon this will be a recipe base I come back to again, I can already visualise the options, using courgette or parsnip and the veggie hit! 

For more breakfast cookies, you find them amongst the concoctions in this breakfast tab.
 

Recipe: Carrot cookies

Makes approx 10 cookies

Ingredients:

60g oat flour
80g whole oats
1 tbs ground flax
¼ tsp baking soda
Pinch salt
1 tsp cinnamon
50g date sugar
1 tbs maple syrup
1 large carrot-coarsely grated
30ml coconut oil (Melted) or olive oil
50g dried cranberries or other dried fruit
50g pumpkin seeds
1 tsp lemon zest (optional)

Method:

Mix the dry ingredient together in a medium bowl.

Ix the carrot, oil, maple syrup and lemon zest and then add to the dry mixture. Mix lightly using hands as necessary.

Form dollops of cookie mix with your hands and flatten into cookies on a lined baking sheet.
Bake at 180C for approx 10 mins until lightly golden. For a crisper cookie, flip and cook for a further 3 minutes.


For further guidance on making gluten free choices please see this post.

For tips and info on recipe measurement conversions, ingredients, substitutions and the methods behind how I do things.... check out my 'baking tips' tab at the top of the page.

Wednesday, 27 March 2013

‘Breakfast Boost’ sprinkles!


I was going to put together a another ‘intro post’ to publish yesterday...but the day ended up being so crazily busy I will have to do that tomorrow. It’s also coming up to the end of Lent ad therefore the end of my ‘Whole Foods Lent Challenge’ and my 6-week to 6-pack Challenge’ so I will fill you in on both of those tomorrow also. Sometimes I wish there were simply more hours in the day!

So, first let me fill you in on yesterday’s events...


I launched my ‘Wholeplus’fitness bar range to the public at my local gym...scary and exciting in equal measures as I just didn’t know what the response would be or quite how much do people really care about their health in the ‘real’ world? It went without a hitch, people loved the products and were really engaging with the simple whole foods concept. It was also so lovely and heartening to know so many people out there do care about what they put in their bodies. I had some really lovely conversations and got some great feedback to develop the products further. I wil keep you posted!
I got a bit carried away and didn’t take many photos... but I am hoping to do another event in a few weeks so will try and take a few more then!

On a whim the night before the event I spontaneously came up with another recipe idea that was also well received... a healthy breakfast mix in to use instead of sugar or syrup on top of oatmeal,  cereal or yoghurt etc. So many people I know enjoy of bowl of healthy porridge BUT then proceed to load it will sugar to sweeten it. This mix-in or topping uses dates ground into course granules and mixed with seeds and various ‘superfoods’ to give a versatile tasty sweet addition with great texture.


These are the only two pictures I got of the event...little cubes of bar tasters, jars of breakfast sprinkle and 2 bowls of truffles.
The jars you see along the back of the table are all the raw ingredients to help engage people with visualising
the 'whole foods' concept.

I made up three different jars of sprinkles for my event, but below is the basic principle I followed and a few ideas to get you going. All ingredients are approximates as I haven’t quite firmed up the recipes yet, and to be honest you can just eye-ball the quantities and throw in things you fancy and then process the mix until the texture looks right to you.

Check out my classic apple oats as shown in the picture...the perfect base for a sprinkly topping! 


Recipe : ‘Breakfast Boost’ sprinkles!

Makes  approx. 450g

Ingredients

250g dates
50g nut butter
100-150g mix of nuts/seeds (I used pumpkin coconut flakes and hemp seed mainly with a little chia thrown in for good measure!)
2 tbs maca powder
1-2 tsp spice – i.e cinnamon, ginger or vanilla
A little sea salt to taste
½ tsp pure stevia powder (note: It’s good to make the mix quite sweet since it will be ‘diluted’ in sweetness when mixed through)
20g coconut oil (if needed to help ‘clump’ the ingredients)


Method

Process the dates with the nut butter until you have small coarse clumpy pieces (i.e 1-2mm grains).

Add all remaining ingredients and pulse to mix until you achieve desired texture. 

Add a little coconut oil at the end if you need a less dry and a more clumpy mixture. (I only needed this when I made a chocolate protein based sprinkle as I used proportionally more dry ingredients).

I imagine this would keep for quite a few weeks in the fridge or a cool cupboard.


(p.s. Geek mode....I love these photos as the jars make great props and I love the shapes they create!)


For further guidance on making gluten free choices please see this post.

For tips and info on recipe measurement conversions, ingredients, substitutions and the methods behind how I do things.... check out my 'baking tips' tab at the top of the page.

Saturday, 9 March 2013

Whipped buckwheat porridge

So we’ve had the 1 minute almond milk tutorial...now time to put it to good use!

If you were thinking oats, you be wrong. See how I like to keep you on your toes!

This would make the perfect creamy dreamy chocolatey fruity Mother's Day breakfast in bed. Shhhhh, let's hope my mum doesn't read this...I have it planned!


This past week I have formed a bit of a love affair for buckwheat. I receive a delivery of goodies from my wholesaler and one of the things I had ordered was plenty of raw buckwheat groats. In the past I’ve only really ever ground the goats in flour for my GF baking. But, there are so many more creative ways to use buckwheat, it seemed like the ideal opportunity for some experimentation.

I have a few more buckwheat ideas in future posts, but for today I thought i'd play it simply and opt for a super creamy whipped buckwheat porridge. I divided the mix andded cocoa for a swirly topping. Through in some fruit and a few extra groats of toppings of choice and you’re good to go.

One quick note: make sure you use raw buckwheat groats and not or roasted groats. I don’t come across these so much in the UK anyway so haven’t made that mistake...just watch out since product names and availability changes depending on where you are in the world! 

(I had some leftover whipped chocolate buckwheat so I dolloped it right on top with some hot pear chunks
...not so pretty but still delicious!!)

Recipe: Whipped buckwheat porridge

Serves 1

Ingredients

¼ cup raw buckwheat groats (not kasha)
½ cup non dairy milk (I used homemade almond milk)
1 cup water
½ banana or 1 tbs nut butter (to add creaminess and thickness)
1 tbs date paste or syrup of choice
---------------------
1 tbs cocoa
Pinch stevia/syrup
Handful of warmed fruit (I used raspberries)
Other toppings or extra groats if desired (I went for whia chia and cacoa nibs)

Method

Grind the buckwheat groats until fairly fine. (do this is large batches for future use and to make flour). Stir in the milk and water and bring to the boil, simmer for 5 minutes, stirring frequently with a whisk. Add the remaining ingredients in the last minute of cooking (other than fruit and cocoa) and whisk well the blend.

Pour most of the mixture into a bowl and then add the cocoa to the remaining mixture, add a little sweetener if needed. Blend well to achieve a chocolate mixture and then lightly stir into the bowl of buckwheat. Top with warmed fruit and extra toppings as desired.


For further guidance on making gluten free choices please see this post.

For tips and info on recipe measurement conversions, ingredients, substitutions and the methods behind how I do things.... check out my 'baking tips' tab at the top of the page.
Tuesday, 5 March 2013

Fresh almond milk.... in one minute!


I’ve been having a bit of a ‘dietary reshuffle’ as of late, not in a big way, simply challenging a few routines and habits and trying alternative ways of going about things things. This all ties in to my Lent Challenge, along my extra Six-Pack Challenge. 

So today we’re going to talk about milk!

 
There are so many dairy free choices out there, many of which can be found in regular supermarkets, the idea of dairy free cooking shouldn’t be a daunting one (though I appreciate the challenge of eating out is another thing entirely).

My choice of ‘milk’ would typically be organic soya due to its viscosity, widespread availability and low cost. However in more recent weeks and months I have begun questioning whether this is the best option out there since there are so many mixed reports of soy products. Almond milk does seem to be a favourite in the health world and it does taste wonderful...but it is so pricey in the stores (over here in the UK at least!)

So, I decided to make my own. I will step in here and say that I have NOT used a nut bag to strain my milk- most people do take this additional step (and you can by all means)  but since I predominantly use milk in my oatmeal or as a liquid in baking then straining was not a key concern for me and it sped up the process dramatically. This milk literally takes 1 minute from start to finish provided you made some almond butter up in advance, this is the easiest way and ensures the smoothest milk.I made a cup's worth which should keep me going for a while.
I added the milk to a bowl of oatmeal and it made for a super creamy bowl...so good! I am planning on making a 1.5ltr batch every weekend and then dividing into two smaller batches and freezing one whilst I use the other over the course of a few days, that way I always have fresh milk to hand for minimal effort.

Four easy steps....almonds....meal...butter...milk!  (plus bowl of creamy oats mmmm)


I will also be building up a bit of a product profile over the next few weeks and months, I will add posts like this to a separate category as soon as I have my new blog layout sorted!

This recipe can join the homemade coconut butter (from way back at the beginning- cue dodgy photos) and also the more recent homemade date sugar experiments.

 
Recipe: Fresh almond milk

Just over 1.5 ltr

Ingredients

scant ¼ cup almond butter* (homemade from blanched or ground almonds without salt added)
1.5 ltr filtered water
1 tbs date paste or other sweetener (if desired for a touch of sweetness)

*You can add more or less almond butter depending on preferred viscosity. You can also make a thicker cream this way by increasing the proportion of almond butter.

Method

Mix the almond butter and date paste with approx 200ml water until well blended, add the remaining water and blend for 1 minute until very smooth. 

Pour into a container and stored in the fridge for 2-3 days (or freeze). 

Note this milk has not been strained and is best used for adding to oatmeal etc where a little ‘texture’ is not noticeable. If you want a finer milk for drinking straight  you can strain this through a nut bag prior to bottling. Shake the container before using as there will be some settling occur.


For further guidance on making gluten free choices please see this post.

For tips and info on recipe measurement conversions, ingredients, substitutions and the methods behind how I do things.... check out my 'baking tips' tab at the top of the page.

you may also like

Related Posts Plugin for WordPress, Blogger...