Showing posts with label raw. Show all posts

Tuesday, 7 May 2013

Fruit and nut slice...no bake!

It’s all about the ‘smoosh bars’ at the moment! With all the recent recipe testing I have an abundance of dried fruits and nuts.


Also my dad recently went all the way and purchased a Thermomix after seeing how much I use mine for everything from nut flours and butters to soup. Though his is an old style one he bought second hand, I wanted to put it through it’s paces to see how it fared against mine….a little blitzing of some fruit and nuts was the perfect test.

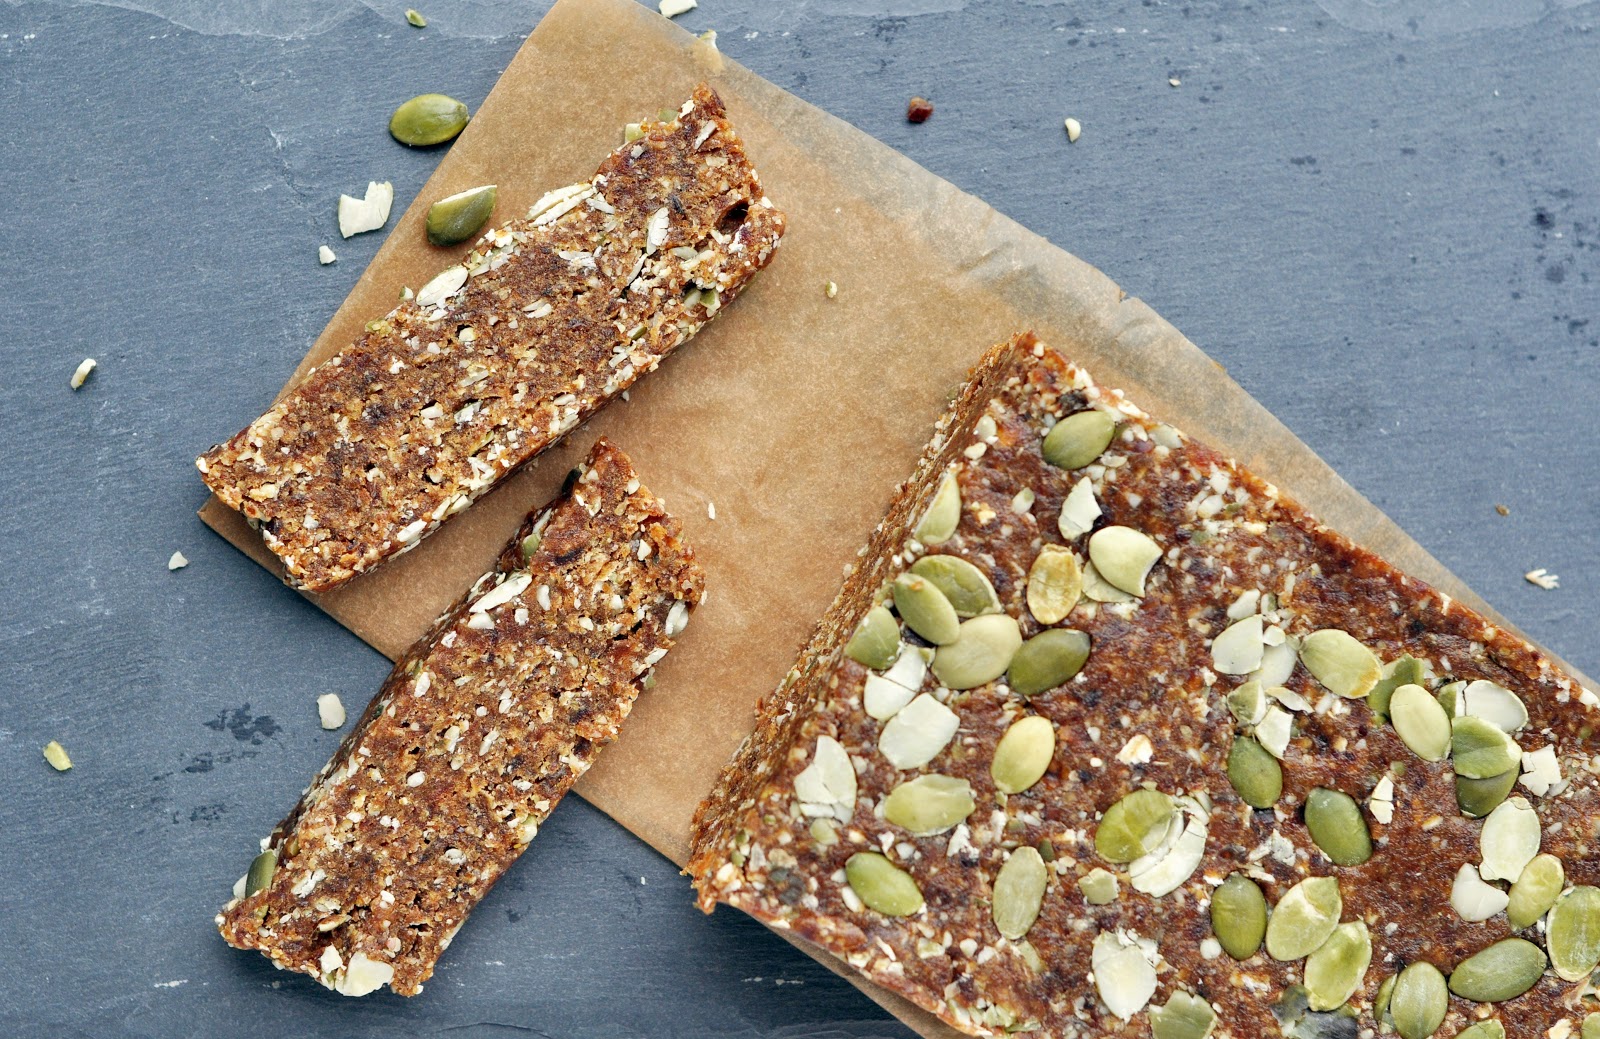
Instead of forming the mix into balls or bars, I figured I would keep it as a loaf stored in the fridge, so that he could simply slice off a slither when the desire struck. The flavours and textures work beautifully and give this loaf a really authentic 'fruit and nut' loaf feel. Keep the seeds and nuts fairly chunky whilst maintaining a fairly sticky mix, you can also press a few extra into the top.  Add a few more oats or dates as needed to get the right consistency to form a loaf.

Obviously it’s a lot denser than your regular cakey loaf so a little goes a long way. It’s very moreish so I will warn you now… you may well find yourself slicing of a little slither and then a little more! If you’d prefer individual balls or bars then go right ahead, the choice is yours.


Recipe: No-bake fruit and nut slice

Makes a shallow 20x10cm loaf

Ingredients:

300g dates (or sub some raisins)
70g oats
70g cashews (or other nuts or mixture of choice)
20g flax
70g pumpkin seeds
1 tsp ground mixed spice
1 tsp ground cinnamon


Method:

Process the cashews, oats , flax seed and spices until just coarse (not to fine). Remove from processor.

Process the dates  to form a paste, this can still containas few chunky bits if necessary.

Add all ingredients and pulse to mix through well whilst keeling a chunky consistency.

The mixture should be sticky but manageable- add a tsp or so of water if too dry and extra oatmeal if too sticky.

Spoon the mixture into a lined loaf pan (or similar sized tin) and press down (I use the back of a rolling on) until well packed. Chill in the free before slicing to serve.

Check out my other no bake treats here!


For further guidance on making gluten free choices please see this post.

For tips and info on recipe measurement conversions, ingredients, substitutions and the methods behind how I do things.... check out my 'baking tips' tab at the top of the page.

Tuesday, 24 April 2012

30 day green smoothie challenge!

Ok, so here’s the thing. Green Smoothie’s have got me curious…

I hadn’t really given them much thought in the past although this debate caught my attention a while back, and I guess that is when I first became much more aware of their seemingly huge following.

Randomly I had bought my dad this book for Christmas last year (although he hasn’t used it!) and the other day whilst at his house, I plucked it from the book shelf, and for the first time read it properly.  It gave some interesting counter arguments to the issues raised in the debate I referred to earlier and the evidence was also persuading.

In addition to this I had been putting together my thoughts for Mantra for Monday no. 17, and then it occurred to me…..why not take a '30 day Green Smoothie Challenge'! My contribution to trying something new for 30 days.

I am apprehensive I’ll admit. I’ve only lightly dabbled with any form of green smoothie in the past, and to be honest I haven’t quite got my taste buds around it. But what better chance to experiment than a smoothie for 30 days- I’m hoping by the end of the experiment I will have refined and tweaked my recipes to concocted some delicious new flavours, I’m also curious to see how my taste buds adapt. (Scroll down to gets hints and tips for green smoothie making). I will report back with a update post in 30 days time!

Who’s with me in this experiment? Always been curious…now is the perfect time to try!

So, here goes!  

Today’s smoothie no. 1 was:
2 cups spinach
1 medium banana
½ cup frozen mango pieces
1/3 cup cucumber
1 cup water
This made two large servings.
(I’ll be having the second serving tomorrow to save preparations every day)

The result? It was palatable but will take a little gettting used to before I come to love it!

The smoothie looks so much prettier in its constituent parts than when blended together- I might invest in a covered cup/flask so that I’m not distracted by the luminous green colour as a reminder!


P.S If I’ve bored you already then you don’t need to read on…. However you really should, because I have summarised what I consider to be the most interesting and useful extracts from the book to help you understand and prepare green smoothies. The following notes are taken more or less directly word for word (page references given).

Pg.7 greens contain all the essential minerals, vitamins, and even amino acids that humans need for optimum health. The only nutrient not found in greens is vitamin B12.

Pg. 19 It’s important to rotate the greens used in your smoothies. Plants carry a trace of alkaloids in their leaves to ensure the animals will move on to eat other green plants and will not exterminate any one species. In small quantities these alkaloids strengthen the immune system, however if you continue to consume one plant type for many weeks without rotation, eventually the alkaloids can accumulate and cause minor symptoms of ‘poisoning’. We do not have to rotate fruits in the same way since they do not (or rarely) contain alkaloids as ripe fruit is intended by nature to be eaten in order to spread the seeds. The author recommends rotating at least 7 varieties of greens.

Pg. 22-23 List of common edible greens:

Amaranth, arugula (rocket), beet greens, bok choi (pak choi), celery, chard (all types), collard greens, endive, frisee lettuce, kale (all types), mitsuna, lettuce (all types), radicchio, romain lettuce, spinach, watercress, wheatgrass. Also the leafy tops of vegetable such as pumpkin or squash leaves, carrot tops, cucumber leaves, grape leaves, radish tops.

Many herbs, wild edibles and weeds can also be used such as clover, dandelion, stinging nettles, sorrel, lovage….etc.  (I have to admit I am a little hesitant when it comes to wild plants so I plan to utilise predominantly cultivated greens).

Pg. 27 Blending vs juicing. Juiced ingredients oxidize faster than their blended counterparts. The main advantage of juices is that they require little digesting and can be assimilated immediately into the blood stream, allowing the digestive system to rest. However juices are also seen as a ‘fracture food’ missing the essential component of fibre along with its antioxidants. Humans could not live off juices alone whereas smoothies are a complete food.

Pg. 33 You can use sweet fruit, dates, raisins, figs and prunes to sweeten smoothies for a beginner. You can freeze greens if they cannot be used within a couple of days. Green smoothies can be kept up to three days in the fridge if necessary although best consumed fresh.

Pg. 45 Green smoothies are not combination of fruit and vegetables since greens are just the leaves and do not contain starch whereas vegetables do. It is also best to use ripe fruits as unripe fruits contain enzyme inhibitors which slow down the action of our digestive enzymes. Unripe fruit also has a higher starch content and less fruit sugar which makes it harder to digest. The author notes that the fibre in the greens slows down the absorption of sugar from fruit, making green smoothies suitable for people with a high sensitivity to sugar.

Pg. 47 The author does not recommend adding nuts, seeds, oils, supplements or other ingredients to the green smoothie because most the these items slow down the assimilation of smoothies into your digestive tract and may cause irritation and gas.

Pg.107 ‘Green puddings’ are thicker smoothies that can be eaten with a spoon. Green puddings don’t usually contain any water and are often thickened with chia sees, dates, coconut or fruit high in pectin.

Guidelines for preparing green smoothies:

-          Prepare first thing in the morning for the amount to be consumed within one day (ideally).
-          Sip slowly
-          Don’t add anything except greens, fruit and water.
-          Drink on its own and not as part of a meal.
-          Do not add starchy vegetables
-          Don’t add too many ingredients to one smoothie. Keep it simple.
-          Rotate greens to maximise nutritional input and rotate fruits to maintain taste variety.
-          Eat organic ingredients and ripe fruits wherever possible.
-          Use a powerful blender for the smoothest result and speediest turnaround.
-          If using a powerful high speed blender it is not necessary to peel organic fruits such as mangoes, apples, kiwis and pears.
-          Fruits rich in soluble fibre and pectin will make the smoothie creamier and prevent any separation- try banana, strawberry, mango.
-          Remove the large stalks from greens such as kale to reduce bitterness.

Tuesday, 3 April 2012

Coconut chocolate slice

It’s now only a few days before Easter, and with plans and preparations already likely to be in full swing, I thought I would give you a simple recipe for a raw healthy chocolate alternative.  You can literally whip this up in minutes and store it in the fridge.

This chocolate is still super rich and decadent, but is made using only raw healthy ingredients. As with any ‘healthy’ dessert it should still be enjoyed in moderation, and since it is a very rich I found a little slice satisfied me so much more than regular dark chocolate would have done.            

I wanted to make a chocolate using coconut oil, or in actual fact using predominantly homemade coconut butter since I buy shredded coconut flakes (the raw ingredients for the butter) in bulk so it is extremely cost effective to make my own this way. Most of the other recipes I found for making raw chocolate used cacao butter instead, which may well create a slightly superior chocolate base and be less crumbly (I found the coconut butter does make it ever so slightly crumbly). However, for me the costs effectiveness and simplicity of using coconut butter along with the fact that this chocolate is still so very good lead me to decide against using cacoa butter.  I may well experiment along those lines in the future but I wanted to offer you a chocolate made using ingredients you would more typically have in your cupboard.  

For me, this chocolate does not taste overpoweringly of ‘coconut’ but then since I use coconut butter all the time I am a little immune to its taste. I would suggest that unless you have a strong dislike for anything remotely coconutty then you would love this chocolate! You can by all means use all coconut oil if that is more your thing, it will create a smoother textured chocolate without the slight grainy texture of the coconut meat content. If you go down this route I would suggest using about 1/3 less oil than the amount of butter the recipe states. You can always add more if you need to, to get a smooth spooning consistency.

You will note I have included both carob and maca powder in the ingredients list below. These ingredients are both optional but I would encourage you to include them if you have them as they create a much more complex flavour base. The carob gives a real richness to the compliment the cacoa and the maca has a ‘malty’ flavour which (depending how much you use) makes for a less bitter chocolate more of the ‘milk chocolate’ variety. If you omit the carob add a little extra sweetener or dried fruit as the carob is naturally sweet. To make this a raw chocolate you would need to use raw cacoa powder instead of regular cocoa powder, but again this is optional and cocoa could be interchanged here is preferred.

Have a happy, healthy….and chocolatey Easter!

For other super simple and versatile chocolatey recipes, check this dessert/mousse/frosting and this (soy free) frosting. Oh and not forgetting smoosh bars and these amazing fudge bites…they can be formed into any shape and they are still made on a very regular basis in this house!


Recipe: Coconut chocolate

Makes once very large bar (approx. 9x4 inch) so feel free to halve the ingredients to make a smaller version. 

Ingredients

200g coconut butter
50g coconut oil (the additional of the oil creates a less crumbly chocolate)
50g raw cacao powder
30g raw carob powder or more cacoa)
1tbs maca powder (optional to taste)
50g agave syrup (plus a tiny pinch of stevia if necessary to taste- I found it sweet enough without)
Pinch of salt
1 tsp vanilla powder or extract
Optional- fruit and chopped nuts

Method

Melt the coconut oil and butter and then mix everything together in a blender/food processor for a few minutes to achieve a thick glossy paste that is easily spoon-able.

You want to ensure that the coconut butter and oil stay warm and therefore liquidy to achieve the smoothest mixture. I used my Thermomix which has heat settings- by setting this at 37C I could maintain the right consistency as it mixed the ingredients together.

Once mixed, add some crushed nuts or dried fruit in last (if using) and briefly mix through evenly. I used coarsely ground almonds and cranberries.

Spoon the chocolate in to the bottom of a lined loaf tin (as I did) or individual moulds and pack down firmly. Store in the fridge to set for a hour. Once set this can be stored either in or out of the fridge for a couple of weeks.


For tips and info on recipe measurement conversions, ingredients, substitutions and the methods behind how I do things.... check out my 'baking tips' tab at the top of the page.

Thursday, 22 March 2012

Raw carrot cake balls

I seem to be having a bit of a carrot cake kick…what with this little concoction a week or so ago and a few other ideas up my sleeve!

Well it is almost Easter, and it would seem that carrot cake it a very seasonal cake…maybe that was my subconscious coming into play because I didn’t consider carrot cake to be seasonal until I ‘googled’ Easter baking. To me typical Easter treats are more along the lines of hot cross buns and simnel cake…?

So carrots…but this time less of the cake and more of the smooshed ball variety. A lightly sweet and juicy treat to keep in the freezer and take out for a deliciously chilled nibble (or defrost fully for a softer bite). The original idea was inspired by these balls, but since I don’t have a juicer and I wanted to avoid the potential hassle of grating and squeezing to remove the juice, I simply  added oatmeal to the mix to absorb some of the liquids. I also thought I’d use carob to coat some of the balls which actually works really well with the flavours of the delicately sweet carrot and apple. You could use whatever you like, I also used coconut flakes for others.

Carob flour is an ingredient I am only just beginning to incorporate into my baking, so you will probably see it crop of more and more as time goes by. I have known of its virtues for a long time but until recently held back from giving it a go.  This is largely due to the fact that it’s simply not chocolate! To elaborate on that point, if you are unfamiliar with the taste of carob don’t fall for those who tell you it’s a ‘healthier alternative to chocolate’ (as I was told many years ago!). Yes its healthy…but no its not chocolate! It tastes a lot different and is naturally sweeter than cocoa. It is another one of those quirky health food ingredients that simply needs to be appreciated and enjoyed in its own right and not as a replacement for something else.

Are you familiar with carob? How have you incorporated it into your recipes? I’d love to know more.

I have kept these carrot balls in the freezer since otherwise they do make for a soft ball, even when kept in the fridge. They only take a couple minutes to thaw out enough to eat without freezing your teeth and I actually really love the chilled texture- almost like an ice cream ball! If you prefer them without the chill simply take out of the freezer about 20-30 minutes before you serve.

If you do want to squeeze out some of the carrot and apple juice, go ahead. I haven’t tried it this way but it should just make for a firmer ball, that can be stored in the fridge quite happily.


Recipe: Raw carrot cake balls

Makes approx. 12 balls

Ingredients:

2 carrots
1 medium apple
½ cup oatmeal (or GF grains)
½ cup dates
½ cup walnuts
1 tsp cinnamon
½ tsp ginger
Pinch salt
4 tbs agave
3 tbs cashew butter (or almond butter)
Carob powder/cacoa nibs/coconut flakes for decoration- optional

Method:

In a food processor blend the carrots and apple to puree (note they will be very wet and so the resulting balls will be soft- optional to use a juicer and drain away approx. ½ the juice).

Add all the remaining ingredients and blend in a food processor until all small chunks and well mixed through. You should have a very soft mixture that can still be formed into a ball, if too wet add a little more oatmeal. 

Decant the mixture into a bowl and allow to sit in the fridge for 30 mins to firm up a little. Once chilled roll into balls and then roll in coconut flakes or carob powder to coat. Lay the balls on a baking sheet in a single layer and freeze.

Once frozen they can be stored together. They are best removed from freezer a few minutes before serving and eaten chilled. They can be stored in the fridge but will be very soft (unless a juicer is used to drain part of the vegetable juice).


For tips and info on recipe measurement conversions, ingredients, substitutions and the methods behind how I do things.... check out my 'baking tips' tab at the top of the page.

Saturday, 11 February 2012

Valentine's cookie sandwich


My last Valentine’s recipe is here! I can’t believe how organised I’ve been. I usually miss the holiday themed recipe opportunities…or only realise at the very last minute, so I’m pleased with my early preparations.

Let’s hope as you are reading this that I am cosied up in a little cottage in the middle of Herefordshire…and not stuck in a blizzard somewhere, since the weather conditions at the time of writing (just gone midnight into Friday morning) were somewhat suspect with snow and ‘freezing rain’ forecast…hmmm not the best start to a holiday!

For this final recipe I just couldn’t get this fudge out of my mind- it is simply so good and so easy to make! Here I’ve rolled it out so that shapes can be made with a cutter and it performs the job just beautifully. Sprinkle with a little coconut and stop here if you like.  But I didn’t want to stop there, I wanted to add a little bit of pink!

I played around with the ‘pink’ options for quite some time. I wanted to create a similar raw ‘smoosh’ recipe so that the whole process was very quick and simple. To take a pink dye the basic dough needed to be light in colour so the two options I trialled were marzipan and cookie dough.

The marzipan still needs a little more work in my opinion as I think the almond flour makes the marzipan stick the roof of your mouth a little as you eat it but the marzipan recipe original seen here was too oily for rolling. The overall taste is good and it forms the shapes well, but for me the texture is not 100%- but then again I am very picky when it comes to textures. I preferred the cookie dough option and this worked best with the chocolate layer on the outside as the cookie dough is very soft and quite sticky whilst the fudge is firmer to touch and so seemed to work best that way round. As you can see I have tried various options here- feel free to vary things and experiment with your own layering!

I also pressed a little desiccated coconut on the chocolate sandwiches to give a pretty delicate finish…this was my favourite option!


Recipe: Valentines cookie sandwich

Makes anywhere between 20-40 heart sandwiches (depending on size of hearts and method used)

Ingredients- chocolate layer (fudge)

½  can black beans- rinsed and drained
1 small mashed banana
½ cup cocoa powder (or raw cacoa powder for an even healthier boost)
1/3 cup dates
2 tsp vanilla extract
½  tsp cinnamon
¼  tsp stevia
½ cup ground oats
2 tbs ground flax
2 tbs chia seeds

Ingredients- pink layer

Option A- marzipan

½ cup ground almonds
¼ cup almond flour
2tbs tapioca or arrowroot
¼ cup coconut butter
2tbs agave (tiny pinch spelt)
1 tsp almond extract (more if needed to taste)
1tbs water (as necessary to form dough)
1-2 drops red food colouring

Option B- cookie dough

2/3 cup cashews
1/3 cup oats
4tbs agave
1 Tsp vanilla extract
3tbs dried cranberries
1-2 drops red food colouring (for a stronger pink colour)


Method (for all):

Blend all dry ingredients in a food processor. Add wet ingredients and then blend again. The dough should be fairly tacky but not too sticky and should still be easy to handle.

Roll out, chill if needed and use cookie cutter to cut out hearts for each sandwich. Assemble in desired fashion and store in an air tight container.

 marzipan hearts with chocolate fudge centres

cranberry cookie hearts with a chocolate fudge centre

coconut chocolate fudge hearts with a soft cookie centre


For tips and info on recipe measurement conversions, ingredients, substitutions and the methods behind how I do things.... check out my 'baking tips' tab at the top of the page.

Thursday, 9 February 2012

Dip-tastic

It stands to reason that there are some universal truths. Fruit and veg = good. No one is debating that, right?  But, there has been lots of ‘debate’ in recent days about the nutritional quality of Green Smoothies.

(photo by nabcommunities.com)

Some highly respected doctors  and nutritionist have suggested that green smoothies are ‘bad’, the general premise being that the fibre content is so broken down and refined by the blending action the nutritional benefits are significantly reduced a with further impact of a sugar rush on the body.

Ok, I see the point, and it is does make you think. I think we all need to ‘think’ once in a while and debates like this, whichever side you may take, ensure we do that. It’s no good to simply follow the crowd off the back of the current ‘trend’. It is importantly that we understand why we do the things we do, and chose to do the things that make us feel good. We are all individuals, and what might work for one person, may not suit another.

Where do you draw the line?  The overall conclusion of these debates was that raw wholefoods in their natural state are the best. Well I guess we all knew that all along. But for me, I enjoy both raw and cooked foods in various states. For example, one could question a bowl of soup- cooked veggies then blended to make a creamy soup.  So are soups now even lower on the nutritional scale?

I personally think it a case of getting the balance right. You need to be aware of what you put in your body and make healthy choices where possible…BUT you should also enjoy what you eat. I’m not giving up my soups!  I personally haven’t yet got into the green smoothie revolution, but it was something I was keen to experiment more with.  Have these latest debates made me think twice?  Think, yes certainly, but would I now not drinks these smoothies? No, that wouldn’t change but I may be more selective with their frequency if I was a hard core green smoothie addict.  Awareness and choice is key.

So, the point of today’s post.

I agree with the general principle that raw food is best, and, for me, the notion of integrating simple raw foods into your everyday diet in an enjoyable way is the way forward.

I often grab raw veggie sticks to munch on as a quick snack any time of day….but when combined with a tatsy dip they are so much better!  My new mission is to create a selection of healthy dips that can really take the raw veg to another level.

Whether it be hummous, lentils, baba ghanoush… I want to try them all!

A big priority for me is the ability the freeze the mixture as typically the dips only stay fresh for a few days and I want to be able to make a big batch for speed and ease (my Thermomix finds it hard to make tiny portions) so making a few varieties and freezing individual portion sizes to last me for a month is my aim.

I will keep you posted on my experiments!  I’d be interested to know your thoughts on the whole ‘raw’ foods debate.


Tuesday, 24 January 2012

The worlds healthiest fudge

This wasn’t supposed to be a fudge recipe.

This was supposed to be an energy power bar recipe!

It still is an energy bar recipe…..it just so happened to turn into fudge too….crazy things do sometimes happen!

Now, before you get ahead of yourself, these little treats aren’t identical to fudge…so don’t go expecting a regular sugar loaded, melt in your mouth (furry teeth inducing) fudge morsel.  These little treats are full of healthy ingredients, are sugar free and have a really soft but firm, chocolatey,  fudgey bite to them, I find them really moreish and the only word I could use to describe them is…well…fudgey!

Perfect for a mid-afternoon pick-me-up or a post work-out protein boost.  What provides the protein…black beans of course!

I have lots of notes and saved recipes from websites and books for various types of granola bars, energy bars, baked bars, raw bars….. and these bars were inspired by Enlightened Cooking who’s power bar recipe can be found here.  I was intrigued by the simple concept, having used beans plenty of times in my baking before, but never in a raw form. My recipe followed closely along the same lines with a few tweaks of my own.

The ‘dough’ is so simple to prepare and very easy to handle. It is also very ‘accommodating’, and by that I mean it holds together really well, so I imagine it could take all sort of mix-ins without a problem….chunks of nuts, fruits, chocolate chips. Feel free to experiment with your favourite flavours. I have used both cranberry and coconut here.


Recipe: black bean energy ‘fudge’

Makes approx 10 slices

Ingredients

200g  or ½ can black beans- rinsed and drained
1 medium mashed banana
½ cup cocoa powder (or raw cacoa powder for an even healthier boost)
1/3 cup dates
2 tsp vanilla extract
½  tsp cinnamon
¼  tsp stevia
½ cup ground oats
2 tbs ground flax
2 tbs chia seeds (optional)

Optional:
Dessicated coconut to coat
Cranberries (or other dried fruit)- finely chopped and mixed through

Method

Combine all ingredients in a food processor and blend until a smooth dough is formed. Add additional dried fruit here also if using. The dough should be fairly tacky but not sticky and should be easy to handle.

Form a log of dough approx. 5cm in diameter. Roll the log in desiccated coconut if desired.

Using a sharp knife, cut the log into rounds approx. 1-2cm thick. Store in a sealed contained in the fridge for up to a week. (these also freeze well).

Note: to form ‘bars’ divide the dough and roll into individual logs and flatten slightly.

 The fudge log before it was cut into pieces, see how soft and malleable the dough looks...just waiting for all those creative mix-ins!


By now you probably already know I've used beans to pack a protein punch and substitute some of the fats in many of my recipes (i don't stop going on about them)..... check out my blondies, my brownie torte and my sticky toffee pudding.  I have also made a few raw energy bars.... like my absolute favourite choc-orange smoosh bars, my power cubes and my raw gingerbread.

For tips and info on recipe measurement conversions, ingredients, substitutions and the methods behind how I do things.... check out my 'baking tips' tab at the top of the page.

Wednesday, 14 December 2011

‘Twelve Days’ day 6: Mini Christmas puds

So, a couple of days ago I told you there was another marzipan inspired treat coming up….no more waiting…. it’s here!

So cute it seems cruel to eat them!

These are a combination of my chocolate orange smoosh bars and the marzipan to create a mini Christmas pudding with custard top. I added some ’holly ’using a little bit of green colouring to the marzipan and a topped with a clove for completeness.  Because cloves are so powerfully fragrant, they added a slight spiced taste to the whole pud. I really liked this as It made it all the more Christmassy flavoured, but if you are not  keen on the taste of cloves I suggest you omit or just use for decoration right before serving so they aren’t in place for so long.

These will store well for a couple of weeks, perfect to make in advance for guests throughout the holiday season. They are also gluten free, raw, super simple, super healthy and just…well…super all round! If you used the marzipan recipe I gave for the stollen you should have enough left over to easily make about 20 custard tops (maybe more). To make 20 puds you will need to double the recipe below.

See my original posts highlighted above or simply refer below where I have included the recipes again for efficiency.


Recipe: Mini Christmas puds

Ingredients

Pudding
(makes approx. 10 puddings)

100g dates
60g cashews
45g raisins
20g coconut flour
10g ground oats
15g cocoa powder
Grated rind of 1 orange or ½ tsp orange extract

Marzipan
(you will need only 1/3 of this amount for the topping- use or freeze the remainder)

100g finely ground almonds
100g white coloured ‘healthy flour’ e.g spelt or other GF flour
100g coconut butter
50g agave (tiny pinch stevia)
1 tsp almond extract (more if needed to taste)

Method

The method is so simple! Blitz together each batch of ingredients in a food processor until a fine sticky powdery crumb is formed. Create the balls by pressing together with your hands. Make sure there is no contamination between the batches (or from your hands) otherwise the marzipan will be discoloured.

Make the custard tops by taking smaller balls then flattening them out over the top of the pudding balls smoothing the edges down and to give the effect of poured custard or cream.

Mix a little bit of green food colouring to part of the dough, mix through well then pull off small pieces to pinch into shape as holly leaves. Press the leaves onto the top of the ‘custard’ and add a clove for decoration.

Leave to chill in the fridge for a little while to fully firm up but then these can be stored at room temperature in an airtight container.

Note: you will probably find the marzipan dough feels oily as you mould it, this is just the oils from the coconut in the warmth of your hands. Once cool the marzipan will not be oily.


For tips and info on recipe measurement conversions, ingredients, substitutions and the methods behind how I do things.... check out my 'baking tips' tab at the top of the page.

These make great little gifts... which reminds me I had planned on linking to a few of my favourites Pinterest pins that i'd come across for the holiday season. There is still plenty of time to get crafty.... I know i'll be using a few of these myself!


Tuesday, 6 December 2011

‘Twelve Days’ day 2: Christmas in a cube!

On the 1st of December it was my brother’s birthday and to celebrate I decided to surprise him with a little package in the post- mini ‘smoosh’ bar cubes. A delicious seasonal selection of chocolate-orange cubes taken from this original recipe, along with a new gingerbread version just in time for the Christmas period. 


I wanted to share the gingerbread recipe with you to kick your mid-morning elevenses up a notch! These cubes are pretty spicy and warming so feel free to cut back on the ground ginger if you prefer a slightly more subtle flavour. I have also included cacoa nibs to give a subtle chocolate hint but this is optional and the cubes are just a good without.  Oh... and one other thing, make some choc-orange cubes too and put one of each in your mouth at the same time....

....Mmmm...Christmas in a cube!

These cubes would also be great served in a little snack bowl with some raisins, nuts and dark chocolate buttons… addictive… but remember its ok because they are good for you! Remember they are raw and GF too.


Recipe: Ginger spiced cubes

Makes quite a lot of mini cubes (or about 10 small bars)

Ingredients

120g dates
25g almonds
35g cashews
20g raisins
40g ground oats
30g buckwheat flour
10g chia seeds
1tbs sliced fresh ginger
1tbs ground ginger
½ tsp mixed spice
½ tsp cinnamon
20g cacoa nibs or coarsely ground dark chocolate chunks- optional

Method

Very simply- add everything to your food processor and whirl until you have a fine sticky meal. To form into bars/cubes I pressed the mixture into a small tin lined with baking parchment and use the flat end of a rolling pin to firmly pack the mixture down. Chill the ‘slab’ for a while before lifting out of the tin and cutting into pieces (I cut some cubes for my borther and some bars for me). Store them in the fridge or cupboard. They will easily last for a couple of weeks maybe longer although the intensity of the flavour may deteriorate.


For tips and info on recipe measurement conversions, ingredients, substitutions and the methods behind how I do things.... check out my 'baking tips' tab at the top of the page.

Sunday, 25 September 2011

Chocolate orange 'Smoosh' bar (aka- Nakd bar/Larabar)

‘Nakd’ bars were something I was introduced to (by the boy) very early on, when veganism was still largely an intriguing curiosity to me.  Well, it could be said that if these bars were anything to go by then I’m in!!  I could barely believe I wasn’t eating chocolate, let alone raw fruit and nuts!

Nakd bars are, in effect, the UK version of the American Larabar. Soooo expensive to buy in the shops I noticed plenty of people were making their own versions and I wasn’t going to be left out. The Nakd bars make it even more straight forward in that they list the percentages of each ingredient on the packet itself so making it super simple to copy. However, in typical ‘me’ directly fashion I like to tweak things a little to lay my own mark. Also, I’m absolutely hopeless at following a recipe and prefer to play it by instinct and whatever takes my fancy (this works most of the time but I would be lying if I said all of the time- it comes back to bite me at times!)

The chocolate orange bar was my first taste and still my favourite to this day. To me, in the early days of my new appreciation of food and nutrition, the choc orange Nakd bar seemed the epitome of healthy decadence! 


Recipe: chocolate orange 'Smoosh' bar

Ingredients (use all organic if possible):

100g pitted dates
60g cashew nuts
47g raisins
25g coconut flour
15g cocoa powder
3g chia seeds (optional)
1 tsp orange rind
1 tsp orange extract

The ingredients add up to 250g and will make 5 x 50g bars. I often double or triple the recipe as these bars will keep in the fridge for a couple of weeks (plus i'm usually making more to give to family members).

Method:

Put everything into a food processor and smoosh together until chopped up into tiny pieces and the bowl is filled with a fine sticky powder (and the air is filled with the heady smell of chocolate orange). If you prefer a smoother bar with less chunky nuts (the cashews in the pics are fairly chunky) then process these for a bit on their own first before adding all the other ingredients in with them.

To form into bars I press the mixture into a tin lined with baking parchment or cling film and use the flat end of a rolling pin to firmly pack the mixture down. You could also form into balls or rolls with your hands (although I haven’t tried this). Chill for a while before lifting out if the tin and cutting into bars. Store in the fridge or cupboard if eating within a few days.

The perfect mid-morning pick-me-up!  ……. Or for that matter mid-afternoon, mid-evening, lunch, dinner….


Friday, 2 September 2011

Raw power cubes

The ‘power cube’ was an early recipe generated by a practical need for a healthy quick fix protein kick after a gym session. They were first conceived as bars with the intention of a being a healthy cereal bar but the consistency was denser and soft (not dry and crisp) lending itself to a flap-jack style bite sized cube.

Thus, the Power Cube was born! 

I feel these bars could be a bit ‘Marmite’ in that you’ll either love em or hate em! The notion behind the cube was less ‘treat’ and more ‘nutrition’ but over the weeks and months I have refined the recipe to my own personal tastes, and so I happen to love them! My family members however do not proclaim these to be among my best work (but again, let me remind you of their reason for being, so best not compared to an indulgent cake!) They are very flexible and accommodating so feel free to change things about and throw in what you fancy- the idea being you get a dense protein rich oaty bar as the end of it!

These bars are rich in a balance of protein fats and carbs and so are also great to grab on the run when you are not sure when you will next be eating or to have a couple tucked away in your bag in case of emergency as a mini meal replacement! The cubes are also raw further boosting their nutritional status.


Recipe: Power Cubes

Makes a 20x25cm tray cut into 25 cubes.

Ingredients:

400g oats
30g dessicated coconut
30 sesame seeds (other small or ground seeds can be used)
3 tbs cocoa powder
1 tbs ground ginger (optional)
150g isolated soy protein powder
3 tbs tahini
3tbs smooth peanut butter (use all PB instead of part tahini if you prefer)
1 ripe banana
1 tbs vanilla essence
2 tbs agave syrup
½ tsp stevia
Approx ¼ cup soy milk or other non-dairy milk (just enough to hold the mixture together well)

Method:

Mix dry ingredients together in a large bowl. Mix and mash wet ingredients together in a smaller bowl. Add wet ingredients to the dry and mix together adding as much soy milk as needed to create firm sticky dough. Firmly press the mixture into a 20x25 cm tray (or whatever similar size you have). It is easiest to line the tray with baking parchment as this will then simply lift out when ready to cut. Place the tin in the fridge for an hour (or longer) to firm up. When firm cut into cubes and store in the fridge. The cubes will keep for a week or more in the fridge and also freeze well. 

I like to make ‘gingery’ power cubes as I love ginger and I think this works well with the peanut butter which I personally find a bit over powdering on its own. Feel free to vary the spices and cocoa content to your own preference.

you may also like

Related Posts Plugin for WordPress, Blogger...