Showing posts with label dessert. Show all posts

Tuesday, 2 July 2013

Strawberry dessert cake with strawberry cream

My weekend was all about sunshine… and strawberries!


Strawberry time is now in full swing over here in the UK… what with the sunshine finally out in the skies and the Wimbledon tennis on the TV there's just no denying it! I love any opportunity to get outside spend time in the sunshine (or even rain) and in particular spend time with friends just relaxing… Something many of you know I am notoriously bad at doing. 

At the weekend I was invited to a barbecue, obviously I was going to be bringing desert (amongst a few other bits and pieces including veggies burgers) and so strawberries were on my mind and in my mouth pretty much the whole of last weekend.

Some of the goodies that were brought to the party (yes there was quinoa...and samosas...I love samosas and even though I don't eat much wheat I caved in for these!)

I also had another challenge- I wanted to create a strawberry themed desert cake that was also totally sugarfree- even agave, coconut sugar and maple syrup were off limits- as I would usually use a little of one of these alongside stevia. One of the ladies coming to the barbecue is very sugar intolerant as well as chocolate intolerant (shock horror) and so I really wanted to be up to create a non-chocolate and sugar free cake that she could enjoy along with everyone else!

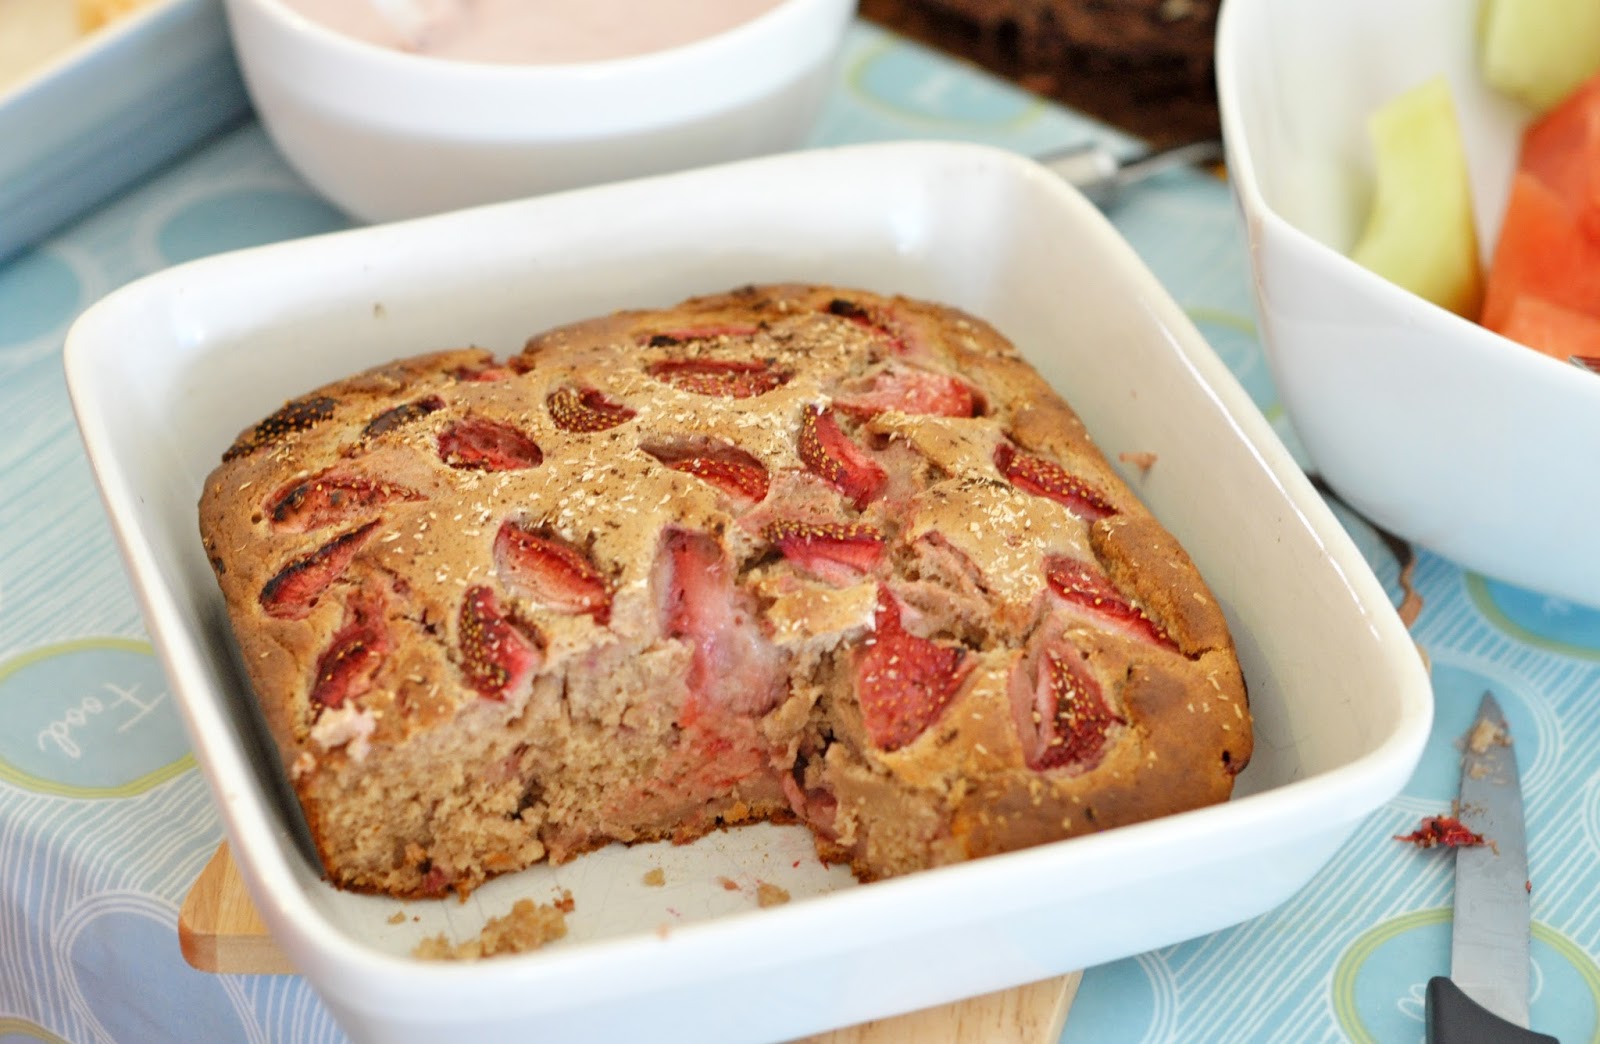
So, this is what I came up with loosely based on my banana blondie recipe and using as much fresh fruit and fruit purees as possible as the main sweetness then bumped up with stevia. I was careful to get the balance right so that the stevia didn't overpower and taste odd. To assist with the rising I actually added just two teaspoons of coconut sugar as when I tried a similar recipe a short while ago it sank a bit when it came out the oven and I wasn't sure whether this had anything to do with the total lack of sugar… may well just be coincidence! P.s if you omit the tiny bit of sugar it may well be ok and even if it does sink it's still good, just denser!

I served this up warmed through with a tofu based strawberry cream/mousse so that the cake became even more dessert-like. Perfect for a garden party carrying on into the evening hours... I know I certainly went back for more! Whilst you're serving your strawberries and relaxing with your friends why not have a little extra fun and play this bingo game* while watching the tennis. Summer time bliss!


Recipe: Strawberry dessert cake

Ingredients:

2 bananas- pureed
1/4 cup sugar free strawberry jam
Scant 1 cup chickpeas
1/4 cup coconut oil- melted (or oil of choice)
2 tsp vanila
30 drops vanilla stevia (I tend to use NuNaturals)
1 cup apple juice (or other fruit juice)
-----------
1/2 tsp cinnamon
1 1/2 tsp baking powder
1/2 heaped tsp baking soda
pinch salt
2 tsp unrefined sugar (optional add in- see note)
1 1/2 cups white spelt flour (or GF flour- if so I would use a mix of buckwheat, ground almonds and starch)
-----------
1 cup chopped strawberries- for filling
1/2 cup chopped strawberries, sprinkle of coconut and vanilla bean- for topping.

Sauce/mousse Ingredients:

1/2 cup strawberries
1/2 cup silken tofu
1 tbs coconut oil
vanilla stevia to taste

Method:

Blend the wet ingredients together until smooth. Mix the dry ingredients together in a large bowl and then add the wet mixing gently but well. Stir through a cup of chopped strawberries in the final strokes.

Spoon the mixture into a round of square cake tin approx. 8" diameter. Smooth the top and press the remaining strawberries in along with a dusting of coconut and pure vanilla bean powder- optional but yummy!

Bake at 180C for approx 30-40 minutes- I needed to lightly cover with foil after 25 minutes to prevent the top from becoming too brown before the centre had cooked through. Check with a toothpick for done-ness. Note: it is a fairly dense moist cake anyway, but cook for as long as possible to maximise 'cakiness'.

To make the 'cream' simply blend the ingredients together well and chill in the fridge for an hour to thicken up for a more mousse like dessert. You can omit the coconut oil if you want to go for a creamy drizzle. Note if you had some beetroot you could add a tiny amount to intensity the pink colour without it coming through in the flavour (I didn't have any beetroot!)


*Note:  This post is in association with Ladbrokes Bingo. The strawberry dessert recipe is all my own creation and was due to be posted exactly as it is regardless, it just happened to tie in nicely with the some extra Wimbledon fun. Enjoy :-)


For further guidance on making gluten free choices please see this post.

For tips and info on recipe measurement conversions, ingredients, substitutions and the methods behind how I do things.... check out my 'baking tips' tab at the top of the page.

Thursday, 20 June 2013

'Power parfait'... with chocolate, quinoa, banana, peanut butter...


The chocolate power pudding has now been made with various toppings on a number of occasions. I just love the warm comforting feeling of an 'oatmeal-esque' bowlful but with a protein powered alternative texture to change things up from time to time.


One morning when I had made a big batch of chocolate 'base mix' to keep in the fridge for a couple of days, I layered it up in glasses for a 'power parfait' (having too much fun with aliteration today!)  The youghurt topping was simply soy yogurt mixed with peanut butter and a drizzle of maple syrup. I mashed some banana through the chocolate base mix and sliced the remaining on top.


It made the perfect mid morning snack (after my early morning green smoothie) and once again since the quinoa mix was pre-made it only took mere minutes to throw together, this could easily become a dessert with a little extra sweetness thrown in.

Oh, on a quick side note, I also tried blending up the mix in a processor to get a smooth and creamy base, but it didn't really work that well and the texture didn't change much, but that's cool with me as I love the texture- just saying in case you had wondered...


Recipe: Power Parfait


Serves 2 

Ingredients:

I cup of this chocolate power pudding (chocolate quinoa)
2 small or 1 large bananas
1/2 cup vegan yoghurt
1 tbs peanut butter
2 tsp maple syrup
Cacao nibs to decorate- optional

Method:

Mash half of the banana and mix through the chocolate quinoa pudding. Spoon the pudding into two serving bowls or glasses.

Mix the yoghurt with the peanut butter and maple syrup and spoon over the top of the quinoa layer. 

Chop the remaining banana to top the yoghurt and decorate with cacoa nibs or other toppings as preferred. Chill if necessary (if the quinoa pudding is not chilled) prior to serving.


For further guidance on making gluten free choices please see this post.

For tips and info on recipe measurement conversions, ingredients, substitutions and the methods behind how I do things.... check out my 'baking tips' tab at the top of the page.

Saturday, 1 June 2013

Tropical chia summer pudding

More coconut and pineapple!


This recipe is a keeper for hot summer afternoons!  I’m planning on making this a few more times in the final lead up to my Tough Mudder event as it was so hydrating and refreshing and I’m in full on hydration mode... irrespective of the fact that the weather in England is still dull and cold most days!

This keeps well in the fridge for 2-3 days so make a double batch if you’ve got a hot spell on... and  grab a big spoonful whenever you pass the fridge!

I’m also now wondering whether this mixture could be frozen into ice lollies...that thought literally just popped into my head so I have not yet had a chance try it out....sounds like it could work?

I added a tsp of maca powder as I often try to add it into my ‘fitfood’ recipes for an extra boost and to assist adrenal recovery, but that is totally optional and won’t affect the taste or texture.


Recipe: Tropical chia summer pudding

Serves 1

Ingredients:

1 heaped tbs white chia seeds (dark will work fine too but won’t look so pretty!)
1 banana- mashed well
1 tsp maca powder (optional)
½ cup fresh pineapple
¼ cup coconut water (or substitute regular filtered water)
Coconut sprinkles and mint to decorate (optional)

Method:

Blend all ingredients together until smooth. Or if you prefer a chunkier consists you could whip everything together lightly with a fork. (I whipped mine until almost smooth)

Allow to chill and thicken in the fridge for at least an hour before consuming.


For further guidance on making gluten free choices please see this post.

For tips and info on recipe measurement conversions, ingredients, substitutions and the methods behind how I do things.... check out my 'baking tips' tab at the top of the page.

Wednesday, 29 May 2013

Tropical pineapple and coconut baked oatmeal


It’s like a holiday in a bowl....tropical paradise by the spoonful!


I love my baked oatmeal and I have been experimenting with different flavour combinations recently. This is one of my favourites and it definitely has the’ dessert factor’, in much the same way as this apple and blueberry pie did.

Use large flakes or coconut curls instead of desiccated coconut for the best appearance and texture. The pineapple is so sweet you barely need any additional sweetener but I added a touch of coconut sugar for good measure... just follow your taste buds. For extra indulgence use coconut milk as your ‘milk’ of choice. 

This is definitely one of those ‘mix it up and throw it in the oven’ bakes...healthy, foolproof’ and it simply tastes divine. I ate this as breakfast (with the help of my mum)...but it's totally desert worthy and once against ridiculously healthy in the desert stakes! No excuses...just make it now!

If it’s not hot and sunny where you are quite yet....this will transport you back to your holiday’s with one simple bite!

Do you want more bresert recipes?...sure, no problem...here they are!


Recipe: Tropical pineapple and coconut baked oatmeal

Serves 2

Ingredients:

½ cup oats
1 tbs ground flax
Pinch salt
1 tsp coconut sugar (or other sweetener of choice- optional)
2/3 cup fresh pineapple chunks (or 1 tin)
¼ cup chunky coconut flakes/curls
¾ cup non dairy milk of choice (I used almond but coconut milk would be great!)
1 tsp vanilla extract (or rum flavouring)

Note: for a more ‘grown up’ dessert you could try add some rum for part of the milk content- I haven’t tried this!

Method:

Mix all ingredients together in a medium bowl, adding the pineapple and coconut last, sprinkle a few of the coconut flakes over the top surface.

Spoon evenly into a medium pie dish- approx 20cm diameter (the mixture should be approx 2cm deep)

Bake at 180C for approx 30 mins until the top is golden.


Oooh get a little cheeky...cheeky! :-)


For further guidance on making gluten free choices please see this post.

For tips and info on recipe measurement conversions, ingredients, substitutions and the methods behind how I do things.... check out my 'baking tips' tab at the top of the page.

Saturday, 25 May 2013

Summer fruit slaw with chia berry dressing


My julienne peeler has been getting a bit of action again! But this time it’s not only with the veggies.


After the success of this simple cucumber and pineapple salsa, I was keen to experiment more with mixing the refreshing subtle taste of cucumber with other fruits.

Here I used any fruits I could get my hands on to julienne. For your reference...no, you cannot julienne a banana. Believe me I tried. It would have been the perfect shape so I am very disappointed! (I even tried with a frozen banana as I was that determined but nope it just wasn’t happening!)

The first time I made this slaw I had a large mango in my fruit bowl and that worked a treat, the second time I didn’t have a mango, hence why the photos below are mango-less but I have still added it to the recipe. I also used rhubarb which gave a great tart flavour contrast, though raw rhubarb is a little tough and stringy so you may want to cook it ever so slightly after julienning it- I left it raw, but it’s just an idea for you to try.

Throw in lots of cucumber, you won’t taste it against the sweetness of the fruits and I also added a simple fruity yoghurt and chia dressing to give an extra touch of sweetness.

Breakfast? Dessert? You choose.


Recipe: Summer fruit slaw

Serves 1

Ingredients:

½ cup cucumber noodles
¼ cup rhubarb noodles (cook lightly if desired)
¼ cup mango noodles
----
1tbs sugar free berry jam
2 tbs non-dairy yoghurt
1 tsp chia seed
Extra fruit/berries to decorate as desired.

Method:

Mix the yoghurt with the sugar free jam and chia seeds and set aside to thicken slightly. 

Prepare the fruit and cucumber noodles and place in a swirl in a serving plate/bowl leaving a well in the centre. Spoon the jam mix into the centre of the slaw.

Decorate with berries  to serve as desired. You could also add a sprinkle of cinnamon, vanilla bean powder, cocoa, coconut, nuts.....


For further guidance on making gluten free choices please see this post.

For tips and info on recipe measurement conversions, ingredients, substitutions and the methods behind how I do things.... check out my 'baking tips' tab at the top of the page.

Saturday, 11 May 2013

Apple and blueberry 'birthday' baked oatmeal (or Mother's Day breakfast!)

I hadn't been planning to post today... My big birthday was going to be a nice chilled out morning followed by a trip out this afternoon. Relaxing...what's that!?!

It ended up being a brief trip to the gym, followed by this amazing breakfast (a last minute idea), a few presents to open, a this blog post write up.... and then my trip out, all because I couldn't contain the excitement of this breakfast and quite a few of you on Facebook saw the picture, got curious and wanted the recipe (I don't blame you!!)  This would make the most amazing Mother' Day brunch for those of you in parts of the world that have Mother's Day this weekend- hence why I wanted to post it for you!!

Saying that I did have an hour or so spent 'pottering' about the house, and my pottering took the form of looking through old photo albums and smiling over childhood photos.  Gosh has 30 years reqally gone by...!

This one in particular tickles me.... already behind the camera!  I also seem to have spent a of of time in my underwear?!  I made a little montage for you. I think actually come across as a lovely 'quiet and calm' child....ha ha that's not quite the story my mum would tell you :-)


The recipe is right below. I'm not going to go on and on describing how to make it, how to tastes, ways to vary it etc etc. Quite simple because it tastes amazing (think breakfast brunch or dessert!), it's ridiculously simple and also because....I wanna go out!  Byeeeeeee

P.s I will have more birthday related foodie things to come...just ran out of time this week with my business launch!!


Recipe: Apple and blueberry 'birthday' baked oatmeal

Serves 2 (or 3)


Ingredients

2/3 cup oats
tiny pinch salt
1 1/4 cup apple juice
1 apple- grated
1 tbs chia/flax seed
1/2 tsp mixed spice or cinnamon
large handful frozen blueberries (I haven't tried with fresh so I am not sure of cooking times)
small handful of pumpkin seeds (or other seeds/nuts as preferred)


Method

Mix everything together reserving most of the blueberries and pumpkin seeds to add on the top last. Spoon into a medium oven dish and add the blueberries pumkin seeds. Sprinkle with exra sugar if you like, but this was seriously sweet enough for me (I would even serve it as desert) just from the fruit and fruit juice.

Bake at 180C for approx. 25 mins until the topping is golden. Serve immediately.  


For further guidance on making gluten free choices please see this post.

For tips and info on recipe measurement conversions, ingredients, substitutions and the methods behind how I do things.... check out my 'baking tips' tab at the top of the page.

Saturday, 13 April 2013

Tough Mudder Challenge... and chocolate 'boost' mousse!

For those of you who are dedicated followers of my blog....I think there may be a few of you out there somewhere ;-)  You will have seen a sneak preview in this weeks Mantra for Monday.

I true crazy style I have signed myself up for a challenge, a challenge that actually brings me out in a cold sweat of panic just thinking about it...though I am now getting used to that feeling.


This blog began back in 2011 at a time when my life and perception of the world around me was changing, I was changing and since that time I have not stopped. This is simply the next chapter...pushing that little bit harder and testing my limits both physically and mentally. Off the back of my Lent Challenge is needed a kickstart and in response I have signed up to Tough Mudder, taking place south of London on Saturday June 8th...just 8 weeks away.

‘Fit foods’ will take priority in the run up to the challenge and so I will be busy using this Fit Food collection of recipes in coming weeks... but always one to add to a collection here is another offering for you today.  


I rarely supplement protein but if I do it’s typically hemp as the cleanest whole food form of protein powder. This is a spin off from my Green Smoothie Cheesecake and coconut cream discoveries. It makes great dessert like snack or semi-freeze for a soft serve or cheesecake option...choices choices!  The texture is mousse like with the soft grain from the hemp and coconut flour giving a great texture- it's not smooth and silky but has a soft light grain and almost bubbly bite (difficult to describe).

I originally made a single serve mini portion (it's intense so you don't need a large serving), but as that worked out so well I increased the ingredients and tweaked things ever so slightly to make 6 portions that I have piped into mini muffin cases and frozen.  Simply pop one out and allow to defrost just a little when you are in need of a boost!

Chances are you’ll be seeing some more ‘fit food’ recipes around here...


Recipe: Chocolate 'boost' mousse

6 servings

Ingredients:

1/2 cup hemp protein (other powders may also work)
3 tbs cocoa or raw cacoa powder
1/4 cup fine coconut flour
2 tsp maca (optional )
1-2 tbs ground chia
1 cup mashed ripe banana (use frozen for a thicker consistency)
1 tbs coconut oil- melted
1/4 tsp stevia to taste
1/2 tsp vanilla extract
up to 1/2 cup non-dairy milk or choice (use more of less depending on desired consistency and whether or not you used frozen banana)

Method:

Blend all ingredients together until very smooth. 

Spoon or pipe the mixture into mini muffin cases (I piped it for purely for aesthetics!) Freeze for 30 minutes or so if you prefer a soft serve consistency, or freeze longer if planning on keeping for a few weeks. 

Serve at room temp or chilled and topped with extra fruit, nuts, chia seeds or trail mix if desired.


For further guidance on making gluten free choices please see this post.

For tips and info on recipe measurement conversions, ingredients, substitutions and the methods behind how I do things.... check out my 'baking tips' tab at the top of the page.

Tuesday, 9 April 2013

‘Magic’ dairy free cream topping... 2 minutes!

Ok, so maybe this topping isn’t actually magic.....but it is almost!

2 base ingredients, 2 minutes and almost infinite variations...plus it’s healthy and allergy friendly.

Seriously could you really ask for any more magic?

Since making the discovery a few weeks ago, I have hinted at this recipe and posted a few of it’s variations for it’s use in recent posts but I figured it was time to give it the attention it deserved and write it’s own dedicated post. It’s all about the topping...and everyone loves a good topping!

As mentioned back in this post, the original idea to use coconut flour to make coconut cream was not my own, The Dairy Free Queen regularly mixes it up into a coconut cream. However I had even greater success when I took this idea to another level and combined it with yoghurt (either dairy or non-dairy works fine- I typically use soy as it’s most readily available to me). It makes the cream super smooth and thick also visually less lumpy (though it still tastes great simply mixed with non-dairy milk as per the original method).

The two base ingredients are coconut flour and yoghurt but there are various additions to tweak it. It has a mild coconut flavour which can easily be disguised with other mix-ins. I have provide two cream options below, but of course there are varying degrees of 'thickness' in between depending on your desired use.  It freezes well and makes an amazing chilled cheese cake! You can also bake it. I made a mini baked cheesecake recipe which I will try and post later this week, though to be honest the unbaked version as in the green smoothie cheesecake is amazing...and may possibly be my preference over baked!

Check out the coconut cream recipes so far below...and then go and make your own. So quick and easy, if you don’t already have coconut flour this is definitely worth buying some for (note I have tried with other flours such as almond and it doesn’t work...I have warned you!)

Chocolate buckwheat bake


Healthy Cadbury's Eggs

Creamy Dark chocolate shake

Green Smoothie Peppermint Cheesecake


Recipe: Cream topping

Makes approx ¾ cup

Thin whippy topping Ingredients:

1/4 cup fine coconut flour
1/3  cup non-dairy milk
1-2 tbs yoghurt of choice
Stevia or syrup to taste
A few drops vanilla extract- optional

OR

Thicker  ‘clotted cream’ style topping ingredients:

½ cup yoghurt (I use soy)
2 tbs fine coconut flour
Stevia or syrup to taste
A few drops vanilla extract- optional
(other flavours also optional)

Method

Combine all ingredients in a small bowl and stir together well. Let sit for a few seconds and test the consistency (coconut flour absorbs a lot of liquid), add more wet or dry ingredients as needed


Sneak preview of baked cheesecakes...coming soon!


For further guidance on making gluten free choices please see this post.

For tips and info on recipe measurement conversions, ingredients, substitutions and the methods behind how I do things.... check out my 'baking tips' tab at the top of the page.

Saturday, 16 March 2013

'Green Smoothie' peppermint cheesecake

I wasn't planning to post a recipe today (well actually I was since yesterdays post was supposed to be today but my fingers got clumsy and hit 'publish' and not 'schedule'...oops!)

But that's ok cos I accidentally came up with a little gem of a recipe that relates to yesterday's recipe and is oh so green I had to share it in the final run up to St Patricks Day!

P.S...I apologies now for the overuse of the word 'exciting' and the number of !!!! and ... you'll see in this post.


This receipt is indulgent whist being ridiculously healthy... I mean totally ridiculously healthy- so much healthier than you'd imagine when tasting a bite! Even my mum was wide eyed at how good it was and she won't go near my green smoothies! :-)

Just quickly scroll down now and take a look at the ingredients list!

I have been playing around with coconut flour and yoghurt combos a lot these last few days....such a revelation of simplicity and so versatile. I was almost dancing around the kitchen when I took this cheesecake out of the freezer, allowed it to thaw out and dove in...the texture is amazing- so soft and creamy!!

I am so excited to have created a vegan cheesecake that doesn't rely on tofu or cashews! Whoop whoop!

I have a few more experiments along these lines to bring your way soon, all equally exciting (in my opinion) but this will have to keep you going for now. Just promise me this....next time you make a green smoothie, reserve a little bit to make this!! I made a mini cheesecake as I wasn't sure if it was going to be a success or disaster, but you could easily make 3 or 4 times the amount and make a regular sized cheesecake. It really is good enough for dessert I promise (although it might freak out your dinner guests!) You can also cheat and use extra sweetener if you need to.

Right...gotta go, so much to do and so little time. All the taste testing I've been talking about that has largely sabotaged my '6 pack challenge' these last few weeks is soon to be coming to an exciting conclusion! Phew- there really is only so many dried fruits and nuts a girl can consume, so it's a good thing I had this little beauty and a big glass of the Super Green smoothie to hand for my post-work out lunch today!


Recipe: 'Green Smoothie' peppermint cheesecake

Serves 2 (or one hungry person!)

Ingredients:

3 tbs leftover green smoothie (I used this recipe)
1 tbs fine coconut flour
3 tbs vegan yoghurt (I used soy) Note: for non vegans this does also work with regular plain yoghurt
1 tbs white chia seeds (plus more for topping if desired)
1/2 tsp peppermint extract
4 drops pure stevia (or to taste)

Cheesecake base: I used some leftover 'smoosh bar' style mix from one of my testing samples. Basically its a mixture of dates, almonds and raw cacao nibs. You can use any raw crust mixture.

Method:

Mix everything together very well to form a smooth thick paste with no lumps of flour.

Press the cheese cake base into the bottom of a large silicone muffin case or a mini pie dish with removal base/sides (approx 8cm wide). Note: it may be hard to remove the cheesecake otherwise.

Spoon the cheesecake mix on top of the crust and firmly smooth the top with the back of a wet spoon. add chia seeds (or other decoration) is desired- or you can add these at the time of serving.

Freeze the cheese cake for a minimum of one hour. To serve remove from the case whilst still solid (it should peel away easily). Allow to defrost on a serving plate at room temperature for at least 30 mins.


For further guidance on making gluten free choices please see this post.

For tips and info on recipe measurement conversions, ingredients, substitutions and the methods behind how I do things.... check out my 'baking tips' tab at the top of the page.

Saturday, 2 March 2013

Gingerbread ice cream


I had a friend over to visit last Sunday and in true Sunday style we had a full on roast dinner complete with this nut roast, I actually used predominatly sunflower seeds this time which worked very well.

For dessert I wanted something quick easy and not too heavy after such a big main course. My hot pear and gingerbread crumble was the perfect fit- particularly since I had some of my buckwheat granola left over to use on top! I made a large batch of saucy topping and had quite a lot remaining afterwards so...what to do?

...Gingerbread ice cream! 


this gingerbread sauce was turned into ice cream!

I’ve not made many frozen desserts in the past, partly because I don’t have an ice cream maker, but every now and again curiosity gets the better of me. This is one such time.  This ice cream also perfectly fits the theme of my sugar free Whole Foods Challenge

If anyone does try this out with an ice cream maker please let me know how you get on and how creamy the ice cream is?  Without an ice cream maker this little concoction has some ice crystals and is more like a sorbet, but in actual fact I think this texture suits the dessert really well as it is a very refreshing after dinner experience and would make the perfect accompaniment to a an apple pie or pear crumble (it could replace the sauce on top of the hot pear curmble).

The strength of the ginger dominates the banana which is what I was looking for, of course the banana undertones are there in the background but I felt this flavour combo struck a great refreshing but mellow balance. I used soy yogurt in my recipe, and have not tried other substitutions, but you may find that full fat coconut milk gives a creamy texture. 

I toped my icecream with a simple dark chocolate drizzle made from melted cacao liquor, melted coconut oil and a little liquid sweetener. It freezes upopn contact with the ice cream for a lovely 'crack' as your spoon dives in. You could also dust with lemon zest, nuts or crystalised ginger if you desired.


Recipe: Gingerbread ice cream

Makes one small tub

Ingredients:

2 bananas (approx 200g peeled weight)
equal weight in vegan yoghurt (or coconut milk)
1/4 tsp pure stevia
1 tbs ground ginger
1 tbs fresh ginger (use more or less to taste)
1/2 tsp ground cinnamon

Method:

Blend all ingredients together until very smooth. Pour into a freezer container and freeze stirring twice during the following 2 hours as it freezes.


For further guidance on making gluten free choices please see this post.

For tips and info on recipe measurement conversions, ingredients, substitutions and the methods behind how I do things.... check out my 'baking tips' tab at the top of the page.

you may also like

Related Posts Plugin for WordPress, Blogger...