Showing posts with label sugar free. Show all posts

Tuesday, 2 July 2013

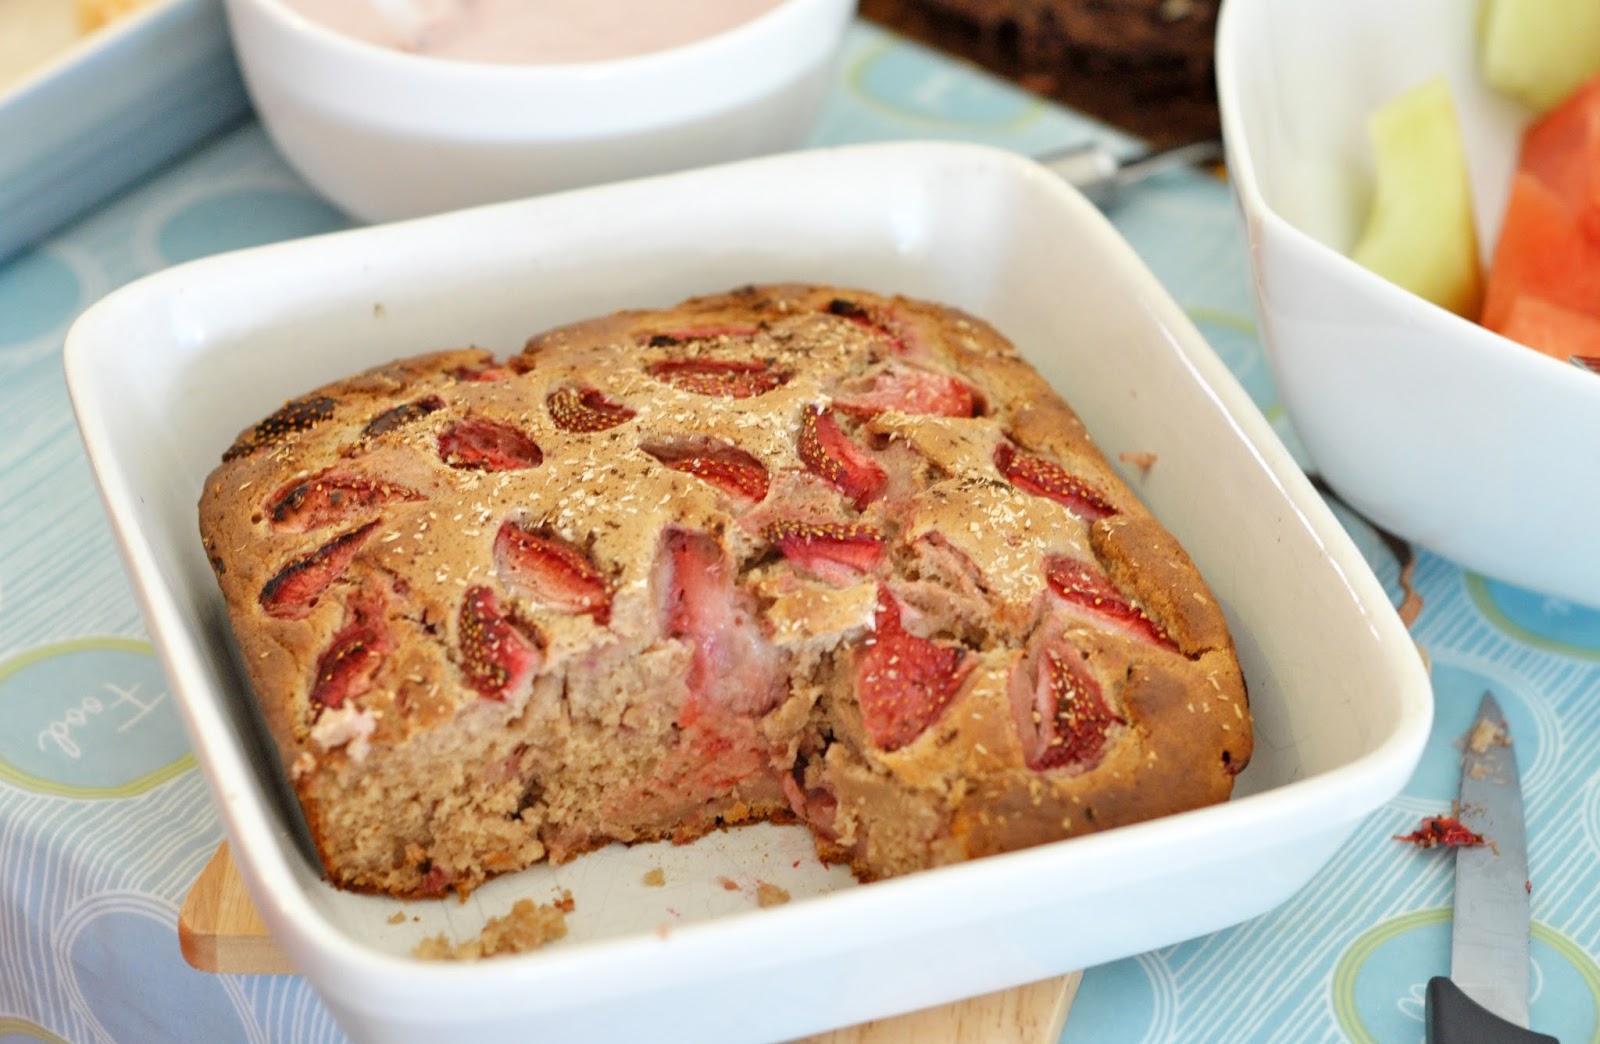
Strawberry dessert cake with strawberry cream

My weekend was all about sunshine… and strawberries!


Strawberry time is now in full swing over here in the UK… what with the sunshine finally out in the skies and the Wimbledon tennis on the TV there's just no denying it! I love any opportunity to get outside spend time in the sunshine (or even rain) and in particular spend time with friends just relaxing… Something many of you know I am notoriously bad at doing. 

At the weekend I was invited to a barbecue, obviously I was going to be bringing desert (amongst a few other bits and pieces including veggies burgers) and so strawberries were on my mind and in my mouth pretty much the whole of last weekend.

Some of the goodies that were brought to the party (yes there was quinoa...and samosas...I love samosas and even though I don't eat much wheat I caved in for these!)

I also had another challenge- I wanted to create a strawberry themed desert cake that was also totally sugarfree- even agave, coconut sugar and maple syrup were off limits- as I would usually use a little of one of these alongside stevia. One of the ladies coming to the barbecue is very sugar intolerant as well as chocolate intolerant (shock horror) and so I really wanted to be up to create a non-chocolate and sugar free cake that she could enjoy along with everyone else!

So, this is what I came up with loosely based on my banana blondie recipe and using as much fresh fruit and fruit purees as possible as the main sweetness then bumped up with stevia. I was careful to get the balance right so that the stevia didn't overpower and taste odd. To assist with the rising I actually added just two teaspoons of coconut sugar as when I tried a similar recipe a short while ago it sank a bit when it came out the oven and I wasn't sure whether this had anything to do with the total lack of sugar… may well just be coincidence! P.s if you omit the tiny bit of sugar it may well be ok and even if it does sink it's still good, just denser!

I served this up warmed through with a tofu based strawberry cream/mousse so that the cake became even more dessert-like. Perfect for a garden party carrying on into the evening hours... I know I certainly went back for more! Whilst you're serving your strawberries and relaxing with your friends why not have a little extra fun and play this bingo game* while watching the tennis. Summer time bliss!


Recipe: Strawberry dessert cake

Ingredients:

2 bananas- pureed
1/4 cup sugar free strawberry jam
Scant 1 cup chickpeas
1/4 cup coconut oil- melted (or oil of choice)
2 tsp vanila
30 drops vanilla stevia (I tend to use NuNaturals)
1 cup apple juice (or other fruit juice)
-----------
1/2 tsp cinnamon
1 1/2 tsp baking powder
1/2 heaped tsp baking soda
pinch salt
2 tsp unrefined sugar (optional add in- see note)
1 1/2 cups white spelt flour (or GF flour- if so I would use a mix of buckwheat, ground almonds and starch)
-----------
1 cup chopped strawberries- for filling
1/2 cup chopped strawberries, sprinkle of coconut and vanilla bean- for topping.

Sauce/mousse Ingredients:

1/2 cup strawberries
1/2 cup silken tofu
1 tbs coconut oil
vanilla stevia to taste

Method:

Blend the wet ingredients together until smooth. Mix the dry ingredients together in a large bowl and then add the wet mixing gently but well. Stir through a cup of chopped strawberries in the final strokes.

Spoon the mixture into a round of square cake tin approx. 8" diameter. Smooth the top and press the remaining strawberries in along with a dusting of coconut and pure vanilla bean powder- optional but yummy!

Bake at 180C for approx 30-40 minutes- I needed to lightly cover with foil after 25 minutes to prevent the top from becoming too brown before the centre had cooked through. Check with a toothpick for done-ness. Note: it is a fairly dense moist cake anyway, but cook for as long as possible to maximise 'cakiness'.

To make the 'cream' simply blend the ingredients together well and chill in the fridge for an hour to thicken up for a more mousse like dessert. You can omit the coconut oil if you want to go for a creamy drizzle. Note if you had some beetroot you could add a tiny amount to intensity the pink colour without it coming through in the flavour (I didn't have any beetroot!)


*Note:  This post is in association with Ladbrokes Bingo. The strawberry dessert recipe is all my own creation and was due to be posted exactly as it is regardless, it just happened to tie in nicely with the some extra Wimbledon fun. Enjoy :-)


For further guidance on making gluten free choices please see this post.

For tips and info on recipe measurement conversions, ingredients, substitutions and the methods behind how I do things.... check out my 'baking tips' tab at the top of the page.

Tuesday, 21 May 2013

'Not as you know it' Nutella

Yes, yes I know there are plenty of 'healthy' 'vegan' nutella recipes already lurking around the blogosphere... and for good reason, who doesn't like a drippy spoonful of thick creamy chocolate?


So far I have avoided the temptation to make my own. Partly because  had concerns as to my self control once made, but also many of the recipes I'd come across had a number of time consuming steps and also many recipes also left a lot to be desired in the healthy department.

I made my first version of the 'Nutella' a week or so ago here for the Real Food Source. It was delcious and the coconut sugar gave a lovely caramelised touch.  I wanted to reinvent it again with a slight twist this time using my ever faithful date paste.

You'll notice there are no roasted hazlenutsa in this recipe, so technically its not Nutella at all...rather a chocolate almond spread. Somehow that description didn't tantalize my tatsebuds in quite the way it should! The chocolate really takes centre stage and the creamy almond paste (make your own or buy it) just brings it all together in a rich and creamy spread.

Plus if you add a little extra water you'll have an amazing chocolate drizzle sauce! Sooooo good.


Recipe: Healthy ‘Nutella’

Makes just under 1 cup

Ingredients:

1/3 cup almond paste*
1/3 cup date paste
3 tbs cocoa powder
1/3 cup boiling water

*almond paste is just blanched almond butter. Make your own or buy it for example here

Method:

Stir the cocoa into the boiling water until smooth. Add all ingredients to a blender and blend until very smooth. This works best with either a smallish sized blender or double the amount (the mixture had a tendency to fling itself to the edges of my large Thermomix and I had to scrape it down a few times)

Store in the fridge. it will thicken up a little. This would also be good mixed with a little hot water and served as a chocolate drizzle sauce. You may want to add a couple of drops of stevia to add sweetness if diluting as a drizzle.


For further guidance on making gluten free choices please see this post.

For tips and info on recipe measurement conversions, ingredients, substitutions and the methods behind how I do things.... check out my 'baking tips' tab at the top of the page.

Saturday, 11 May 2013

Apple and blueberry 'birthday' baked oatmeal (or Mother's Day breakfast!)

I hadn't been planning to post today... My big birthday was going to be a nice chilled out morning followed by a trip out this afternoon. Relaxing...what's that!?!

It ended up being a brief trip to the gym, followed by this amazing breakfast (a last minute idea), a few presents to open, a this blog post write up.... and then my trip out, all because I couldn't contain the excitement of this breakfast and quite a few of you on Facebook saw the picture, got curious and wanted the recipe (I don't blame you!!)  This would make the most amazing Mother' Day brunch for those of you in parts of the world that have Mother's Day this weekend- hence why I wanted to post it for you!!

Saying that I did have an hour or so spent 'pottering' about the house, and my pottering took the form of looking through old photo albums and smiling over childhood photos.  Gosh has 30 years reqally gone by...!

This one in particular tickles me.... already behind the camera!  I also seem to have spent a of of time in my underwear?!  I made a little montage for you. I think actually come across as a lovely 'quiet and calm' child....ha ha that's not quite the story my mum would tell you :-)


The recipe is right below. I'm not going to go on and on describing how to make it, how to tastes, ways to vary it etc etc. Quite simple because it tastes amazing (think breakfast brunch or dessert!), it's ridiculously simple and also because....I wanna go out!  Byeeeeeee

P.s I will have more birthday related foodie things to come...just ran out of time this week with my business launch!!


Recipe: Apple and blueberry 'birthday' baked oatmeal

Serves 2 (or 3)


Ingredients

2/3 cup oats
tiny pinch salt
1 1/4 cup apple juice
1 apple- grated
1 tbs chia/flax seed
1/2 tsp mixed spice or cinnamon
large handful frozen blueberries (I haven't tried with fresh so I am not sure of cooking times)
small handful of pumpkin seeds (or other seeds/nuts as preferred)


Method

Mix everything together reserving most of the blueberries and pumpkin seeds to add on the top last. Spoon into a medium oven dish and add the blueberries pumkin seeds. Sprinkle with exra sugar if you like, but this was seriously sweet enough for me (I would even serve it as desert) just from the fruit and fruit juice.

Bake at 180C for approx. 25 mins until the topping is golden. Serve immediately.  


For further guidance on making gluten free choices please see this post.

For tips and info on recipe measurement conversions, ingredients, substitutions and the methods behind how I do things.... check out my 'baking tips' tab at the top of the page.

Saturday, 20 April 2013

It’s all about...dates, dates, dates!

I use dates a lot!! 

Particularly this last month or so, as I cut out syrups of all kinds during lent in a bid to use only whole food sweeteners, and to be honest I have enjoyed keeping this up! That’s not to say I won’t use agave, brown rice syrup or maple syrup ever again, I have simply enjoyed the challenge of not relying on these foods.


Dates have therefore become by go-to versatile sweetener above and beyond bananas or other dried fruits on the basis they are so neutral in taste and still pack a lot of sweetness in to a small bite.

I have written a few posts about various homemade date products before, but I figured it made sense to do a bit of a round up here with all the basic recipes in one place for easy reference, plus this old date paste post was in need of a little refresher (and much better photos!)

I’d love to hear how you use dates and other dried fruits in your baking?

Date paste

Recipe: Date paste

Ingredients 

1 packed cup of dates (I used 1 heaped cup to compensate for the fact the dates were whole and not packed in- so you want to visually aim for a fairly packed cup)
½ cup hot water
1 tsp vanilla extract- optional

Method

Place the dates in a small/medium bowl. Pour the required amount of boiling water over the dates and leave to soften for approx. 30 minutes. Once softened pour the contents of the bowl, along with a little vanilla extract, in to a blender (I used my thermomix) and blend until smooth.

Spoon the paste into a jar and store in the fridge if not using straight away.  This keeps for at approx 1 month in a sealed container.


date syrup


Recipe: Date syrup 


Ingredients 

1 packed cup of dates (I used 1 heaped cup to compensate for the fact the dates were whole and not packed in- so you want to visually aim for a fairly packed cup)
1.5 cups hot water- for a smoother easily spoon-able syrup
1 tsp vanilla extract- optional
1/4 tsp pure liquid stevia (to gove back sweetness diluted by the water)

Method

Place the dates in a small/medium bowl. Pour the required amount of boiling water over the dates and leave to soften for approx. 30 minutes. Once softened pour the contents of the bowl, along with a little vanilla extract, in to a blender (I used my thermomix) and blend until smooth.

Pour the syrup into a jar and store in the fridge if not using straight away.  This keeps for at least two weeks in sealed container.


date sugar


Recipe: Date sugar

Makes 1 cup

Ingredients

3 cups fresh dates (I used deglet noor- so as big and sticky as medjool)
1-2 tsp starch (I used arrowroot but others will also work)

Method

Halve the dates and lay them in a single layer on a lined baking sheet.

Place in the oven on the lowest temperature (mine was approx 50C) and ‘bake’ for about 3 hours, turn the oven off and allow to cool whilst still in the oven. I left mine in their overnight. They should end up much harder and dryer.

Placed in a high powered food processor (I used a Thermomix) and blitz on high for 30 seconds. Add 1 tsp of starch and blitz for another 30 seconds.

At this stage I lots of small clumpy grains that were still a little sticky. Lay this mixture out on the baking sheet once again in an even layer and bake at a low temp for another hour until the mixture is very hard to the touch.

Once fully cool, re blend the mixture in the processor adding a touch more starch if necessary (the starch helps to prevent clumping).  You could also add other flavours such as vanilla or cinnamon here if desired.

Once the date sugar is as fine as you can get it and there is no moisture present. Pour into an airtight storage container for future use. You will find that the date sugar hardens together over time which is normal. Use a fork to loosen for use.

Notes: you may find that if you are able to ensure the dates are rock hard from the first bake the resulting sugar will be fine enough from the first blend without the need for re-baking. You can also use a dehydrator to achieve the same affect. Follow the manufacturer’s instructions.
 

I also use ground dates as the basis for these breakfast sprinkles.


Here is a little list of a few of my date sweetened recipes:

Bakes Apple Oatmeal

Chewy Buckwheat Clusters

Spiced Apple Pancakes with Date and Walnut

Toffee Granola Bars

Quinoa Breakfast Cakes

Dark Chocolate Pudding

Sticky Toffee Pudding


For further guidance on making gluten free choices please see this post.

For tips and info on recipe measurement conversions, ingredients, substitutions and the methods behind how I do things.... check out my 'baking tips' tab at the top of the page.

Thursday, 18 April 2013

Baked 'coconut cream' cheesecakes

More coconut cream concoctions...this stuff is totally amazing, please don’t roll you eyes at me as I go off on one again!  Try it first...please (if only to shut me up!!)


Ok, so now we've tried it as a creamy whipped topping, as a thick mouse, in a cream egg and as a chilled cheesecake. So how about cooking it?

Yes, you can bake this stuff too!!

My initial reason for doing this was to see whether I could make a light and not too thick mix and then bake it instead of freezing it and still be able to take it out of a pudding mold (i.e muffin case). Without baking these little beauties there would have been no way that I would have been able to remove them...that would have been an absolute mess!

It worked perfectly since the short baking time seals the edges and allows them to pull away from the muffin case or whatever silicone mold you use. Since the edges pull away I would suggest that you would also be fine with metal cake pans- just edge round using a knife to lever them out.

You can add any mix-ins you choose, I tried out a few options but creativity is virtually endless.  I would suggest serving these cheesecakes hot, just for a change and to make the most of the ‘just baked’ feel.
Oh, before I go....here is one more coconut cream idea... a chocolate cookie cream sandwich that I posted over here at the Real Food Source. I based the recipe on my popular chocolate quinoa cookies.


Recipe: Baked coconut cream cheesecakes

Makes 3-4 mini cheesecakes

Ingredients:

2/3 cup soy yoghurt (other yoghurts would probably work well)
3 tbs fine coconut flour
Stevia or syrup of choice to taste
1/2 tsp vanilla extract

Topping mix-in options
2 tsp cocoa powder
Crushed frozen raspberries (frozen are easier to handle to create a mottled not blended look)
Blueberries (frozen are best to avoid burning during baking

Base: I used a variant of my breakfast cookie oat base without the choc chunks, or you could use a smoosh bar style base. Or go for no base at all!

Method

Combine all cheesecake ingredients in a small bowl and stir together well to from a thick paste. Add mix ins as necessary.

Press chosen base mix (if using) in the bottom of mini muffins or cupcake tins (use silicone for ease of removal) and then top with the cheesecake mix  and toppings. Bake for 5-10 mins at 180ºC just until the edges have baked and sealed and the mixture is heated through, no need to be golden. The baking will seal the edges and make for an easy removal.

Serve hot or cold.


For further guidance on making gluten free choices please see this post.

For tips and info on recipe measurement conversions, ingredients, substitutions and the methods behind how I do things.... check out my 'baking tips' tab at the top of the page.

Saturday, 6 April 2013

Creamy dark chocolate pudding or shake....you decide!


I am dreaming of chocolate...probably...as I'm trekking up mountains as you read this!

I know being the week after Easter you are probably now screaming at the screen... 'no more chocolate, i'm all chocolated out'  Maybe? Maybe not?


Either way, you'll enjoy this chocolate treat, super chocolatey, BUT super light and healthy (i'm still enjoying my sugar free explorations!) and best of all you can make it two ways. A thick after dinner chocolate pudding or a dreamy creamy chocolate shake. Just a slight tweak or ingredients gives you both options...can't decide? half and half the mixture after the first stage before adding the rest. Its not too sickly sweet, more of a dark chocolate twang, and it has a great lower fat and higher protein content. The banana taste is very subtle in the background and so barely noticeable (in my opinion).

Ok, so if you've got a little impatient and have already scrolled down to the recipe you'll have noticed the first item in the list... black beans! Have any of you guessed where this concoction was inspired from?

Yes...these babies!  When making a batch of truffles I always add a little soy milk to the remains in the processor and then blitz to loosen the mixture from the blades and sides before washing the Thermomix bowl out... It makes a fab chocolate milk, so then I tweaked it a little added a few extra bits to turn it in to a super creamy shake.  Simple! just make sure you blend and blend... I recommend straining the mixture through a sieve into the glass before drinking it so make sure it is super smooth, this is less important for the pudding as you wont notice the odd tiny piece of bean or date fibre.

The topping you see is my own so light but decadent newly created coconut flour frosting...it is what inspired this creation, so you can probably figure it out for yourself if you want to give it a try, but I will write up the post in full for you next week. Dust with cacoa nibs and you are good to go!


Recipe: Chocolate pudding or shake...you decide! 

Serves 2-3

Ingredients: chocolate shake

½ cup black beans
1 small mashed banana (1/4 cup approx)
3 tbs date paste (or 4 softened dates)
A pinch of stevia to taste
¼ cup cocoa powder
1 tsp vanilla
Approx 2 cups milk of choice (I’ve tried with both almond and soy)
1 tbs melted coconut oil

Note for a chocolate pudding reduce the milk to 1 ½ cups and increase coconut oil to 2 tbs)

Method

Process the beans, banana and dates until you have a thick smooth paste. Add remaining ingredients and blend until very smooth. Pour into serving glasses or bowls and chill for approx 30 minutes until thickened.  If serving as a shake strain through a sieve.

Serve in tall glasses or short bowls...perfect with a coconut cream topping... recipe to come next week! sorry to make you wait :-)


For further guidance on making gluten free choices please see this post.

For tips and info on recipe measurement conversions, ingredients, substitutions and the methods behind how I do things.... check out my 'baking tips' tab at the top of the page.

Saturday, 30 March 2013

Easter Simnel Cake

This is very much a last minute post before I rush out of the door to drive 5 hours north to Snowdonia for a 'relaxing' break with the family. I say relaxing...but there will be lots of walkng involved. Relaxing my mind for a few days is the intention here and something I am very much in need of.

I'm planning on switching off from the internet...so I may be a little silent for a few days (other than the odd bit of dabbling on my phone!)


It's Easter Saturday and I hope for many of you that means enjoying a long weekend. Relaxing? DIY? Family time? What are your plans?

Yesterday I promised you one final Easter themed recipe...this one is quick and easy and can be made as a a single or double serving. I've made mine as a sharer as that was the size of my tin but you can easily half the ingredients (or save half for latter) if you prefer.  It uses the  coconut  cream that has been popping up in a few recipes...I've yet to write a full post dedicated to it, but it so simple and versatile its crept in of its own accord!

This cake is based on a fruit cake recipe but it would be equally nice using my single serve 2 minute carrot cake as a base. You can make any 'mazipan' style eggs or use some of the thickened  coconut cream. I had some vanilla energy bar mixture left over from my taster session so I used that. If you want to follow my basic recipe... it's based on these bars using just dates dessicated coconut and vanilla.

The top of the cake should have 12  'eggs' on it if you are following the biblical tradition of the 12 apostles but I struggles with space! Here's some brief info on the traditions behind the simnel cake if you are interested.  :-)

Right, i'm off...Have a lovely Easter. Eat lots of good food and be happy!

P.s apologies the photos aren't up to my usual efforts.... I was littering clicking and posting as fast as I could with my family clamouring to get out of the door!!


Recipe: Mini Simnel Cake

Ingredients:

1/3 cup blanced almond flour*
3 tbs ground almonds
1/2 tsp baking powder
1/4 tsp baking soda
pinch salt

1/2 cup mixed dried fruit and nuts roughly blended- I used cranberries, raisins and walnuts
1/2 tsp mixed spice and/or cinnamon
1 small apple grated (approx. 1/3 cup)

3 tbs orange or apple juice mixed with 1 tbs ground flax seed
1 tsb coconut oil- melted (or other)

*Note- this would probably work fine with regular flour or spelt too (but I haven't tried it that way)

topping:
3 tbs vegan yoghurt
2 tsp fine coconut flour
tiny pinch of stevia to taste
pinch turmeric (just for yellow colour)
few drops almond extract

Decoration: 12 'eggs' (or an many as you can fit around the edge!)

Method:

Mix the dry ingredients in a small bowl. Roughly blend the dried fruits/nuts and then add to the dry ingredients along with remaining ingredients. Mix lightly to combine.

Spoon into a smallish tin (I used two extra large muffin tins approx 8cm diameter).

Bake for approx. 20 mins at 180C until golden on top. Note this probably also work in the microwave for 2-3 mins cook time but it wouldn't go golden.

Allow to cool before mixing the topping ingredients together to form a thick spreadable frosting and spreading over the top of the cake. Decorate with eggs to the perimeter to serve.

P.s for some random reason I added some strands of saffron.. it didn't add anything... i'd leave it off ;-)


For further guidance on making gluten free choices please see this post.

For tips and info on recipe measurement conversions, ingredients, substitutions and the methods behind how I do things.... check out my 'baking tips' tab at the top of the page.

Sunday, 24 March 2013

Cadbury's Creme Eggs...crazy healthy style!

I know this is a Silent Sunday (that will be along later) but I just couldn't help myself...I got so excited yesterday when this recipe worked out, I actually shouted 'yes' as I cut into the 'yolk' and it looked so amazingly realsitic....if I hadn't been holding a sharp knife at the time I would have also flung my arms in the air!


This recipe, may appear to have a few steps to it, but actually it very simple and the coating is my 'worlds healthiest truffle recipe' which really you should make a batch up anyway (because it is amazing!) and because it makes for perfect Easter truffle balls... plus the 'dough' can be made in advance and frozen which makes things much more versatile.

So the yolk....would you ever have guessed it was a dried apricot! Nope didn't think so!

And for the white creme...my newest 'coconut cream' discovery. You saw it first in this green smoothie cheese cake recipe, and I have loads more recipes that use that as a base coming up.

A little bit of freezer action in between to help firm things up and make the eggs easier to model and there you have it!  I've even provided some step by steps pictures.... just cos I'm being nice today ;-)

Can you believe this crazy indulgent recipe is sugar free, fat free, gluten free.... It also just about fits my Wholefoods Challenge (other than the tiny bit of agave in the truffle mix- but I let that one slip!)

Would you ever think these could make Creme Eggs!!! Crazyness at is best...


Right I'd better go, as I am off to London to meet a friend at the Vitality Show at Earl's Court...there is an amazing line up of stalls and events and Terry Hope Romeo is giving a talk on veganism..so excited!!

I have another Easter themed recipe planned for next week...I'd love to hear of your Easter plans too!


Recipe: Healthy Cadbury's Creme Eggs

Makes approx. 5-6

Ingredients:

1 batch of this truffle mixture* (you will probably have some left over)

approx. 1 heaped cup vegan yoghurt (or any yoghurt for non-vegan)
1/4 heaped cup fine coconut flour (it is important to use the fine stuff to get a really smooth paste)
1/2 tsp pure liquid vanilla stevia (or to taste) or regular stevia and extra vanilla extact.

1 dried apricot for each yolk

*If you don't want to make the truffle mix, you could freeze the eggs once you have wrapped them in coconut cream and then once fairly solid, smooth the surface into shape and dip in chocolate (obviously not quite so healthy but still better than regular creme eggs!)

Method:

Make a batch of truffle mixture and set aside (this can be made in advance and chilled/frozen).

Mix the yoghurt, coconut flour and stevia together to form a thick smooth paste. Chill for approx. 30 minutes until very stiff.

Once the 'white' is stiff, form egg sized dollops tucking a dried apricot in the centre of each one, Roughly smooth into egg shapes. Lay on a lined baking sheet (so they don't touch) and re-freeze for another 30 mins or so until fairly firm.

Meanwhile roll approx. 30g balls of truffle dough into ovals approx. 2-3mm thick, and then wrap around the eggs, using a wet finger to smooth the seams. Allow to sit for a few minutes so that the whites inside can fully defrost and get super creamy. Yum!!

I imagine these would store in the fridge for a few days (I haven't tested that though!)


Saturday, 23 March 2013

Introducing ‘Fit-food’ and buckwheat balls!

So many new ‘introductions’ these last couple of days…plus another one planned for next week!  There has been a lot going on that is beginning to take shape very nicely so I just want to bring you up to speed with where I am and share my excitement with you too!

Off the back of the launch of my new Wholeplus Fitness bar range, the recent weeks have had me thinking about and exploring all sorts of ‘fitness’ related snacks and recipe ideas. For example my green smoothie cheesecake was a bit of a revelation in super-healthy-tastyness!


I have a new recipe to share with you today that continues the buckwheat theme that you’ve also seen here, here and here in very different ways. Yum- I love buckwheat. But on the theme of introductions, I have added another new category to the recipes tab so now you’ll be able to search through ‘Fit-Food’. These recipes are all about high protein, or low carb, or grab and go power-snacks… basically plenty of recipes to fit an active lifestyle. Feel free to throw more ideas and comments my way as this is an area if nutrition I am very passionate about.


So without waffling on any more, here is the ‘fit-food’ recipe for today. Super simple but certainly hits the spot. Enjoy!


Recipe: Buck-coconut bites

Makes 12 balls

Ingredients

½ cup dates
¼ coconut flakes
½ buckwheat groats (you can toast them first if you like but I didn't)
2 tbs peanut butter (or other nut butter) add a pinch of salt if not using salted nut butter.

Method

Process the dates until sticky and coarsely ground.  Add all remaining ingredients and pulse to combine. Add more nut butter if too dry and more coconut if too sticky.

Options: you could also add vanilla, spices, carob or cocoa, or nuts of seeds of choice to sub some of the buckwheat or coconut.


For further guidance on making gluten free choices please see this post.

For tips and info on recipe measurement conversions, ingredients, substitutions and the methods behind how I do things.... check out my 'baking tips' tab at the top of the page.

you may also like

Related Posts Plugin for WordPress, Blogger...