Showing posts with label cake. Show all posts

Tuesday, 2 July 2013

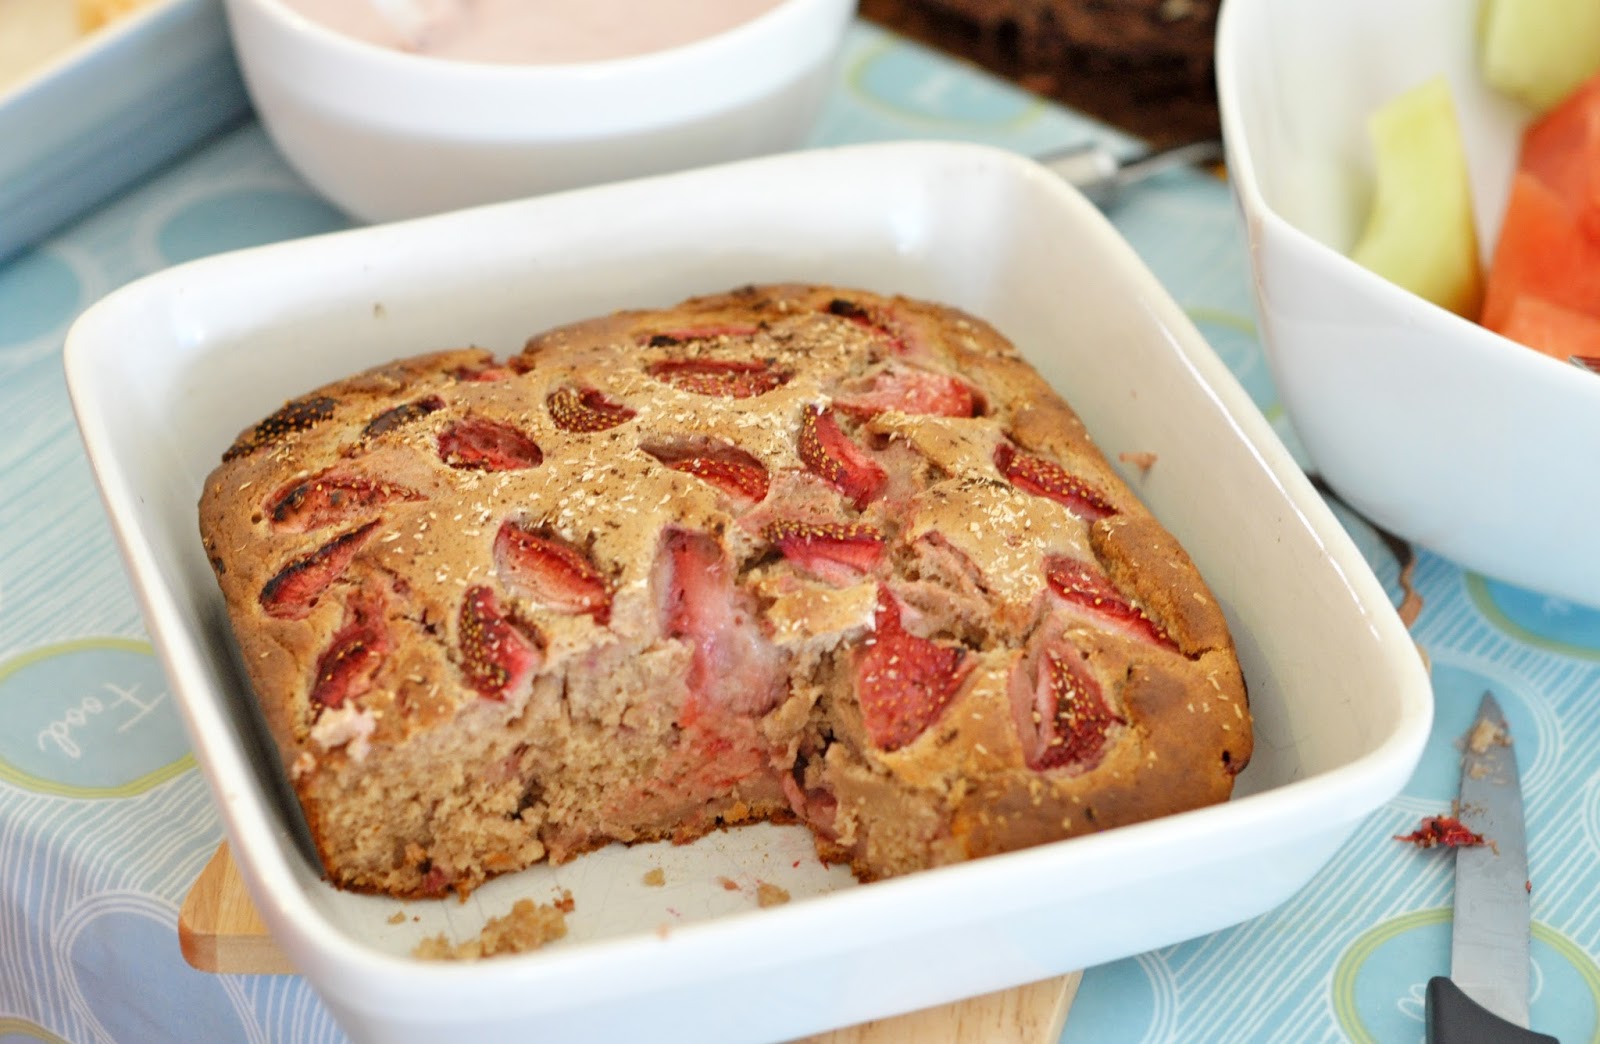
Strawberry dessert cake with strawberry cream

My weekend was all about sunshine… and strawberries!


Strawberry time is now in full swing over here in the UK… what with the sunshine finally out in the skies and the Wimbledon tennis on the TV there's just no denying it! I love any opportunity to get outside spend time in the sunshine (or even rain) and in particular spend time with friends just relaxing… Something many of you know I am notoriously bad at doing. 

At the weekend I was invited to a barbecue, obviously I was going to be bringing desert (amongst a few other bits and pieces including veggies burgers) and so strawberries were on my mind and in my mouth pretty much the whole of last weekend.

Some of the goodies that were brought to the party (yes there was quinoa...and samosas...I love samosas and even though I don't eat much wheat I caved in for these!)

I also had another challenge- I wanted to create a strawberry themed desert cake that was also totally sugarfree- even agave, coconut sugar and maple syrup were off limits- as I would usually use a little of one of these alongside stevia. One of the ladies coming to the barbecue is very sugar intolerant as well as chocolate intolerant (shock horror) and so I really wanted to be up to create a non-chocolate and sugar free cake that she could enjoy along with everyone else!

So, this is what I came up with loosely based on my banana blondie recipe and using as much fresh fruit and fruit purees as possible as the main sweetness then bumped up with stevia. I was careful to get the balance right so that the stevia didn't overpower and taste odd. To assist with the rising I actually added just two teaspoons of coconut sugar as when I tried a similar recipe a short while ago it sank a bit when it came out the oven and I wasn't sure whether this had anything to do with the total lack of sugar… may well just be coincidence! P.s if you omit the tiny bit of sugar it may well be ok and even if it does sink it's still good, just denser!

I served this up warmed through with a tofu based strawberry cream/mousse so that the cake became even more dessert-like. Perfect for a garden party carrying on into the evening hours... I know I certainly went back for more! Whilst you're serving your strawberries and relaxing with your friends why not have a little extra fun and play this bingo game* while watching the tennis. Summer time bliss!


Recipe: Strawberry dessert cake

Ingredients:

2 bananas- pureed
1/4 cup sugar free strawberry jam
Scant 1 cup chickpeas
1/4 cup coconut oil- melted (or oil of choice)
2 tsp vanila
30 drops vanilla stevia (I tend to use NuNaturals)
1 cup apple juice (or other fruit juice)
-----------
1/2 tsp cinnamon
1 1/2 tsp baking powder
1/2 heaped tsp baking soda
pinch salt
2 tsp unrefined sugar (optional add in- see note)
1 1/2 cups white spelt flour (or GF flour- if so I would use a mix of buckwheat, ground almonds and starch)
-----------
1 cup chopped strawberries- for filling
1/2 cup chopped strawberries, sprinkle of coconut and vanilla bean- for topping.

Sauce/mousse Ingredients:

1/2 cup strawberries
1/2 cup silken tofu
1 tbs coconut oil
vanilla stevia to taste

Method:

Blend the wet ingredients together until smooth. Mix the dry ingredients together in a large bowl and then add the wet mixing gently but well. Stir through a cup of chopped strawberries in the final strokes.

Spoon the mixture into a round of square cake tin approx. 8" diameter. Smooth the top and press the remaining strawberries in along with a dusting of coconut and pure vanilla bean powder- optional but yummy!

Bake at 180C for approx 30-40 minutes- I needed to lightly cover with foil after 25 minutes to prevent the top from becoming too brown before the centre had cooked through. Check with a toothpick for done-ness. Note: it is a fairly dense moist cake anyway, but cook for as long as possible to maximise 'cakiness'.

To make the 'cream' simply blend the ingredients together well and chill in the fridge for an hour to thicken up for a more mousse like dessert. You can omit the coconut oil if you want to go for a creamy drizzle. Note if you had some beetroot you could add a tiny amount to intensity the pink colour without it coming through in the flavour (I didn't have any beetroot!)


*Note:  This post is in association with Ladbrokes Bingo. The strawberry dessert recipe is all my own creation and was due to be posted exactly as it is regardless, it just happened to tie in nicely with the some extra Wimbledon fun. Enjoy :-)


For further guidance on making gluten free choices please see this post.

For tips and info on recipe measurement conversions, ingredients, substitutions and the methods behind how I do things.... check out my 'baking tips' tab at the top of the page.

Wednesday, 15 May 2013

Summer fruits chocolate frosted cake

I might sound strange making your own birthday cake. Maybe a little sad even!

But I just had so many ideas that didn’t bother me in the slightest. My friends and family had said they’d have given me a cake but were too nervous to know what to get! Oops sorry- I don’t tend to make things easy for them ;-)


I had so many ideas of my own, that just like last year, I made a birthday cake for myself...I even blew out my own candles (well I had to light them for the photo shoot!)  This year the cake came a day late. If you read this post you’ll understand why!  But hey, it was still part of my birthday weekend so it still counts!

It was the perfect cake to make for a day when I was off to eat lots of Thai food with friends.  I knew
I’d be stuffed full of lunch so this little treat was just right for a super light morning snack, and then also served again as dinner! Yep this beauty is super light and healthy. 

It’s not just a birthday cake....it would be perfect for any summer gathering or BBQ. Vary the fruits as you wish or according to the season.  My super speedy healthy frosting  also made for the perfect companion, and I added some cocoa to it for a chocolatey hit.

Remember to throw on some sprinkles. The world is always a better place with sprinkles!!


This time I've even given you a few step-by-step process shots! Hope it helps....


Summer fruit frosted cake

Makes 1 cake (size depends on size of melon)

Ingredients:

1 medium water melon (mine was approx 20cm round)
½ cup strawberries (or other fruits)
½ cup banana (or other fruits)
Approx 1 cup chocolate frosting*
Approx ½ cup vanilla frosting*
Handful of chocolate sprinkles*

Method:

Prepare the melon by slicing of the top and bottom (I sliced a larger chunk off the top so that I could have a small top layer), slice the skin off the sides to form a fairly neat round ‘cake’

Prepare the frosting. (see linked post and notes below) I prepared both together and then divided them and added cocoa to the larger portion.

Place the watermelon on it's final serving plate, and begin spreading the frosting over the surface with a palette knife or spoon. Dollop some of the vanilla round the edge of the top surface (or all over the top if you are not having a smaller top piece) place the strawberries and banana or other fruit around the edge and then position the top piece. Cover the top piece with the remaining vanilla frosting and decorate with the top with the remaining fruit.

Add sprinkles, such as these, or any types of sprinkles, seeds, nuts, cocoa.... as desired over the surface.

Serve immediately.  It will keep for a couple of days but always nicest eaten on the same day...so make sure you have a crowd (or like a lot watermelon!)


Frosting:
For frosting refer to this post (for more details) adding 2-3 tbs cocoa powder to one cup’s worth of mix. To make a thick frosting for spreading mix 4:1 yoghurt to coconut flour ratio plus vanilla extract and a few drops of stevia and drizzle of maple syrup (or other sweetener), you may need to increase the yoghurt quantity slightly for the chocolate version.

Sprinkles:
For sprinkles, I used a cocoa version of these sprinkles, also referred to here for the choclatey version.  Feel free to use whatever you like to add a touch of sweetness.


chocolate sprinkles!!

For further guidance on making gluten free choices please see this post.

For tips and info on recipe measurement conversions, ingredients, substitutions and the methods behind how I do things.... check out my 'baking tips' tab at the top of the page.

Saturday, 30 March 2013

Easter Simnel Cake

This is very much a last minute post before I rush out of the door to drive 5 hours north to Snowdonia for a 'relaxing' break with the family. I say relaxing...but there will be lots of walkng involved. Relaxing my mind for a few days is the intention here and something I am very much in need of.

I'm planning on switching off from the internet...so I may be a little silent for a few days (other than the odd bit of dabbling on my phone!)


It's Easter Saturday and I hope for many of you that means enjoying a long weekend. Relaxing? DIY? Family time? What are your plans?

Yesterday I promised you one final Easter themed recipe...this one is quick and easy and can be made as a a single or double serving. I've made mine as a sharer as that was the size of my tin but you can easily half the ingredients (or save half for latter) if you prefer.  It uses the  coconut  cream that has been popping up in a few recipes...I've yet to write a full post dedicated to it, but it so simple and versatile its crept in of its own accord!

This cake is based on a fruit cake recipe but it would be equally nice using my single serve 2 minute carrot cake as a base. You can make any 'mazipan' style eggs or use some of the thickened  coconut cream. I had some vanilla energy bar mixture left over from my taster session so I used that. If you want to follow my basic recipe... it's based on these bars using just dates dessicated coconut and vanilla.

The top of the cake should have 12  'eggs' on it if you are following the biblical tradition of the 12 apostles but I struggles with space! Here's some brief info on the traditions behind the simnel cake if you are interested.  :-)

Right, i'm off...Have a lovely Easter. Eat lots of good food and be happy!

P.s apologies the photos aren't up to my usual efforts.... I was littering clicking and posting as fast as I could with my family clamouring to get out of the door!!


Recipe: Mini Simnel Cake

Ingredients:

1/3 cup blanced almond flour*
3 tbs ground almonds
1/2 tsp baking powder
1/4 tsp baking soda
pinch salt

1/2 cup mixed dried fruit and nuts roughly blended- I used cranberries, raisins and walnuts
1/2 tsp mixed spice and/or cinnamon
1 small apple grated (approx. 1/3 cup)

3 tbs orange or apple juice mixed with 1 tbs ground flax seed
1 tsb coconut oil- melted (or other)

*Note- this would probably work fine with regular flour or spelt too (but I haven't tried it that way)

topping:
3 tbs vegan yoghurt
2 tsp fine coconut flour
tiny pinch of stevia to taste
pinch turmeric (just for yellow colour)
few drops almond extract

Decoration: 12 'eggs' (or an many as you can fit around the edge!)

Method:

Mix the dry ingredients in a small bowl. Roughly blend the dried fruits/nuts and then add to the dry ingredients along with remaining ingredients. Mix lightly to combine.

Spoon into a smallish tin (I used two extra large muffin tins approx 8cm diameter).

Bake for approx. 20 mins at 180C until golden on top. Note this probably also work in the microwave for 2-3 mins cook time but it wouldn't go golden.

Allow to cool before mixing the topping ingredients together to form a thick spreadable frosting and spreading over the top of the cake. Decorate with eggs to the perimeter to serve.

P.s for some random reason I added some strands of saffron.. it didn't add anything... i'd leave it off ;-)


For further guidance on making gluten free choices please see this post.

For tips and info on recipe measurement conversions, ingredients, substitutions and the methods behind how I do things.... check out my 'baking tips' tab at the top of the page.

Saturday, 26 January 2013

‘Muffin top’ banana blondie

This was originally dreamed up as a single serve recipe...and as much as I could have eaten it all to myself, I felt it was better suited two and so shared it with my mum. If you choose to eat it all yourself...I wont judge! It is the weekend after all ;-)


I love single serve recipes as they are quick, require few ingredients and are great for experiments as if things don’t turn out quite the way you expected you haven’t got a whole pan of cake to dispose of! Luckily that was not necessary in this instance.

This little recipe is a coming together of my mug cakes and my blondies. I also tried to strip back the ingredients to the bare minimum to keep it quick and easy.  Chickpeas feature...that was always going to be the case...you know me by now! This little blondie was just like a giant muffin top in shape and texture hence the title of the post, yummy!

I baked this in the oven and it had a deliciously light (blondie like) texture and a golden top. I haven’t tried it in the microwave but since my mug cakes are typically microwave versions I see no reason why this wouldn’t work, obviously without the golden oven baked top so they may not have quite the same 'muffin top-ness'. 


Recipe: Quick banana blondie (for two)

Ingredients:

1 banana (1/3 sliced, 2/3 mashed)
1/4 cup chickpeas
1 tbs coconut oil- melted
2 tbs agave
1/4 cup flour- I used white spelt (but you could use GF mix of choice)
scant 1/2 tsp baking powder
pinch salt
1/4 tsp (or more) cinnamon
Maple syrup to serve (optional indulgence)

Method:

Blend together the mashed banana and chickpeas with the oil and agave until well blended. Add the remaining dry ingredients and mix through.

Spoon the blondie into a 'dollop' on a small lined baking sheet or alternatively use a small pie dish. arrange the remaining banana slices on the top. Decorate with a few choc chunks or nuts if desired.

Bake for approx. 10-12 minutes until golden on top. Note: You could microwave this blondie for 90 seconds, but the texture may not be so light or the top golden.


For further guidance on making gluten free choices please see this post.

For tips and info on recipe measurement conversions, ingredients, substitutions and the methods behind how I do things.... check out my 'baking tips' tab at the top of the page.

Friday, 21 December 2012

Chestnut sponge pudding


Ahhh...apologies for the delay in posting. I really wanted to get a post up each day during my '12 days of Christmas', but the recent events with my stolen laptop have meant that I've struggled to get onto a computer with all the software I need to edit the photos. Alas, I failed in my task...but I still have so many Christmassy recipes I want to fit in so I am determined to complete my challenge but it will simply mean that in the next few days there will probably have to be multiple posts on some days (hence why I'm writing and posting this at 1:30am!)....not that I ever heard anyone complain about too much cake!

Ok, relax and breathe, back to cake....


I was in a huge chestnut mode a week or so ago, as i'd been to the supermarket and stocked up on these ready prepared chestnuts (I feel I should prepare my own from scratch too just so I don't feel like i'm completely cheating this year!) 

So then of course I wanted to set about making lots of things with them, particular since this chestnut roast had gone down so well. I first tried making a batch of chestnut scones using this pumpkin recipe as a guide but changing the flours to make it gluten free. It was not much of a success, the flour combo just wasn't doing anything for the consistency or the rise of the scone, i'm pretty sure that if i'd used spelt it would have been fine, scone making is one aspect of my gluten free baking that I have to get right since this is the second attempt in the last few weeks that has gone in the bin! 

So onto trial number two....a mug cake. This little mug cake actually turned into a gem of a dessert in its own right, simply because it seemed too grown up to be a regular mug cake. I actually gave this one two attempts each with different flours. I tried buckwheat (my go to gluten free flour) for the first attempt but I wasn't totally convinced- the flavour seemed to overpower the chestnuts a little, so then a I had another go using ground oats (make sure they are GF if dealing with sensitives) and this sponge was perfect, light and fluffy but still delicate and moist. 

I'm sure other flours would also work just be careful to opt for a mild flavour. It had a lovely subtle chestnut flavour and paired so well with a creamy vanilla sauce. The sauce was a last moment act of spontaneity since I had some of this yoghurt to use up. To make a healthier cream to the one I used (which contained some sugar) you could opt for this cashew custard which would think would be awesome!


Recipe: Chestnut sponge pudding

serves 1-2

Ingredients:

3tbs ground oats (oat flour)
1tbs rapadura
1/4 tsp each baking power and baking soda
1/4 cup chestnut pure
1/4 tsp cinnamon
approx. 2 tbs soy milk (or other) if needed
1tbs chopped chestnuts mixed through batter (optional)
1tbs chopped nuts on chestnuts reserved for top
1/3 yoghurt/custard/cream to serve

Method:

Mix the dry ingredients together in a small bowl. Add the wet ingredients and mix to form a soft spoonable batter. 

Using a silicone egg poach, a silicone muffin case or a small lightly greased microwaveable domed dish, add the reserved nuts to the bottom of the dish and then spoon the batter on top. Cook in the microwave for 60 seconds until just cooked (if the top is still sticky cook for a further 20-30 seconds). You could oven bake this but the result might not be quite so moist, if you decide to oven bake try 10-15 minutes at 180C (note I haven't tried this method).

To create an indulgent dessert pour vegan vanilla yoghurt, cream or custard into the bottom of a small serving dish and then turn the sponge out into the dish so that the cream surrounds it and the nuts are now on top. Drizzle with maple syrup and dust with cinnamon if desired.

You could double or triple this recipe to make multiple individual cupcake sized servings.


For further guidance on making gluten free choices please see this post.

For tips and info on recipe measurement conversions, ingredients, substitutions and the methods behind how I do things.... check out my 'baking tips' tab at the top of the page.

Wednesday, 12 December 2012

Gingerbread quinoa bake


Homemade mincemeat is definitely my new favourite thing around here. Once you've made a jar (which literally only takes minutes) you can store it in the fridge and then use it in everything. I did the same last Christmas and these were a couple of the resulting recipes from back then.


Cranberries also seem to be a bit of a recurring theme at the moment, maybe it’s because they look like Christmas jewels and I like pretty seasonal photos!


But in actual fact this post is really in celebration of…ginger and quinoa. I almost reached across for the cinnamon when mixing together this batter then my fingers switched track and out came Mr Ginger accompanied by Miss Molasses, another fabulous combo for this time of year. Note I am very cautious with adding too much molasses as I find it easily overpowering to my taste buds, feel free to be more generous if that’s your thing.

The texture of this bake was spot on, really moist but light and cakey. If you are not accustomed to the taste of quinoa flakes you may pick up on a slight bitterness, I think the ginger works really well to compliment the quinoa. But feel free to modify the level of spice and agave to your own taste.

Perfect for breakfast or dessert…or both! The recipe can easily be doubled up for a larger pie dish.


Recipe: Gingerbread quinoa bake

serves 2

Ingredients

½ cup quinoa flakes
1 tbs ground chia/flax
½ tsp baking powder
½ tsp vanilla extract
1 tsp ground ginger
Pinch stevia (1/6th tsp)
3 tbs agave/maple syrup
1 tsp molasses
1/3 cup soy yoghurt to mix (or other yoghurt)
3 tbs apple puree (or more yoghurt)
2-3 tbs mincemeat for base (homemade ideally)
Handful of part-cooked fresh cranberries to decorate top
1 tbs crystalised ginger- chopped for top
Brown rice syrup/agave/maple syrup to drizzle (if desired- I omitted)

Method

Part cook the cranberries by cooking in the microwave (1 minute) or hob for a few minutes until the first few cranberries only just begin to pop their skins.

Meanwhile, mix all wet ingredients together in a small bowl before adding to the dry ingredients (other than base and toppings) Mix well to achieve a thick smooth batter consistency.

Line the bottom of a small pie dish (approx. 15cm diameter) with the mincemeat mixture (or mix this through the batter- see note) spoon the quinoa batter over the top and smooth top with a spoon. Gently press the part cooked cranberries into the top of the batter and sprinkle with the finely chopped ginger pieces.

Bake in a preheated oven at 180 for approx. 15 minutes until golden, check with a toothpick and if the mixture is still uncooked in the centre loosely cover with foil so that the top doesn’t brown and continue to bake for another 5 minutes until cooked through. (I had to cover mine)

Notes:
Instead of using mincemeat as a base, you could mix it through the batter and reduce the yoghurt slightly.  I used a small ceramic fluted pie dish and it was tricky to get the bake out neatly. It would be advisable to use a dish with a removable base and mix the mincemeat through the batter if you wish to remove it. Or do as I did and eat from the dish- I didn't eat it all by myself!


For further guidance on making gluten free choices please see this post.

For tips and info on recipe measurement conversions, ingredients, substitutions and the methods behind how I do things.... check out my 'baking tips' tab at the top of the page.

Saturday, 17 November 2012

5 minute choc orange puddle cake

This dessert came totally on a whim!

I had a sudden chocolate craving and usually when such an attack strikes I have some choc-orange smoosh bars or healthy chocolate fudge to hand. However at this particular moment in time I had neither!


Since a taste for a chocolate orange combo had been planted in my mind, I set about using my silicone egg poacher trick to create a super speedy (I wanted that fix pretty quick!) healthy chocolate puddle cake using the dome shape to encapsulate a melty chocolate centre.

Oh my… 5 minutes later and one awesomely indulgent but healthy chocolate cake was all mine! Ok, so I would suggest reigning in a little self-control and not eating the entire thing in one sitting- it is quite large. (but I won’t tell if you don’t). 

I used buckwheat as my GF flour of choice but other flours of wholemeal spelt if GF is not a requirements are likely to work fine also. I also added in grated courgette for moistness, it works really well and you really can’t tell it’s there. Finely grated carrot or pureed cauliflower would also work well.

This puddle cake could be made into all sorts of flavours…how about substituting almond extract for the orange and adding flaked almonds on top of the cake (or in the silicone mould or bowl before pouring in the batter). Mix through some berries and sugar free jam for a fruity kick.  Or why not go all out and leave out the orange and spread this crazy healthy banana frosting over the top.


Recipe: Choc orange puddle cake

Serves 2-4 (depending on how hungry you are!)

Ingredients

¼ cup buckwheat flour (or whole meal spelt)
¼ cup finely grated courgette (carrot could also work)
2 tbs tapioca flour or arrowroot
Slightly heaped ½ tsp baking powder
Pinch salt
2 tbs cocoa powder or raw cacao
1 tsp ground chia/flax
1 tbs agave and a tiny pinch stevia
1/2 tsp orange extra
3 tbs orange juice
Grated orange zest- optional (I didn’t have any)
1 tsp mild flavoured oil
Approx. 1 tbs worth dark choc chunks (I broke off a chunk from  a dark choc bar)

Chocolate drizzle: 1 tbs agave mixed with 1 tsp cocoa powder.

Method

Add everything (except choc chunks) to a mini blender and blend until well mix and there are no visible courgette strands. You could mix by hand if the courgette strands are very fine.
Using a silicone egg poach or other lightly greased domed microwavable bowl (approx. 12cm diameter) spoon in half the mixture, place the choc chunks in the centre and then top with the remaining mixture.

Cook in the microwave on full power for 90 seconds. Allow to cool for 1 minute before loosening and tipping out into a serving plate.

Serve hot whilst the chocolate centre is still oozing. Serve with a chocolate drizzle if desired.


For further guidance on making gluten free choices please see this post.

For tips and info on recipe measurement conversions, ingredients, substitutions and the methods behind how I do things.... check out my 'baking tips' tab at the top of the page.

Thursday, 15 November 2012

Persimmon scone

This little delicacy is really a scone-cake. It has the lovely light and crumbly texture of a scone in a cake form. My scone was a little hard to handle since the chunks of fruit were fairly large, I’d suggest cutting the fruit into chunks less than 1cm and also ‘scoring’ the scone into 6 pieces before cooking it to make slicing it easier (I forgot that part too!)


This recipe was two ‘firsts’ for me…the first time I’d ever eaten persimmon and the first time I have tried cooking the scone by this super speedy microwave/grill method. It wa sa a success on both counts. The persimmon has a very delicate flavour.

There are plenty of options with this recipe…you could double it up and cut scone shapes with a cookie cutter if you preferred, you can also bake the scoene on the oven in a more traditional manner or you can go down my route and use a combination of 2 mins in the microwave and then 2-3 mins under the grill to give a crips crust. This shaves off about 10 mins of oven cooking time.

I had a persimmon to try out and it worked nicely in this recipe but you could substitute it for apple, apricot  or plum…or any fairly firm fleshed fruit. Just take care if you use anything that has a very high water content or no firmness as it might alter the nature of the scone, use a little less soy milk if necessary.


Recipe: Persimmon scone cake

Serves 2-3

Ingredients

1 persimmon- chopped into small pieces
½ tsp vanilla extract
½ tsp cinnamon
1 cup ‘flour’ (I use an equal mix of quick oats and wholemeal spelt but you could also use GF flours)
1 tsp ground chia or flax
1 tsp baking powder
¼ tsp baking soda
2 tbs rapadura
Pinch salt
2 tbs coconut oil
Up to ¼ cup soy milk (or other)

Method

Cut the persimmon into small 1cm chunks ( a little smaller than I have for a scone that is easier to handle), mix with the vanilla and cinnamon and allow to sit whilst preparing the remaining ingredients.

Combine the flours, baking powder, baking soda, rapadura and salt in a small bowl, add the coconut oil (this should be solid not runny) and mix through with fingers to achieve a crumbly mixture. Add the soy milk a little add a time to achieve a soft dough that holds together without being sticky.

You can either mix the persimmon chunks through the dough and then flatten altogether, or you can divde the dough into two halves, flatten one half into a circle approx. 15cm diameter, press half the persimmon onto the surface , flatten the other half firmly over the top making a ‘sandwich’ and then press the remaining fruit into the top. Dust with a little cinnamon and sugar as desired.
.
You can either bake for approx. 15 minutes at 180C, or for a super speedy scone, microwave for 2 minutes and then grill the top for 3-5 minutes to get a lovely crisp crust. I used the microwave method as I was keen to experiment this way and it worked perfectly!

Note: if using the microwave method be sure to use a baking liner that can be used for both the microwave and grill to avoid having to fuss around with transferring the part cooked scone.


For further guidance on making gluten free choices please see this post.

For tips and info on recipe measurement conversions, ingredients, substitutions and the methods behind how I do things.... check out my 'baking tips' tab at the top of the page.

Saturday, 27 October 2012

DAY TWENTY SEVEN: 'Surprise me Saturday' Chocolate pillow cakes

We are nearly at the end of Vegan Mofo now…the month has flow by! I’ve enjoyed my oaty experiments and also following other vegan bloggers along the way. One last round-up of inspring recipes tomorrow but for now I give you chocolate!!


Just other day I was contemplating something chocolately, I was also contemplating whoopie pies…something I have not yet attempted to create.

The result of my kitchen experiment were these light as a cloud chocolate pillows, not a whoopie pie as such as they don’t have a frosting (no reason you couldn't whip up a batch of healthy banana frosting or this jam and cashew cream to sandwich between them) and anyway I wasn't really attempting a full on whoopie pie quite yet. I love the way they rose and cracked the surface as they baked.

The best thing about the these little flat sponge cakes are so versatile, much more so than a cupcake. They also have a healthy dose of fruit (you could also add some beetroot!) and are fat free. Healthy fats are an important part of any diet, but its sometimes nice to create a cake on the lighter side- plus you then have the option to dress these up with a slather of peanut butter…oh yeah!

I've used wholemeal spelt flour for these cakes as I've found it typically gives a lighter crumb than GF flours, particularly when baking fat free, but there is no reason at all why you shouldn't try substituting your favourite gluten free mix- you could add a little oil if you wished to ensure a good texture.

One of my variations for an afternoon snack was a light covering of sugar free raspberry jam with a handful of fresh garden raspberries on the side…yummy!

What variations will you be coming up with?


Recipe: chocolate pillow cakes

Makes approx. 12-16 pillow cookies (depending on size)

Ingredients

1 cup wholemeal spelt flour
½ cup cocoa powder
¾ tsp baking soda
½ tsp cinnamon
Pinch salt
½ tsp chocolate extract (optional for a more intense flavour)
1 tsp vanilla extract
¼ cup agave and a pinch (1/6th tsp) stevia
½ cup apple puree
1/3 cup vegan yoghurt
1 tbs balsamic vinegar
Up to 1/3 cup soy milk (or other vegan milk) to achieve required consistency

Method

Mix the dry ingredients in a medium bowl.

Mix the wet ingredients in a separate bowl and add to the dry and mix through evenly.

Add just enough soy milk to achieve a smooth batter, not to runny so that it flattens right out when spooned onto the baking sheet, but not so thick that the surface does not have a smooth appearance.

Bake at 180C for 10 mins or until just beginning to brown and the sponge springs back when pressed with fingertips.


What Vegan MOFO means to me.


For further guidance on making gluten free choices please see this post.

For tips and info on recipe measurement conversions, ingredients, substitutions and the methods behind how I do things.... check out my 'baking tips' tab at the top of the page.

Thursday, 18 October 2012

DAY EIGHTEEN: Quick apple spice cake

What do you get if you cross and a cake and a pie?  Answer = a slice of yum!

Or more accurately, this little beauty…


Taking the principle from the trusty breakfast cookie also this cookie-pie I used both grated apple in the batter itself and sliced apple to top the pie. The result is a light and subtle appley dense oaty ‘sponge’ with a lovely browned apple top- double apple action!

As ever, there are loads of variations for the topping or add-ins for the batter. I added nuts to the top, but you could easily mix these through the batter for some added crunch and texture instead.

The batter mix is super simple and so the whole thing comes together within a couple of minutes plus some baking time, I wouldn’t suggest microwaving this one!  I served mine hot with a little soy yoghurt, but I also ate the last couple of slices cold the next day and that was also delicious.


Recipe: Quick apple cake

Serves 2-3

Ingredients

½ cup oats
¼ buckwheat flour (other mild  flours  would probably be fine too)
¼ tsp baking powder
1 tbs ground flax/chia
Ground cinnamon and vanilla extract to taste (approx. 1 scant tsp each)
3 tbs agave or maple syrup
2 tsp oil (coconut, olive, rapeseed)
¼ cup soy yoghurt (or regular yoghurt for non vegan)
1 medium apple- half grated and half sliced
2 tbs chopped nuts or your choice- for topping or mix through
1 tsp rapadura (or other unrefined sugar) for sprinkling on top
  
Method

Mix the dry ingredients together in a small bowl and then add the agave and yoghurt. Mix the grated apple and nuts (if using) through the mixture last to achieve a sticky ball or dough.

Flatten the dough into a 2cm thick round on a lined baking sheet. Press the apple sliced into the top and add nuts, sprinkling of sugar and a dusting of cinnamon if desired.

Bake at 180C for approx. 20 mins until the apple slice s and edges of the pie are golden.


What Vegan MOFO means to me.


For further guidance on making gluten free choices please see this post.

For tips and info on recipe measurement conversions, ingredients, substitutions and the methods behind how I do things.... check out my 'baking tips' tab at the top of the page.

you may also like

Related Posts Plugin for WordPress, Blogger...