Showing posts with label muffins. Show all posts

Friday, 2 November 2012

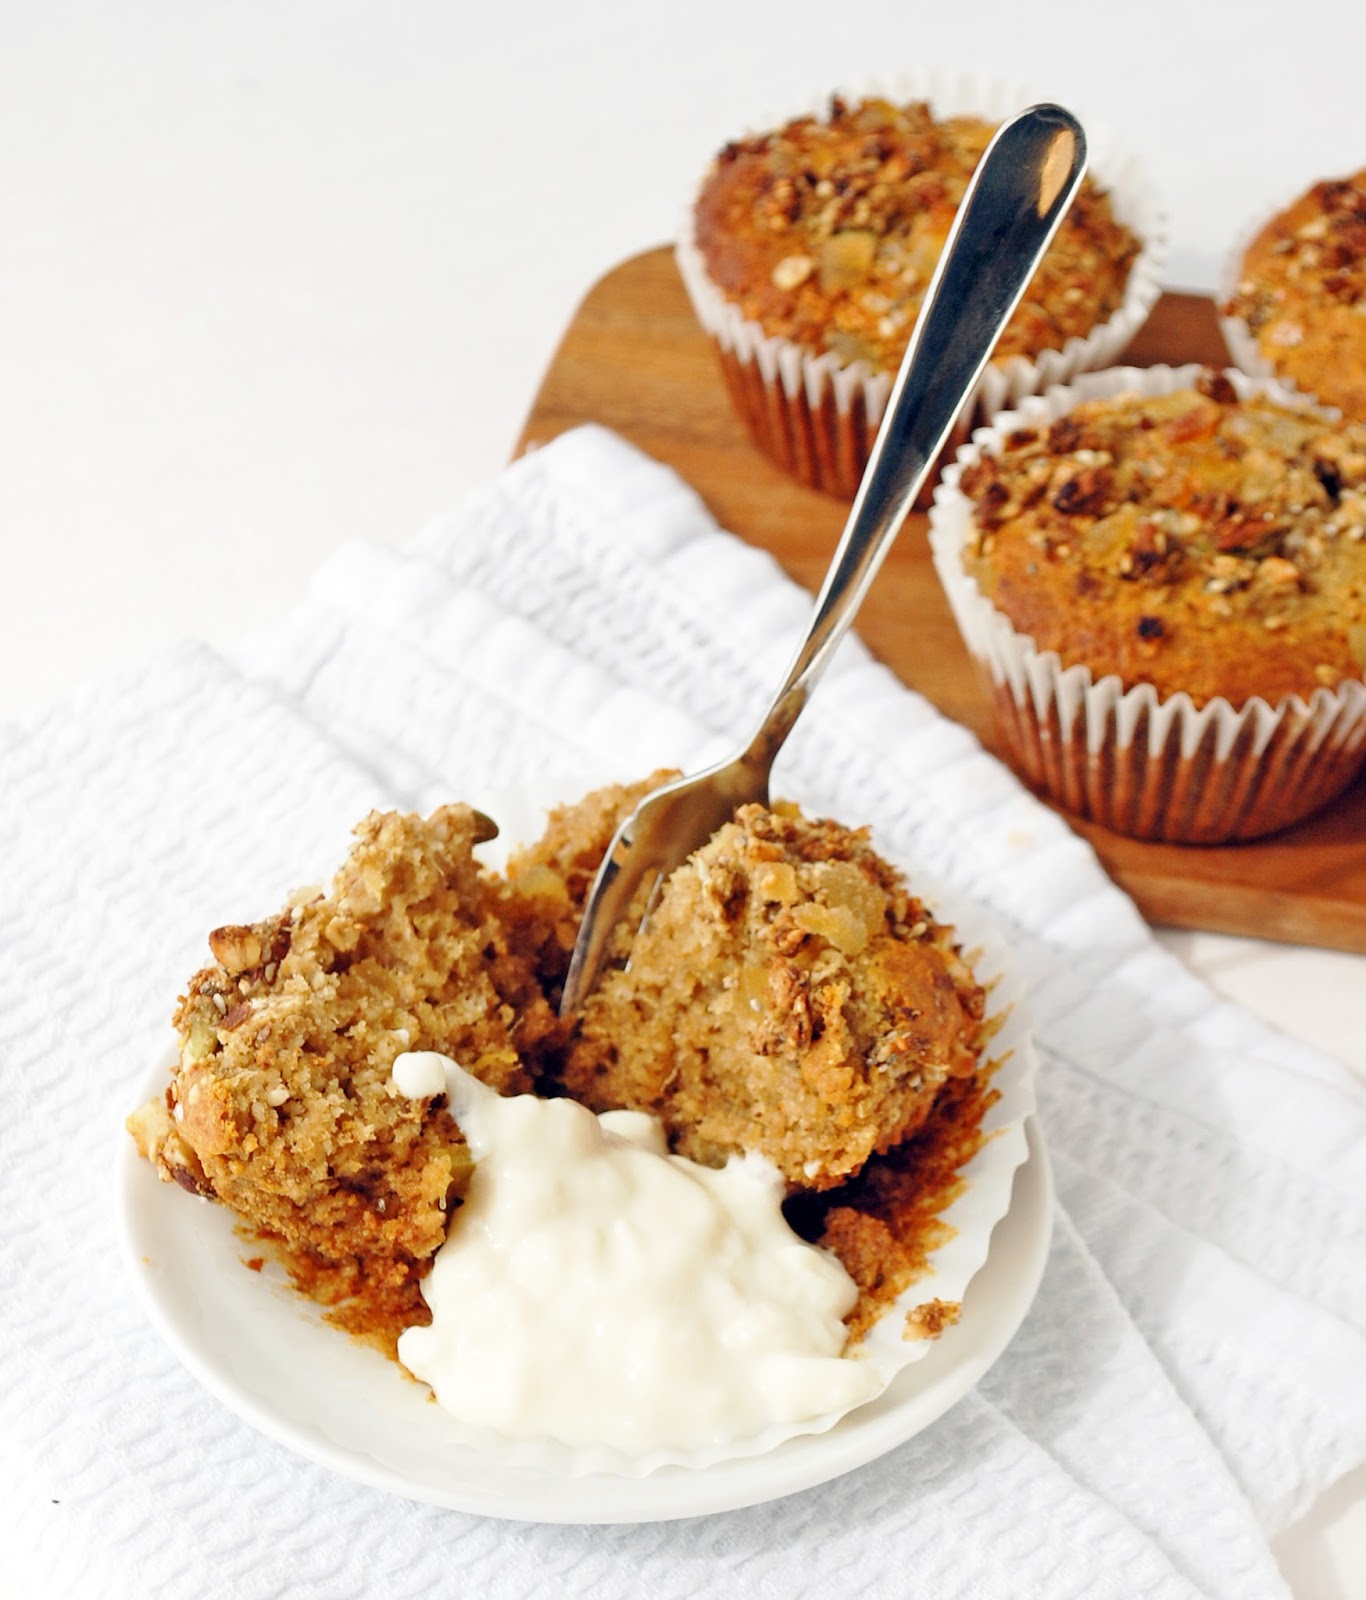
Pumpkin granola muffins


I have made a lot of pumpkin puree this last couple of weeks. I blended it up and froze it in muffin cup portion sizes…so many of my baking experiments have been making use of it.

This recipe is no exception and it is a double whammy as you have a pumpkin granola topping too! Of course the granola is optional- you could simply top with nuts and spice instead, but since at the time I was making a batch of this granola I figured it would be a good opportunity to set aside a little for the muffin tops.

mini muffins using a buckwheat flour mix

I’ve made these muffins using both flour combinations- spelt and my GF mix. I think between them I preferred the spelt, I enjoyed the buckwheat but found the flavour slightly dominant over the pumpkin, you may find it preferable to use oat flour or brown rice flour in its place.

For the granola topping, take pinches of raw granola mix and press firmly into the top of the uncooked muffin. Pre-baked granola will burn.  I also used mini muffin tins on my second attempt as the first try using full sized muffin cups lead to the granola burning at the edges before the muffins had cooked through.  If you are opting for a topping I would definitely advise you not to use larger than cupcake tins.

larger spelt muffins- great texture but burnt tops

These make the perfect winter warming snack served warm with a little vegan yoghurt and a drizzle of maple syrup….so good!


Recipe: Pumpkin granola muffins

Approx. 8 mini muffins

Ingredients

1 cup GF flour mix (I used ½ buckwheat, ¼ tapioca, ¼ ground almonds) or WM spelt
¼ cup coconut sugar/rapadura and 1/6th tsp stevia
pinch salt
1 ½ tsp baking powder
2 tsp ground chia
1 tsp cinnamon
2 tbs coconut oil- melted
2/3 cup pumpkin puree
1 tsp vanilla
2 tbs agave syrup
¼ cup apple or orange juice
Topping: 1/3 cup pumpkin granola for topping- optional

Method

Mix all dry ingredients together in a medium bowl and then add wet ingredients. Mix together lightly but well.

Spoon the batter into 8 mini muffins pans and press the uncooked granola mix into the top of the batter in each case.

Bake at 180C for approx. 12 mins until cooked through when tested with a toothpick.

Serve warm with a drizzle of maple syrup if you want to be full on indulgent!

NOTE: you can make regular sized muffins but I found that the topping began to burn a little before the muffins were fully cooked.


For further guidance on making gluten free choices please see this post.
For tips and info on recipe measurement conversions, ingredients, substitutions and the methods behind how I do things.... check out my 'baking tips' tab at the top of the page.

Saturday, 6 October 2012

DAY SIX: 'Suprise me Saturday' Muffins with banana frosting

‘Surprise me Saturday’ is freestyle day…breaking away from the oaty recipes for one day each week (Sunday and Monday aside) to jazz things up a bit and make sure I don’t go totally oat crazy. Plus it’s not as if I haven’t been up to anything else in the kitchen, there is a stock pile of recipes mounting up now…I just can’t help myself. Even when I tell myself ‘no baking today’ (like for example the day before I went on holiday and was in a mad rush to pack) I still can’t help myself and on said day in question snuck down to the kitchen to make a quick carrot cake baked granola…once an idea has planted I can be very impatient!

Anyway, I digress…

Banana bread muffins! Everyone loves a good banana bread. Everyone loves muffins. Everyone loves frosting.  Win Win Win…bonus it’s all super healthy! This frosting takes super luxurious and creamy but without tonnes of sugar. Wohoo! (I apologise for over use of exclamation marks- not sure why I am so excitable today)


It was recently a colleagues birthday at the architects practice where I work and when I mentioned to the guys that I’d bring in a cake for everyone (mainly so I could eat it too!) the immediate request was for my banana cake that I’d shared with them once before. So this time, using the same recipe I turned it in to muffins with a generous swirl of frosting.

Even my colleague Kasia, who claimed she never usually liked any frostings gave this one the thumbs up. Can’t do much better than that!


You’ll find my original banana bread recipe here, just reduce the baking time to account for the smaller size of the muffins. This frosting has a lovely thick consistency and would also be great as a topping or filling for any type of cake.


Recipe: healthy banana frosting

Makes approx 8-12 muffins depending on size

Ingredients

2 large or 3 small ripe bananas
1/3 cup dates
1/3 cup mild nut butter (e.g cashew)
2 tbs coconut oil- melted (not needed if frosting is not required to be extra thick)
3 tbs agave syrup
Approx. ¼ tsp stevia to taste
3 tbs fine coconut flour
½ tsp cinnamon (optional)

Method

Blend dates and bananas until very smooth, add all remaining ingredients and blend until you have a thick smooth paste.

Chill the frosting to thicken up a little for piping, or use un-chilled for a cake filling or a spreadable ganache type frosting.


What Vegan MOFO means to me.


For further guidance on making gluten free choices please see this post.

For tips and info on recipe measurement conversions, ingredients, substitutions and the methods behind how I do things.... check out my 'baking tips' tab at the top of the page.

Wednesday, 25 July 2012

Ginger and mango muffins


I’ve been on a bit of a savoury kick recently. I’m not sure why that it…but upon looking through my photo file of various recipes yet to be posted, I noticed a lot of savoury descriptions lurking. Hmmmm, I might have to do something about that to re-address the balance!

I think it’s got a lot to do with the fact that I’ve been so busy at weekends recently and have struggled to find time to dedicate to a major afternoon baking session and therefore my lunches and dinners have been the focus of my posts. Also the sunshine finally appears to have come out here in England and so baking endeavours are simply not quite so as appealing…more ice cream and no-bakes on the menu?                                                                                        


One recipe I did manage to find time for last weekend was these ginger and mango muffins. They were actually inspired  off the back of a batch of gingerbread granola I’d made the morning before and saved a few of the uncooked  crumbles for the top. I made the mistake of eating the granola before I’d had a chance to photograph it…ooops! I will post that recipe another time soon, but you could use any homemade granola (uncooked so it doesn’t burn on the top) or simply some nuts or seeds and extra crystallised ginger for a warming kick!

I have included crystallised ginger in this recipe. Crystallised ginger is not healthy since it is coated in refined sugar, but for the small amount this recipe required and for the extra special chewiness and intense gingery taste it offers I was happy to use it. However if you would prefer to omit this, feel free to add extra ground or fresh ginger in its place.

I made these in muffin pans and the recipe made 5, but if you used slightly smaller cupcake pans you’d easily get 6. Perfect for my mid morning snacks this week!


Recipe: Ginger and mango muffins

5-6 muffins

Ingredients

1 cup GF flour mix* (I used ½ buckwheat, ¼ tapioca, ¼ ground almonds)
¼ cup agave syrup and a pinch of stevia
pinch salt
1 ½ tsp baking powder
½ tsp baking soda
1 tsp ground chia
1/3 cup soy milk (or orange juice or other ‘milk’)
2 tbs coconut oil- melted
¼ cup mango puree
¼ cup chopped mango chunks
2 tbs crystallised ginger- finely chopped (optional or use grated  fresh) (reserve some for topping)
2 tsp ground ginger
Handful of uncooked gingerbread granola for topping (or oats and seeds)

Method

Mix all dry ingredients together in a medium bowl and then add wet ingredients. Mix together well.

Spoon the batter into 6 muffins pans (you may only get 4-5 muffins worth if the pans are large).

Add the reserved ginger and granola sprinkles to the top of each muffin.

Bake at 180C for approx. 20 mins until cooked through when tested with a toothpick. You may need to lightly cover the muffins with foil after 10 minutes if they are looking almost done, to prevent the tops burning.


* for further guidance on making gluten free choices please see this post.

For tips and info on recipe measurement conversions, ingredients, substitutions and the methods behind how I do things.... check out my 'baking tips' tab at the top of the page.

Friday, 25 May 2012

Mini picnic quiche

The sun is shining, summer is here ….and it’s BBQ time!

Sunshine always gives me the feel good factor, but today just didn’t feel quite right. You know sometimes you just get those days when you feel a bit bummed out, sometimes there’s a logical reason and sometimes there’s not.

Sometimes I just feel lonely. There have been a few things playing on my mind recently, and at times like that I am reminded of the downside to ‘doing things differently’ and not simply following the crowd without questioning.  I haven’t got anyone to turn to in the same way as I did before and I have no-one that truly understands me anymore, I mean I’ve barely begun to understand myself yet!

I will never regret going down the paths I have taken, and the ways in which my life has changed, but sometimes I wish, just for a few moments, I didn’t have to think, I could just be and go with the flow and not worry about the consequences or what will become. I sometimes wish someone else could make the decisions and just tell me what to do…working it all out for yourself is mighty hard! But I also know it’s the only way to truly live the life you want.

Well, that’s enough of all that philosophical talk. That’s what happens when it’s silly late at night and I’m tired…but determined to get the post written up before going to sleep!

It’s been a hot sunny day…happy happy happy. And I am happy, really, life is good. I’m just having a silly moment.

So let’s talk BBQ’s, since this evening’s dinner was a cosy little BBQ at my friend’s house. I took along a couple of things to add to the food collection.

Guess which one was mine?


If you read this post you may have guessed!  Yep it was the black bean beet burger towards the back. Looks pretty authentic though, right?

I also made a few mini quiches to share. These mini's are perfect for BBQ's or picnics. The recipe was prety much identical to this quiche recipe, but this time without a crust and served cold as mini snack bites, so they seemed totally different; the perfect light bite. This is such a simple recipe and I have provided it again below. I would strongly recommend silicone mini muffin pans as this will make it easier to pop the quiches out. Also allow the quiches to fully cool before handling them as I also found it a little more difficult to remove from the pan whilst still warm (I was in a rush to get to the BBQ so couldn't wait for as long!)

In typical Bristish style the sun began to set and the breeze got up just as we sat own to eat. It was a little on the chilly side, after having been so hot all day, so as soon as we’d eaten we cosied up inside for an evening of girlie chat.


Recipe: Mini picnic quiche

Ingredients:

½ tsp garlic powder
½ cup chickpea flour
1 tbs potato starch (or other starch)
3 tsp nutritional yeast
1 tsp mustard
½ teaspoon salt
¼ tsp mixed herbs
pinch paprika
Large pinch baking powder
1 tbs olive oil
1 cup water
Veggies- I used ½ grated courgette, 1 small pepper diced, 1/3 cup  each sweetcorn and soy beans. Feel free to use whatever other veggies you have to hand, ensuring you chop the pieces small enough.

Method:

In a medium bowl whisk together the ingredients, other than the water. Once a smooth paste is achieved add the water and whisk again until smooth. It should be about the consistency of pancake batter and have no lumps.

Pour the batter into mini muffin pans filling them  half way. Add the vegies equally between each muffin pan.

Bake for approx. 30 minutes, until the filling appears well set and pulls away from the side of the muffin tray. Let cool in tray before removing.


For tips and info on recipe measurement conversions, ingredients, substitutions and the methods behind how I do things.... check out my 'baking tips' tab at the top of the page.

Tuesday, 22 May 2012

Apple oat bites

Oats never go away from my blog for long do they! It’s because they are always on my mind. Such a healthy, substantial, cost effective, simple, versatile ingredient…I truly believe oats are what make the world go round!

Oats are my breakfast every day, snacks in between on other days and occasionally dinner (when all I need is a quick post-gym snack). So when I need a quick and simple 2-minute breakfast, often the answer lies in my oats.

This recipe concept is based on my regular breakfast apple oats’ merged with the amazing breakfast cookieLast weekend, to shake things up a little instead of eating my regular oats as a very liquidy mix in a bowl, I reduced the liquid content right down, added some shredded coconut (for good measure) and then packed the mixture into a mini silicone muffin pan to cook them up. By the way, the mixture also tastes great pre-cooking…yes I was very hungry at that point and so very tempted to eat it all…but then I wouldn’t have any recipe for you!

Quick recap on the apple oats theory. I always grate a whole apple to mix through my morning bowl of oats for four reasons- it's a great way to get an extra portion of fruit in your day, it gives a subtle sweet taste without the need for additional sugar, it is fairly neutral so can easily accommodate other mix-ins to jazz things up, it bulks up the size of my breakfast without needing to add more oats so offers a great balance between being substantial and light.

The apple base mix is great…but what about the add ins. It’s always all about the add ins, that’s what brings sunshine and smiles to my day, amongst other silly things that make me smile….like a cat on it tiptoes drinking out of the bird bath (spotted this morning!)

So I spent a little extra time putting together a few simple flavour combos to get you started- the key thing for me is that they shouldn't take more than a minute to prepare since this is a speedy breakfast after all.  I also ran a test for microwave vs oven. I found the only real difference to be that the oven gave a dryer ‘baked’ exterior where as the microwave version stayed soft on the outside. The inside of both versions were very soft and moist. Take your pick!

You could also make a larger 'breakfast bombe' using my silicone egg poacher method. The photo below is a plain apple oats version with extra coconut flakes on top...still super yummy without anything more!

This is a cheeky little 'bombe' version of the origial apple oats without mixins.

Recipe: Apple oat bites

This makes approx. 6-8 mini oat bites (or a couple of breakfast bombes)

Ingredients

1 cup regular oats
1/3 cup unsweetened coconut flakes
2 tsp vanilla extract
1 large apple grated
2 tbs ground chia or flax
½ cup preferred milk alternative
Approx. ½ cup total mix-ins

Mix-in ideas: 
'carroke cake' (carrot and nutmeg), date and walnut, 'gingerbread' (fresh, ground and crystalised ginger plus mollasses) maple cacao....plus pretty much anything else you can think of!

Method

Mix everything together and pack firmly into silicone mini muffins trays (silicone for easy removal and microwave compatibility). Microwave on full power for approx. 90 seconds until the top feels firm.

my mix-ins of choice- I made two of each of the above listed flavour combos

basic mixture ingredients
wet basic mixture
oven version
microwave version
For tips and info on recipe measurement conversions, ingredients, substitutions and the methods behind how I do things.... check out my 'baking tips' tab at the top of the page.

Friday, 27 April 2012

Armenian nutmeg cake

Is it that time of the month again already?!

Time for the Daring Bakers Challenge reveal…  this month Armenian Nutmeg Cake! There was also an option of creating Armenian Nazook, which looked deliciously intriguing but sadly I did not find the time to attempt a vegan version of this recipe also.

You can find the original recipe outline and instructions here.

The Daring Bakers’ April 2012 challenge, hosted by Jason at Daily Candor, were two Armenian standards: nazook and nutmeg cake. Nazook is a layered yeasted dough pastry with a sweet filling, and nutmeg cake is a fragrant, nutty coffee-style cake.

There were a few things I changed in order to veganize and healthanize this recipe: I used soy milk to replace regular milk, I reduced the quantity of sugar and added some polenta so that the base layer maintained some crunch, I use coconut butter and reduce the quantity by adding soy yoghurt to substitute in part. Lastly I used wholemeal spelt flour as my usual flour of choice when baking.

The cake turned out quite well, it was light and airy although not very deep, I think if I made this again I would use a 7” or 8” pan. It ws delicately spiced and not over sweet which I really liked. However, I made a bit of a silly mistake by not fitting the base of the pan tin correctly so that some of the mixture leaked through. Silly me! This meant my crust was a little messy and it was also a bit crumbly.  I was keen to have another go at getting the crust sussed! In my second attempt I added a little ground chia to help the mixture stick together. This time I also decided to go down the route of mini muffins with a little base mixture pressed into each muffin mould with the end of a rolling pin.  This time the mixture was not crumbly at all but it was not very crisp either- I wasn’t sure if it should be?  I have therefore come to the conclusion that in order to get a crisper denser crust you would need to include nearer the full quantities or sugar and butter. I’d be interested to get thoughts on how the base turned out for you?

Either way I really enjoyed the taste of this cake, a lovely change from the norm as I usually opt for fruity flavours. Even though the name of the cake is ‘nutmeg’ you can use any warming spices you wish such as cinnamon and cardammon depending on you preferences. I used a combo of cinnamon and nutmeg (I just had to get cinnamon on there somewhere!) Similarly you could decorate the top with any nuts you wish (or go crazy with some chocolate shavings!...shhhh you didn’t hear that from me!)


Recipe: Armenian nutmeg cake

Makes  a  9” cake

Ingredients

1 cup soy milk
Just under 1 tsp baking soda
2 cups spelt flour- mix of whole and white
2 tsp baking powder
½ tsp cinnamon
1 tsp nutmeg
1/2 cup rapadura plus a pinch of stevia
¼ cup polenta (to add crispness)
1/3 cup coconut butter/oil
1/3 cup soy yoghurt (or apple puree)
1 tbs ground chia or flax and 2 tbs hot water
½ cup flakes almonds and desiccated coconut

Method

Mix the soy milk and baking soda and set aside.
                                                                                      
Mix the flour, baking powder, spices, rapadura and polenta in a food processor. Add the coconut butter and yoghurt/apple and mix to form crumbs.

Press half the mixture into a cake pan (or in the bottom of cupcake moulds) to form a base.

Add the chia egg and milk mix to the remaining dough in the food processor and mix to form a lumpy batter. Pour the batter over the base mixture in the pan. Sprinkle nuts over the top.

Bake at 180C for approx. 30-40 mins until lightly golden and a skewer comes away clean.


For tips and info on recipe measurement conversions, ingredients, substitutions and the methods behind how I do things.... check out my 'baking tips' tab at the top of the page.

you may also like

Related Posts Plugin for WordPress, Blogger...