Showing posts with label summer. Show all posts

Tuesday, 2 July 2013

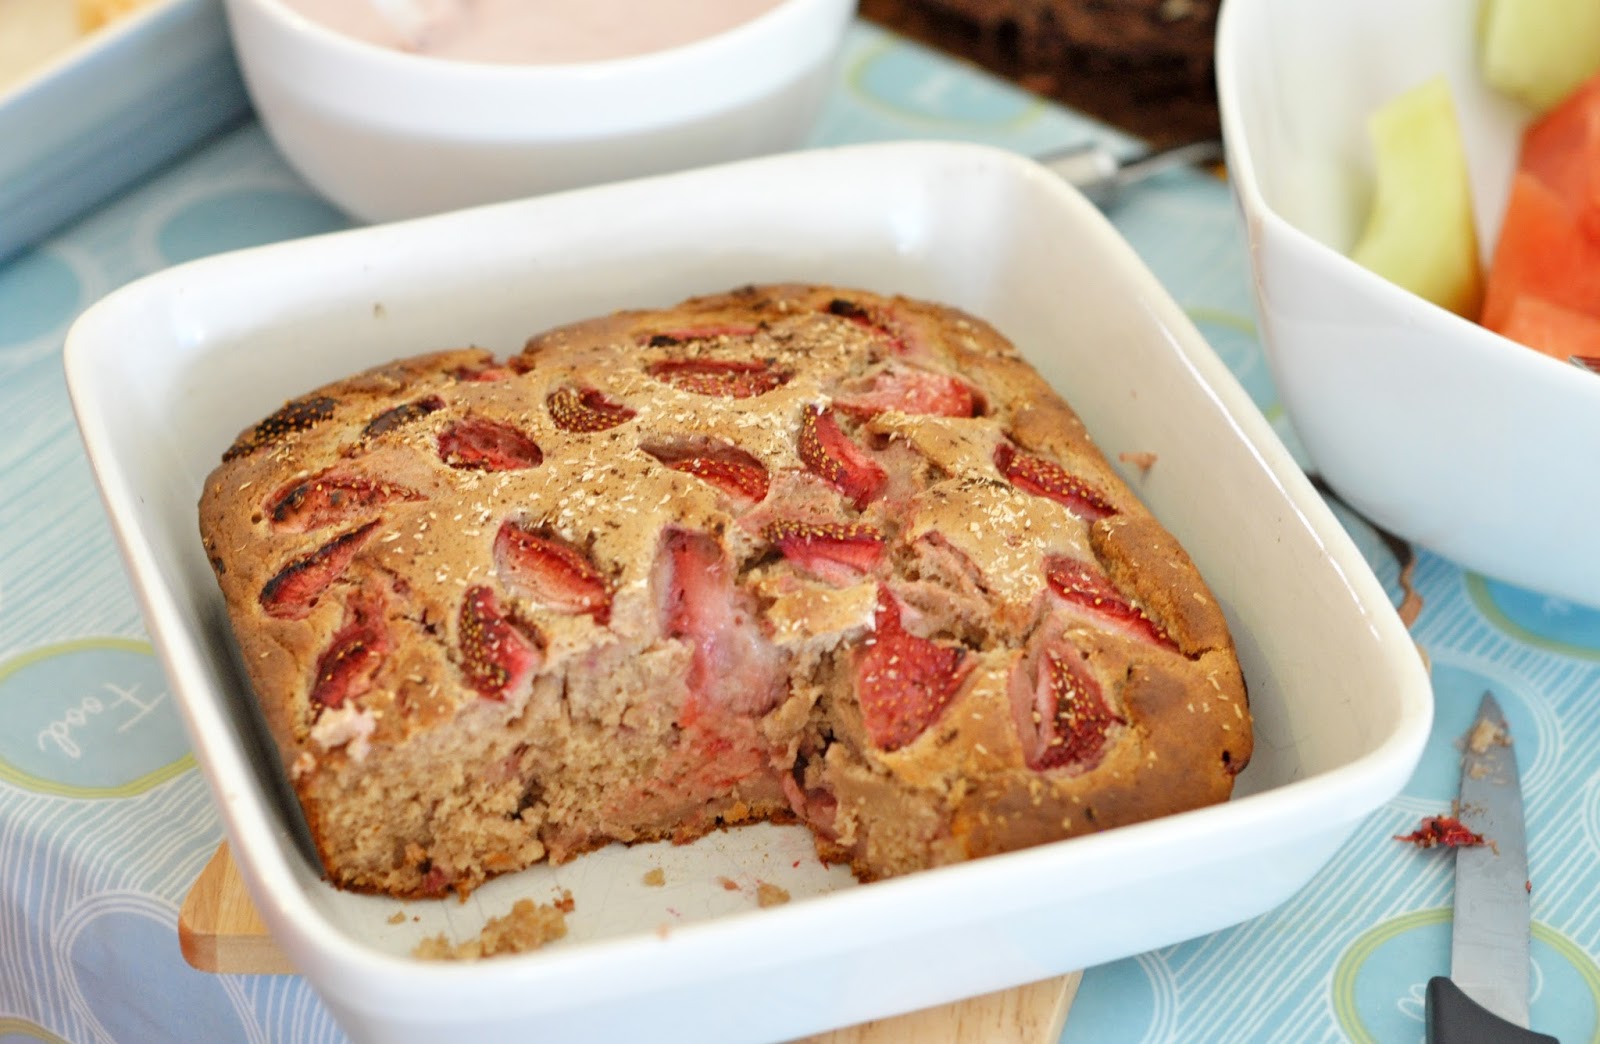
Strawberry dessert cake with strawberry cream

My weekend was all about sunshine… and strawberries!


Strawberry time is now in full swing over here in the UK… what with the sunshine finally out in the skies and the Wimbledon tennis on the TV there's just no denying it! I love any opportunity to get outside spend time in the sunshine (or even rain) and in particular spend time with friends just relaxing… Something many of you know I am notoriously bad at doing. 

At the weekend I was invited to a barbecue, obviously I was going to be bringing desert (amongst a few other bits and pieces including veggies burgers) and so strawberries were on my mind and in my mouth pretty much the whole of last weekend.

Some of the goodies that were brought to the party (yes there was quinoa...and samosas...I love samosas and even though I don't eat much wheat I caved in for these!)

I also had another challenge- I wanted to create a strawberry themed desert cake that was also totally sugarfree- even agave, coconut sugar and maple syrup were off limits- as I would usually use a little of one of these alongside stevia. One of the ladies coming to the barbecue is very sugar intolerant as well as chocolate intolerant (shock horror) and so I really wanted to be up to create a non-chocolate and sugar free cake that she could enjoy along with everyone else!

So, this is what I came up with loosely based on my banana blondie recipe and using as much fresh fruit and fruit purees as possible as the main sweetness then bumped up with stevia. I was careful to get the balance right so that the stevia didn't overpower and taste odd. To assist with the rising I actually added just two teaspoons of coconut sugar as when I tried a similar recipe a short while ago it sank a bit when it came out the oven and I wasn't sure whether this had anything to do with the total lack of sugar… may well just be coincidence! P.s if you omit the tiny bit of sugar it may well be ok and even if it does sink it's still good, just denser!

I served this up warmed through with a tofu based strawberry cream/mousse so that the cake became even more dessert-like. Perfect for a garden party carrying on into the evening hours... I know I certainly went back for more! Whilst you're serving your strawberries and relaxing with your friends why not have a little extra fun and play this bingo game* while watching the tennis. Summer time bliss!


Recipe: Strawberry dessert cake

Ingredients:

2 bananas- pureed
1/4 cup sugar free strawberry jam
Scant 1 cup chickpeas
1/4 cup coconut oil- melted (or oil of choice)
2 tsp vanila
30 drops vanilla stevia (I tend to use NuNaturals)
1 cup apple juice (or other fruit juice)
-----------
1/2 tsp cinnamon
1 1/2 tsp baking powder
1/2 heaped tsp baking soda
pinch salt
2 tsp unrefined sugar (optional add in- see note)
1 1/2 cups white spelt flour (or GF flour- if so I would use a mix of buckwheat, ground almonds and starch)
-----------
1 cup chopped strawberries- for filling
1/2 cup chopped strawberries, sprinkle of coconut and vanilla bean- for topping.

Sauce/mousse Ingredients:

1/2 cup strawberries
1/2 cup silken tofu
1 tbs coconut oil
vanilla stevia to taste

Method:

Blend the wet ingredients together until smooth. Mix the dry ingredients together in a large bowl and then add the wet mixing gently but well. Stir through a cup of chopped strawberries in the final strokes.

Spoon the mixture into a round of square cake tin approx. 8" diameter. Smooth the top and press the remaining strawberries in along with a dusting of coconut and pure vanilla bean powder- optional but yummy!

Bake at 180C for approx 30-40 minutes- I needed to lightly cover with foil after 25 minutes to prevent the top from becoming too brown before the centre had cooked through. Check with a toothpick for done-ness. Note: it is a fairly dense moist cake anyway, but cook for as long as possible to maximise 'cakiness'.

To make the 'cream' simply blend the ingredients together well and chill in the fridge for an hour to thicken up for a more mousse like dessert. You can omit the coconut oil if you want to go for a creamy drizzle. Note if you had some beetroot you could add a tiny amount to intensity the pink colour without it coming through in the flavour (I didn't have any beetroot!)


*Note:  This post is in association with Ladbrokes Bingo. The strawberry dessert recipe is all my own creation and was due to be posted exactly as it is regardless, it just happened to tie in nicely with the some extra Wimbledon fun. Enjoy :-)


For further guidance on making gluten free choices please see this post.

For tips and info on recipe measurement conversions, ingredients, substitutions and the methods behind how I do things.... check out my 'baking tips' tab at the top of the page.

Saturday, 8 June 2013

Black bean and mango stew


A simple lunch that packs a punch!  Oh dear, I think i’ll leave the rhymes behind in future...


As you read this I am fighting back the nerves as I get my gear in order and make last minute preparations for Tough Mudder…. In just a couple of hours time I'll be en-route to the army base in Winchester where the event takes place so there is no backing out now. I just hope I don’t let myself down, I’m my own worst enemy for setting the bar so high in my mind and then struggle to match it. The main thing is that I give it my best shot and come back on one piece… no doubt I’ll keep you updated on Facebook once I’m done (and maybe a post on here later today if I’m not totally exhausted!!)

Now, back to food….

This is the kind of lunch (and dinner) I’ve been eating recently off the back of my tropical fruit experiments. I‘ve made this ‘stew’ both with mango and pineapple and they were equally nice. The sauce is light and fruity and makes more of a glaze.

This would be great to make with some leftover pineapple after having made the tropical bake for breakfast...just a thought ;-)

It’s a bright and simple ‘stew’ and can be cooked up as a light meal or added on top of brown rice or quinoa (i've been easy so much quinoa these final few days!) for a more hearty main dish.  Use veggies of your choice sliced thinly to cook through evenly and you’re good to go in no time.


Recipe: Black bean and mango stew

Serves 1

Ingredients:

½ cup black beans
2 cups veggies (I used an onion, sweetcorn, red pepper, mange tout and tomatoes)
½ cup fresh or pineapple mango chunks

Sauce:
1 tbs marmalade (sugar free if possible)
1 tbs lemon juice
1-2 tsp soy sauce
1 tbs fresh ginger

Method:

Saute onion for 5 mins until softened, add the remaining veggies and cook for another 5- 10 minutes (depending on size/type).

Add the cook black beans and continue to cook for a couple minutes until heated through.

Meanwhile mix the dressing ingredients and mix through with the mango/pineapple chunks. Add to the stew in the final minute of cooking to glaze and warm through.


For further guidance on making gluten free choices please see this post.

For tips and info on recipe measurement conversions, ingredients, substitutions and the methods behind how I do things.... check out my 'baking tips' tab at the top of the page.

Thursday, 6 June 2013

Cucumber and watermelon coconut coolers


These coolers are just as perfect for sipping on a hot summers days as they are for replenishing electrolytes after a strenuous bout of exercise.

Good for everybody and every body ;-)


For any fitness foodies out there, or in fact any one into plant based health... if you haven’t already checked it out then Thrive Forward by Brendan Brazier is well worth a look. It’s a fairly new newsletter subscription but so far (a few months in) i’ve been pretty impressed and it’s given me lots of useful info and tips...including inspiration for today’s post.

As ever I made a few tweaks to simplify things (mainly because I didn’t want to wait overnight for the tea to seep) but Brendan’s method probably has the nutritional edge in this respect so I’ve linked it here if you’d prefer to follow it. There are some other recipes and info in his recipe article too.

Out of the two I preferred the watermelon version but both are super refreshing and hydrating- perfect prep for any endurance race!  I will definitely be making them again throughout the summer for sipping in the sun or post workout. (note: I've since made these again and fused the two options by basing the cooler on the watermelon recipe but adding cucumber to sub some watermelon and a few raspberries to maintain the lovely pink colour)

Dress with a straw and a slice of fruit and you can sit by the poolside and smile in the knowledge that good taste need not come with a sugar overload and a mouthful of additives!


Recipe: Watermelon coconut cooler

Serves 2-3 (depending on size of glass)

Ingredients:

1 ¼ cups plain coconut water (equivalent to 1 can)
1 cup berry flavoured herbal tea of choice
½ tsp fresh grated ginger
½ tsp coconut sugar (or a couple stevia drops)
Pinch sea salt
1 cup watermelon chunks (unpacked)


Recipe: Cucumber coconut cooler

Serves 2-3 (depending on size of glass)

Ingredients:

1 ¼ cups plain coconut water (equivalent to 1 can)
1 cup mint tea
1 tsp lemon or lime juice
½ tsp coconut sugar (or a couple stevia drops)
Pinch sea salt
Approx. 10cm chunk of cucumber- chopped


Method:

Blend all ingredients together until smooth. Strain into glasses.

Best consumed within 24 hours. Store in the fridge if not using straight away and shake before drinking.


For further guidance on making gluten free choices please see this post.

For tips and info on recipe measurement conversions, ingredients, substitutions and the methods behind how I do things.... check out my 'baking tips' tab at the top of the page.

Tuesday, 4 June 2013

Watermelon ice lollies


This recipe is the simplest spin off from this summer watermelon cake!   Frost, Slice, Freeze, Eat...


Even of you don’t plan to make the cake, it’s still really easy to whip up the chocolate frosting, spread a thick later on a large watermelon segment, slice up and freeze. Throw on nuts or sprinkles to add some jazz and crunchy texture. I just frosted the outer edge of the segment before slicing but you could add extra if you prefer.

The original cake got a bit of stick by some who felt i'd 'desecrated' the watermelon... but that's cool, each to their own, though I felt my healthy 'not sickly sweet' frosting was a true compliment. To be honest watermelon chunks are also are pretty good on their own and so refreshing on a hot summers day (we are finally getting a few of those at the moment- let's hope I haven't now jinxed it!) 

But hey, if it gets chilly again I know what I'll be making...my pineapple baked oatmeal...warm comfort with holiday feelings all in one!


Recipe: Watermelon ice lollies

Makes 4-6 lollies

Ingredients:

1 large slice of watermelon segment- peeled and de-sseded (as far as possible)

Chocolate frosting: 
2/3 cup vegan yoghurt (I use soy)
2 tbs fine coconut flour (increase to 3tbs if thicker consistency required)
2 tbs cocoa powder
Stevia or syrup to taste
A few drops vanilla extract- optional

Method

Combine all ingredients in a small bowl and stir together well. Let sit for a few seconds and test the consistency (coconut flour absorbs a lot of liquid), add more wet or dry ingredients as needed)

Place the water melon slice on a plate suitable for the freezer.

Using a knife thickly frost the watermelon slice. This will be easier if you first pat the surface of the melon dry to remove excess moisture. I found it easiest to frost the largest area of outer skin and also I did not want to fully frost the lolly. Press extra fruits, nuts or sprinkles into the frosting if desired.

Carefully  push lolly sticks at intervals into the fat side of the segment making sure to leave the frosting intact. Slice the water melon carefully and slightly separate the segments so that they don’t freeze together.

Place in the freezer until solid and then re-bag as necessary to store. Allow to defrost for 5 mins prior to eating for optimum texture (and so you don't break your teeth!) 


For further guidance on making gluten free choices please see this post.

For tips and info on recipe measurement conversions, ingredients, substitutions and the methods behind how I do things.... check out my 'baking tips' tab at the top of the page.

Saturday, 1 June 2013

Tropical chia summer pudding

More coconut and pineapple!


This recipe is a keeper for hot summer afternoons!  I’m planning on making this a few more times in the final lead up to my Tough Mudder event as it was so hydrating and refreshing and I’m in full on hydration mode... irrespective of the fact that the weather in England is still dull and cold most days!

This keeps well in the fridge for 2-3 days so make a double batch if you’ve got a hot spell on... and  grab a big spoonful whenever you pass the fridge!

I’m also now wondering whether this mixture could be frozen into ice lollies...that thought literally just popped into my head so I have not yet had a chance try it out....sounds like it could work?

I added a tsp of maca powder as I often try to add it into my ‘fitfood’ recipes for an extra boost and to assist adrenal recovery, but that is totally optional and won’t affect the taste or texture.


Recipe: Tropical chia summer pudding

Serves 1

Ingredients:

1 heaped tbs white chia seeds (dark will work fine too but won’t look so pretty!)
1 banana- mashed well
1 tsp maca powder (optional)
½ cup fresh pineapple
¼ cup coconut water (or substitute regular filtered water)
Coconut sprinkles and mint to decorate (optional)

Method:

Blend all ingredients together until smooth. Or if you prefer a chunkier consists you could whip everything together lightly with a fork. (I whipped mine until almost smooth)

Allow to chill and thicken in the fridge for at least an hour before consuming.


For further guidance on making gluten free choices please see this post.

For tips and info on recipe measurement conversions, ingredients, substitutions and the methods behind how I do things.... check out my 'baking tips' tab at the top of the page.

Saturday, 25 May 2013

Summer fruit slaw with chia berry dressing


My julienne peeler has been getting a bit of action again! But this time it’s not only with the veggies.


After the success of this simple cucumber and pineapple salsa, I was keen to experiment more with mixing the refreshing subtle taste of cucumber with other fruits.

Here I used any fruits I could get my hands on to julienne. For your reference...no, you cannot julienne a banana. Believe me I tried. It would have been the perfect shape so I am very disappointed! (I even tried with a frozen banana as I was that determined but nope it just wasn’t happening!)

The first time I made this slaw I had a large mango in my fruit bowl and that worked a treat, the second time I didn’t have a mango, hence why the photos below are mango-less but I have still added it to the recipe. I also used rhubarb which gave a great tart flavour contrast, though raw rhubarb is a little tough and stringy so you may want to cook it ever so slightly after julienning it- I left it raw, but it’s just an idea for you to try.

Throw in lots of cucumber, you won’t taste it against the sweetness of the fruits and I also added a simple fruity yoghurt and chia dressing to give an extra touch of sweetness.

Breakfast? Dessert? You choose.


Recipe: Summer fruit slaw

Serves 1

Ingredients:

½ cup cucumber noodles
¼ cup rhubarb noodles (cook lightly if desired)
¼ cup mango noodles
----
1tbs sugar free berry jam
2 tbs non-dairy yoghurt
1 tsp chia seed
Extra fruit/berries to decorate as desired.

Method:

Mix the yoghurt with the sugar free jam and chia seeds and set aside to thicken slightly. 

Prepare the fruit and cucumber noodles and place in a swirl in a serving plate/bowl leaving a well in the centre. Spoon the jam mix into the centre of the slaw.

Decorate with berries  to serve as desired. You could also add a sprinkle of cinnamon, vanilla bean powder, cocoa, coconut, nuts.....


For further guidance on making gluten free choices please see this post.

For tips and info on recipe measurement conversions, ingredients, substitutions and the methods behind how I do things.... check out my 'baking tips' tab at the top of the page.

Saturday, 18 May 2013

Black bean burgers and fruity cucumber salsa

Double whammy recipe post for you today! That doesn’t often happen.

I had originally thought to post as two separate recipes but then decided they’d work best together. So here you go.


The burger recipe is very similar to other bean burger recipes I’ve posted. Such as these Mexican burgers and these black bean burgers, whereas the salsa is a totally new concoction.

The inspiration for the salsa came from this post by Kathy at Healthy Happy life. It looked so simply and perfect for the BBQ I was going to at my friends a couple of weekends ago (when the weather was actually nice!) She also got me into the bean burger mindset too so then I scouted around for a new spin on the idea for those and loved this simple concept by No Meat Athlete.

This salsa is a lovely light BBQ side and my non-vegan friends were all seen adding a dollop to their plate! It’s sweet and refreshing in equal measures and it got me into a cucumber frame of mind- I have some more cucumber ideas up my sleeve for next week too!

P.S Barbequed plantains...amazing! Try them if you haven't already!


Recipe: cucumber pineapple salsa
Inspired by Healthy Happy Life

Makes approx 2 ½ cups worth

Ingredients:

1 tbs tahini (or use cashew butter)
2 tsp lemon juice
1 cup diced cucumber
1 cup fresh diced pineapple (drain a little of the liquid if very wet)
2 tsp sesame seeds
1 tbs chopped fresh mint

Method:

Mix the lemon juice with the tahini and then mix through the cucumber and pineapple chunks, adding the sesame seeds and chopped mint last.

Serve chilled and eat within one day.


Recipe: Black bean beet burgers- mk 2
Inspired by No Meat Athlete

Makes approx 8 burgers

Ingredients:

1 onion- finely chopped
1-2 cloves garlic- crushed
1 cup sweet potato- grated
1/3 cup beetroot- grated
1 tsp oil (I used melted coconut)
1 ½ cup cooked black beans
1 tsp soy sauce
1 tbs tomato puree
1 tbs fresh herbs (I used rosemary)
1 tbs ground flax or chia
1 cup cooked quinoa (or brown rice)
Salt and pepper to taste

Method:

Prepare the black beans and quinoa as necessary and set aside (mine were already cooked and frozen so I just defrosted them).

Stir fry the onion, garlic, sweet potato and beetroot in the oil for 5 minutes until softening.

Add the remaining ingreodmets and poulse through lightly to kix but keep some chunky bits, the mixture should be sticky but hold together well.

Form into flattened patties and place on a lined baking sheet. Brush a little extra oil on each side.  Bake at 200C for approx 30 minutes until golden. Note: I baked mine for approx 20 mins and finished them off on the BBQ


For further guidance on making gluten free choices please see this post.

For tips and info on recipe measurement conversions, ingredients, substitutions and the methods behind how I do things.... check out my 'baking tips' tab at the top of the page.

Friday, 3 May 2013

Cookies and cream parfait


It seems you loved the carrot cookies! Well to be honest I don’t blame you… to honour their gloriousness I gave them a simple twist that turns a cookie into the basis for a simple no-bake bressert 


You could use any fairly thick cookie here, they can either be soft or a little it crisp but you’ll want to be able to break them into chunks. I reckon the chocolate quinoa cookies, chocolate pillowcakes (these are fat free) or coconut oatmeal cookies would work really well. Or even any of my breakfast cookies!

The cookie forms the base of the parfait and then gets layered up between soft whippy coconut cream…you can infuse this with lemon, orange, cocoa or other flavours to compliment the cookie base, and fresh fruit for extra healthy zing. You can also add a sprinkle topping or cookie crumbs if you wish. Depending on the shape of your bowl you can layer u as many times as you wish. Mine was wide and shallow so I just used cookie chunks at the base.

This would make a refreshing light summer treat (ok so I am getting a bit ahead of myself!) and reminds me bit of trifle (without the jelly layer of course) oh how I miss trifle!


Recipe: Cookie parfait  

Serves 4 (based on original carrot cookie recipe amount)

Ingredients:

10 carrot cookies (or other cookie of choosing)
approx. 1 ½ cups fairly thick coconut cream plus mix ins if required.
approx. 1 ½ cup fruit
toppings of choice or extra cookie crumbs

Method:

Prepare the coconut cream and set this aside

Break up the cookies into small chunks and place the equivalent of 2 small cookies at the bottom of
a dessert dish (or split into two layers if preferred).

Add a dollop of coconut cream to each dish and then layer fresh fruit on top (repeat these layers depending in shape of dish- i.e wine glass?) Finish with some crumbs of the remaining cookies or other sprinkles of choice.


For further guidance on making gluten free choices please see this post.

For tips and info on recipe measurement conversions, ingredients, substitutions and the methods behind how I do things.... check out my 'baking tips' tab at the top of the page.

Saturday, 27 April 2013

Simple spring soup


Sometimes a quick an easy 10 minute soup is exactly what you need! This one is fresh and green, light and creamy and perfect to welcome spring…we’ve had a few days of sunshine these last few days so though I hesitate to say it…I think spring may have arrived!!


This soup topping was inspired by this photo that I’d posted on Instagram a week or so ago. It was a simple root vegetable soup my mum cooked up and then because there was some cauliflower to use up and because I wanted to jazz things up a bit I roasted some cauliflower florets to throw on top along with some kale chips (I had the last few crumbs of tub of Inspiral Kale chips left over).

Obviously this spring soup has a totally different base, but I needed a quick snack…and this soup was a 10 minute option, faster than the original root veg version and also much more seasonal! Chop the cauli florets nice and small and they will be lightly roasted in the time it takes your soup to cook.

I had a go at making my own kale chips this time round. I used my new Sedona dehydrator (still getting the hang of it) and they turned out pretty good, but not yet worthy of a recipe in their own right. If you fancy adding some crispy kale there are loads of recipes out there in blog world, but the generally concept is to massage a little oil into a bowl of chopped kale, mix through a few spices (I also added some nutritional yeast) and then lay evenly on a baking sheet and bake on low until crispy (or dehydrate for 2-3 hours).


Recipe: spring soup

Serves 2

Ingredients:

1 cup each: frozen peas, grated courgette and spinach (packed)
1 onion
2 tsp almond/cashew butter to make creamier (optional)
500ml vegetable stock

Topping:
1 cup roasted cauliflower (or broccoli) chopped into small florets
1 tsp coconut/olive oil
1 tsp dried mixed herbs
Crispy kale chips (optional)


Method:

Saute the onion for approx. 5 minutes until softening.

Meanwhile prepare the cauliflower/broccoli and mix through with the oil and herbs. Spread in an even layer of a baking sheet and bake for 10 minutes until golden.

Once the onion has softened, add the peas and courgette with the stock and simmer for 5 minutes. Add the spinach and simmer for a further two minutes. Add the nut butter if using before blending with a hand blender until smooth.

Serve the soup with the roasted cauliflower on top and sprinkle over crispy kale chips if desired.


For further guidance on making gluten free choices please see this post.

For tips and info on recipe measurement conversions, ingredients, substitutions and the methods behind how I do things.... check out my 'baking tips' tab at the top of the page.

Saturday, 22 September 2012

Lemon poppy pancakes

It must be the weekend! Pancakes for a weekend breakfast is pretty much the only time I have them, you know the drill by now!


These lemony delights soak up the remains of summer time and were a twist on  the norm as I often opt for spelt flour, as with GF flours I often find the pancakes have more trouble holding together. This time I was determined that things should be a little different. These worked a treat, however I would still recommend making small pancakes as they will be so much easier to flip, regardless of what flours used I often find myself making the mistake of spooning a large blog of batter into the pan which is much more tricky to handle.

I’m having a bit of a lemony kick at the moment, must be the sunshine these last few weeks... and maybe also a little wishful thinking that summer wasn't over already! Since I also had some poppy seeds to use up, I figured this would be the perfect combo.

Served up with some vegan yoghurt, a squeeze of lemon and a sprinkle of coconut sugar and you’re good to go. Breakfast? These are more like dessert!


Recipe: Lemon poppy pancakes

Makes approx. 4-5 pancakes

Ingredients:

½ cup GF flour mix (I used Doves)
¾ tsp baking powder
Tiny pinch salt
1 tbs poppy seeds
3 tbs apple puree
1 tbs lemon juice and zest
1 tbs agave
1/3 cup soy milk with 1 tsp chia seeds mixed in
1 tbs melted coconut butter (or omit for fat free)

Method:
Mix the wet ingredients together in a small bowl. Combine with the dry ingredients and mix well but lightly.
Spoon smallish dollops on a lightly oiled hot frying pan and fry till golden for a minute or so each side. Serve with soy yoghurt, a squeeze of fresh lemon and coconut sugar as desired.


* for further guidance on making gluten free choices please see this post.

For tips and info on recipe measurement conversions, ingredients, substitutions and the methods behind how I do things.... check out my 'baking tips' tab at the top of the page.

Tuesday, 11 September 2012

Power ice cream!

This is quite simply my new favourite snack…just a pity I discovered it during the last few weeks of summer since it is a snack of the ice cream and soft serve variety! Oh well, I will still eat it in winter too, maybe simply as a chilled desert as it really is that versatile. This is very similar in principle to the 'chia puddings' seen all over blog land, but for some reason I just couldn't make the texture of those chia puddings work for me...however change things up and add some yoghurt and I love it, crazy how such a small change can make such a big difference!

banana and raspberry soft serve bowls

I’ll stop going on in a moment and cut to the chase, but this really one of the best breakfast, dessert and post work-out power snack concoctions that I have chanced upon in a while.

The chia seeds are the key ingredient in this recipe with the added bonus of their amazing hydrating qualities (perfect for summer or post workout).  This recipes simply calls for chilling the mixture until it begins to freeze for a soft-serve or just freeze for longer for an ice cream. Note that without the addition of refined sugars and dairy fats the ice-cream will freeze harder than regular ice creams but I have found that a 30 minute thaw in the fridge prior to serving thaws the ice cream just enough for serving up, it can then simply go back in the freezer if need be.

The chilled chia soft serve is best made in quantities to eat on the same day (unless you want to fully freeze into an ice cream). You could alternatively make a larger batch and keep in the fridge for more of a chia pudding without the’just frozen’ texture.


This is another simple recipe base where you can easily play around with topping until your hearts content. I particularly like the banana soft serve with a sprinkle of cacoa nibs- as pictured in my ice cream balls, or how about topping with, granola or a crumbled smoosh bar or simply go chia crazy and add a dollop of chia jam!

banana soft serve with a dash of cinnamon (couldn't resist!)

Recipe: Chia soft serve dessert and ice cream

Serves 1

Ingredients

½ cup yoghurt of choice (I used soy)
2 tbs chia seeds (plus extra to sprinkle serving if desired)
¼ cup fruit puree (i.e apple, strawberry, raspberry or banana puree) note: banana is my favourite and makes the dessert super creamy.
Spices to complement the fruit.e.g a large pinch each of cinnamon and nutmeg
Extra fruit, chocolate, granola etc for optional topping

Note: I used white chia seeds for a light coloured mixture but dark would be fine too.

Method

Mash/blend all ingredients together to achieve a smooth consistency.

Chilled pudding: Store in fridge of min. 30 mins. before serving to thicken up.
Soft-serve: Store in the freezer for a 2-3 hours to create a soft-serve dessert.
Ice cream: Freeze for longer to make an ice cream.

chia banana ice cream with coconut flakes and cacoa nibs to serve


For tips and info on recipe measurement conversions, ingredients, substitutions and the methods behind how I do things.... check out my 'baking tips' tab at the top of the page.

you may also like

Related Posts Plugin for WordPress, Blogger...